
Sometimes you will want a component family to ‘always’ show a certain label. In other words, you do not want to have to manually ‘tag’ the family after placing it in project. How can we do this?Basically, while in the component family (for example, a Plumbing family), load the following Annotation family:
Generic Label.rfa Now, place an instance of the annotation family. You can drag the type directly from the Project Browser and drop it into the Ref Level view.You should link the parameter in this annotation family to a parameter from the Plumbing host family (you should know how to do this by now!) When you load this Plumbing component into the project, it now comes with an ‘automatic tag’, of sorts. However, there are some things to keep in mind – the main one being that this annotation will show in any view where the host family is included in the view range – it will not be masked by geometry.So, use this method with care. I have found it useful for things like a Hot Water System family, where you always want to show ‘HW’ in plan views. And I have handled the visibility issue with some trickly view filters.
Month: March 2010
As you know, Autodesk is now making software available as a ‘Download’ by default for Subscription customers – you won’t automatically receive a boxed version. However, if you still wish to receive a boxed version, you can.
I received an email from a reseller that outlined how to change your Autodesk subscription delivery preference. These steps are shown below: To change the delivery method:
1) Follow this link to log into the Autodesk Subscription site.
2) Login using your userID and password. (If you don’t have a UserID and Password refer to the Q&A below.)
3) Select My Profile.
4) Select your delivery preference.
5) Scroll to the bottom of the page and check the delivery address is correct. If not select Edit Location.
Thanks to ADA CADPartners Pty Ltd for this guide.
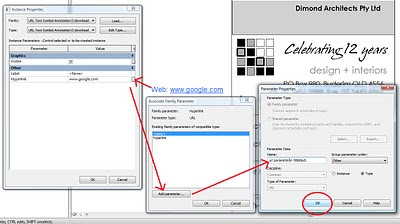
No doubt you issue many PDF files to consultants, Clients, Builders and the like. Why not add a URL link to your titleblock, so that anyone receiving your PDF files can jump directly to your webpage?
Its as simple as adding a parameter of type:URL into your titleblock.
To make it even easier for you, I have created a Generic Annotation family with a URL parameter inside it. Simply load this family into your titleblock, then link the parameter from it to a parameter in your titleblock (see image).
Here is the download link:
Now, when anyone opens this PDF, they can jump directly to your webpage.
The URLs worked fine for me using CutePDF and Adobe Reader, but Foxit Reader seemed to have an issue parsing the link correctly.
I was interested in what I could find on Scribd to do with Revit – turns out there are some resources available. Have a look at some of the search results here:
autodesk revit architecture essentials search
Please note that I am not responsible for the legality or copyright of the content that others have made publicly available on the internet.
Here are some direct links:
http://www.scribd.com/doc/22419267/Learning-Autodesk-Revit-Architecture-2010-Volume-1
http://www.scribd.com/doc/20307652/Learning-Autodesk-Revit-Architecture-2010-Volume-2
Revit doesn’t want you to copy lines between Annotation and Model Families (see below)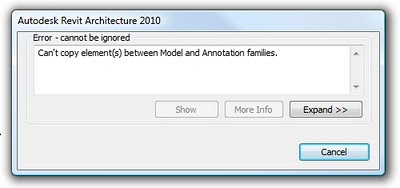
However, it can be done. This is the workflow to copy lines from Annotation to Model families:
- Copy lines from the Annotation Family to a plan view in a Project File.
- Copy the lines from the Project File to a Profile Family.
- Copy the lines from a Profile Family to the Model Family.
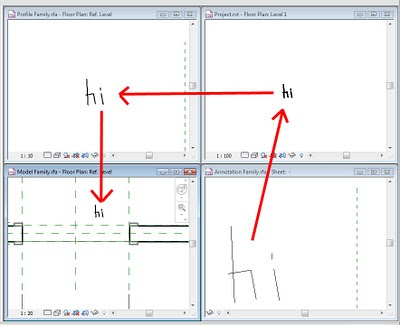
Pretty tricky workaround huh?
Erik Egbertson over at Inside the Factory made a comment about modeling a Stealth Aircraft in a recent post, and it got me thinking. How would you go about it?
Now, I’m sure it would be possible to do it with the Conceptual Modeling tools, but it could take a while.
Why not utilise some existing 3D content and import it into a family? I described that workflow in my post Contextual 3D Views – Shaded vs Rendered. Basically, you need to:
- Download a Sketchup model that you like the look of (from http://sketchup.google.com/3dwarehouse/).
- In Revit, create a New-Generic Model family.
- Import the SKP file using Import CAD.
- Make sure the resulting geometry is of an appropriate size.
- Save the family and load it into your project.
Please note that there may be copyright on these models.So, about that Stealth Aircraft. Here is the link.
When you use the Join Geometry tool in Revit, you may notice that it sometimes just doesn’t seem to ‘work’. You do everything right, join the two adjacent surfaces – and there is still an ugly join line!
The problem is that Revit only wants to join surfaces correctly IF they are the same material. You could go into each object (floor, wall etc) and make sure all the materials are the same. However, the quick fix is shown below:
- Use the Paint tool to apply the same material to the two faces you want to join.
- If you have already ‘joined’ the surfaces, you need to unjoin them from each other. With walls, the easiest way to unjoin two objects is to physically disconnect the wall using grips (I do this in 3D). Revit will give you a warning – and you can then Unjoin the elements.
- Now, pull the objects back together, so they are in the same plane and they meet at a clean edge.
- Use Join Geometry again between the two surfaces – now that they are the same material, Revit is happy to join them properly, and it all works beautifully!
 In short, Revit wants joined surfaces to be the same material before it will join them properly.