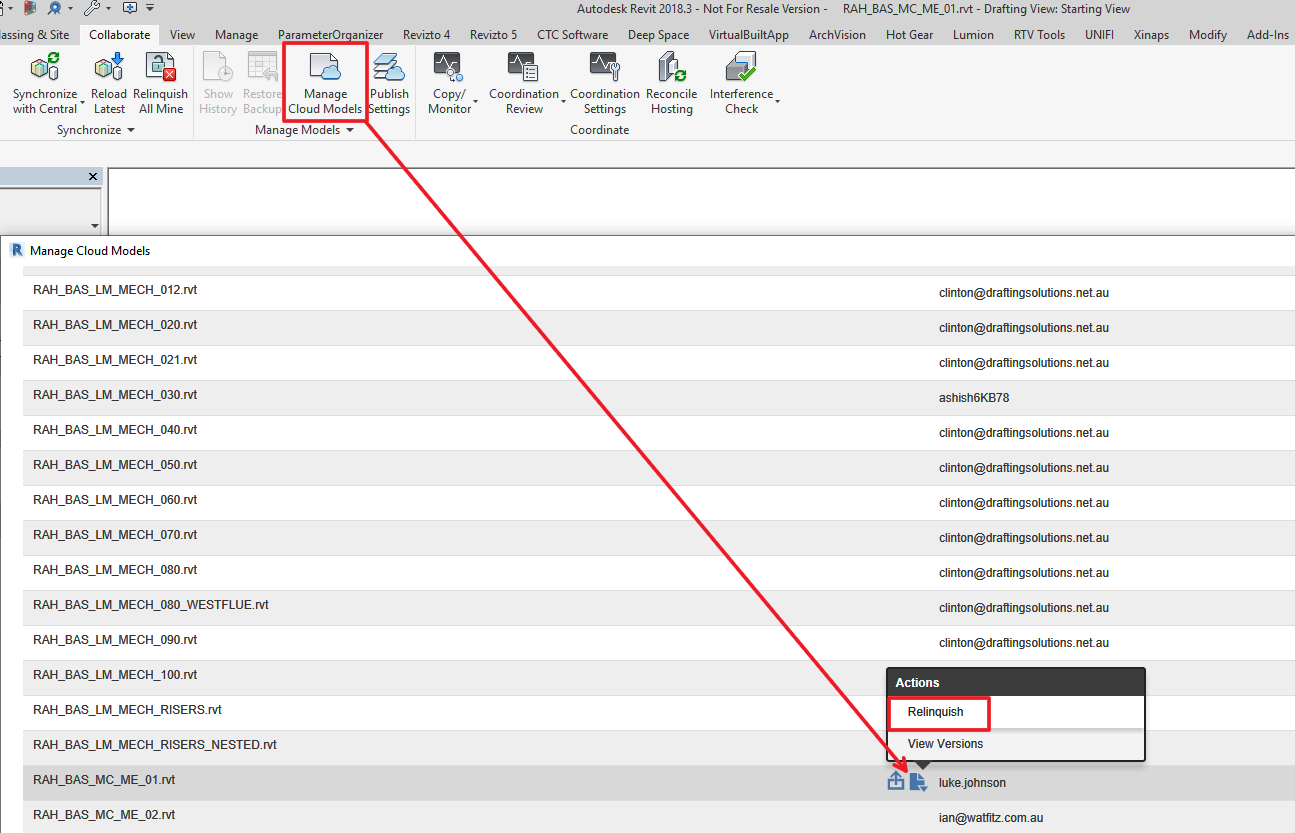
Sometimes you have to say goodbye to old technology to welcome in new ways of doing things. This is the case as BIM 360 Team basically almost dies in 2 weeks…
The key message here is:
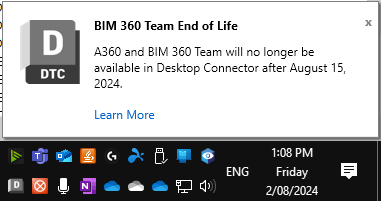
A360 and BIM 360 Team will no longer be available in Desktop Connector after August 15, 2024.
What does this mean? To easily backup files now, while you can, you should:
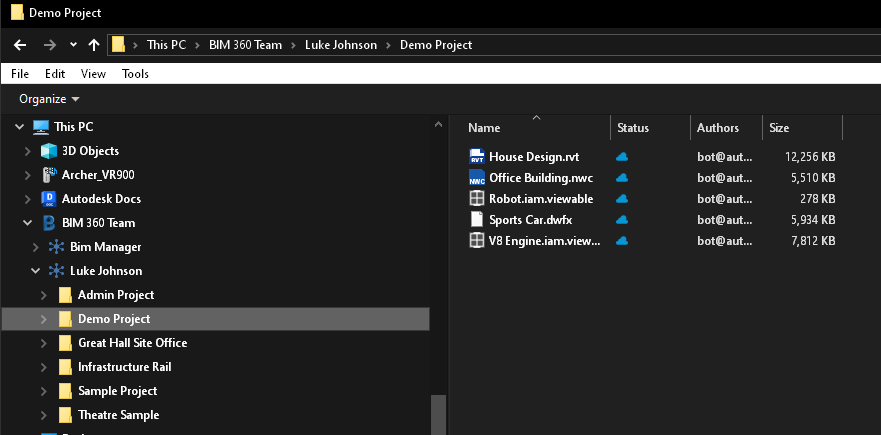
login to Autodesk Desktop Connector,
browse to BIM 360 Team, and
drag-drop any files you would like to save onto your local PC somewhere.
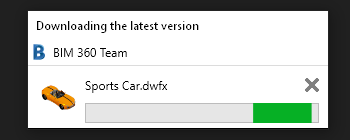
The dialog should pop up as each file copies over:
As part of a very bad Cloud Model upgrade experience (a story I will tell some other time…) some models failed to upgrade.
I was trying to upgrade a file from Revit 2018 to Revit 2022. After upgrading, I was unable to save this file, even though I have a machine with 192GB RAM.
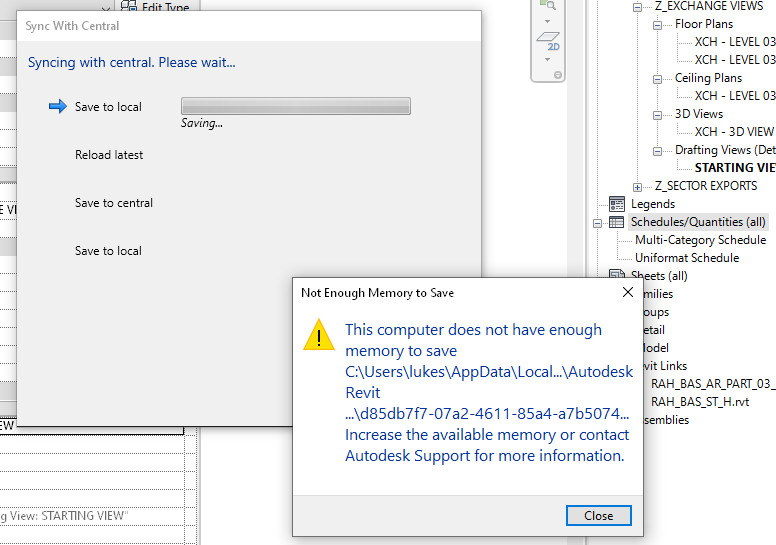
Revit reported this message:
“This computer does not have enough memory to save…”
“Increase the available memory or contact Autodesk Support for more information”
I contacted Autodesk Support, and eventually got this reponse:
Due to the “Multi-category Schedule”, the Revit file was failing to save in Revit 2021 or Revit 2022 version as the schedule view is large.
After deleting the schedule view we are successfully able to save the file. Attached is the fixed model…
Sounds good! Let’s give it a go:
Open the model in Revit 2018
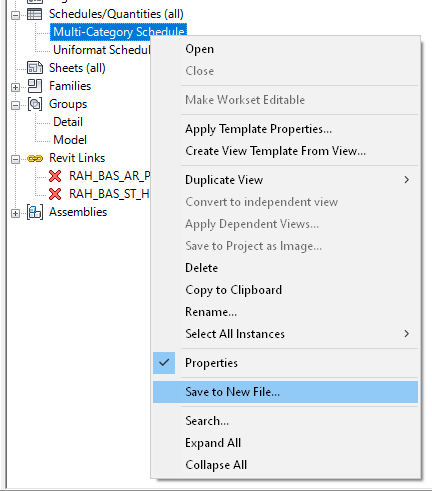
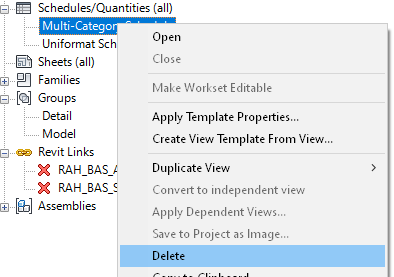
Identify the Multi-Category Schedule
Let’s back it up while we can using “Save…”
Now delete the Multi-Category Schedule
And then Save the Revit 2018 File somewhere
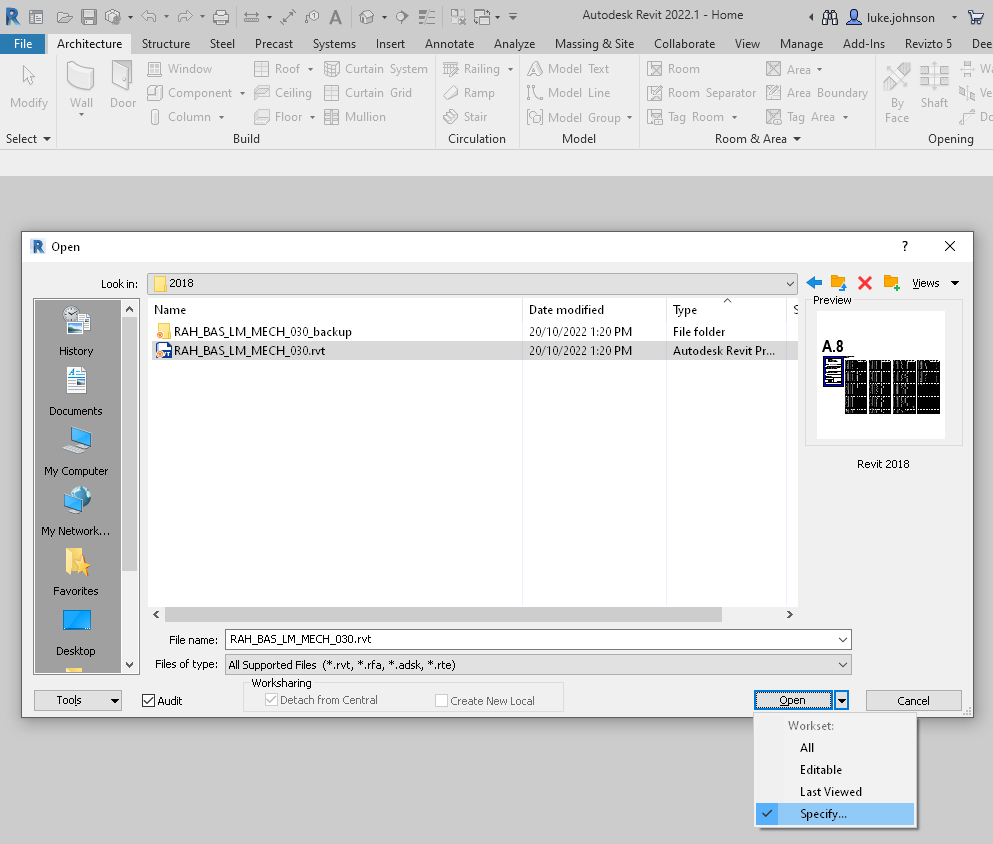
Open Revit 2022
Manually upgrade using Revit 2022. Detach, Audit and Specify worksets (All Closed) on Revit 2022 open settings:
Does it save now – yes!
Initiate the Model into the correct folder on the (now upgraded) Revit 2022 BIM360 site.
Finally, I tried using “Insert Views from file” to load back the Revit 2018 Multi-Category Schedule into the upgraded project – but it still would not save if that schedule exists:
One day, when I recover from the experience, I will write about the overall Revit Cloud Model Upgrade experience when dealing with hundreds of models and trying to jump from Revit 2018 to Revit 2022…
I was recently trying to link Revit models to a federated file on Revit 2021. The models were failing to link, but no error message or warning was provided. The federated host model and the links were all initiated and ‘live’ collaborated models on the Autodesk Construction Cloud.
Resolution:
I had previously used this method ( Moving the Revit BIM360 CollaborationCache Folder to a Secondary Hard Drive ) to move the cache for BIM 360 / ACC Docs to a secondary hard drive. Windows Explorer showed this hard drive was essentially running out of space. So Revit was failing to link the model, but wasn’t providing a ‘insufficient hard drive space’ warning.
But why was the hard drive filling up?
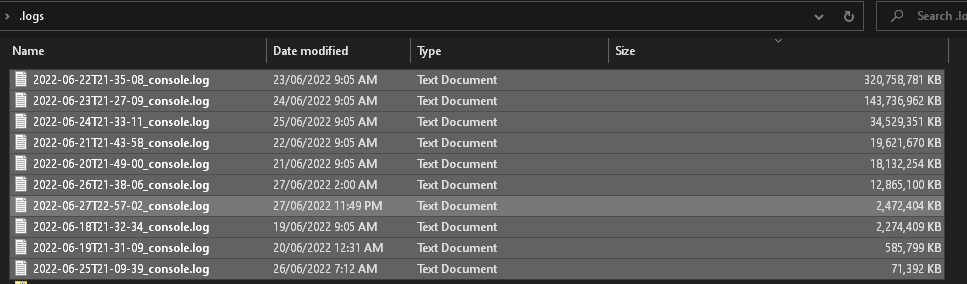
I reviewed the files and folders and discovered that one particular program was generating massive log files:
The final resolution was quite simple – delete the massive log files, and then the files linked to Revit fine. I used 7-zip with the “Fastest” and “Delete files after compression” option to archive and delete those logs.
To future-proof this scenario, I’m considering writing a Powershell script to detect and possibly archive and delete the existence of massive log files.
First, let’s manage some expectations – Aconex is generally viewed as a closed platform. They seem to deliberately resist platform-level integration with other tools like BIM 360 and Revizto. However, you can achieve the promise in the title of this post – with a bit of work!
The basic steps are:
Setup a sync between the Aconex Doc Register and Autodesk Docs (BIM 360 Document Management), using the Aconex PIF and Autodesk APIs
Connect the BIM 360 project to the Revizto project and connect your BIM 360 ‘official Aconex’ PDFs to Revizto 2D Sheets.
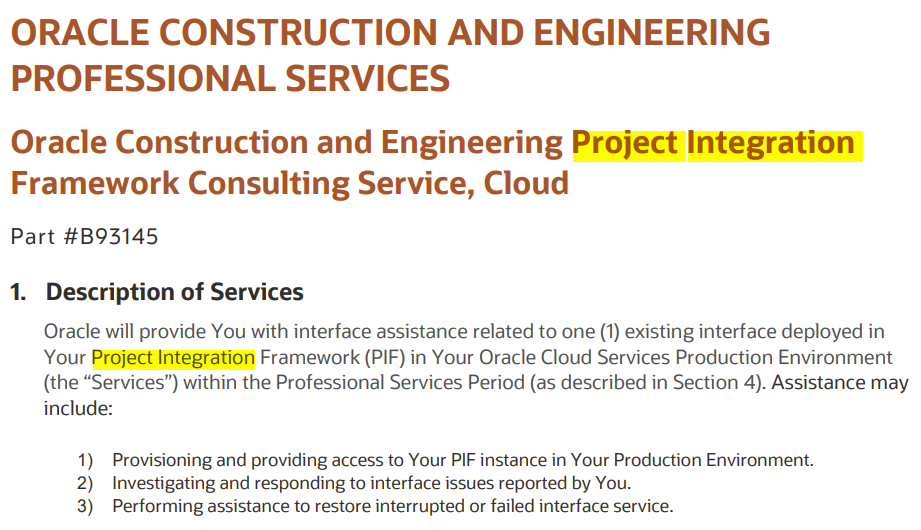
Aconex provides a PIF (Project Integration Framework). This essentially acts as an API, and clients are able to build integrations between Aconex and other tools using their own budget.
The Aconex PIF is hard to find on the inter-webs…
As part of my strategic consultancy work as a Director at Virtual Built Technology, I have assisted clients in setting up the Aconex to BIM 360 sync. This will require considerable time, effort, $$ and planning. Although the scope is basically the same for every Aconex client that wants this, it seems individual Aconex clients will be charged significantly for this development to occur and operate on their ‘own’ PIF.
Once complete, you will begin to see PDFs arriving in Autodesk Docs from Aconex on a daily / nightly basis. Depending on how you have briefed the Aconex development consultants, you may end up with some interesting PDF file naming in the BIM 360 environment – so how can we deal with that?
Step 2a – BIM 360 Preparation Script for Merging Filenames to a single Folder
Let’s say you have your Aconex-to-BIM360 sync running, and you have PDFs arriving in 360 into “Discipline” folders like Architectural, Structural and so on. Not bad! But what if your PDFs are named like this:
SheetNumberX_Rev_1.pdf
SheetNumberX_Rev_2.pdf
SheetNumberY_Rev_1.pdf
etc
When thinking about downstream applications like Revizto, this is really sub-optimal. Why? Because a Revizto 2D sheet will want to connect directly to a SINGLE BIM 360 PDF document with Versions – not to a mangled set of ‘revision suffixed’ pdfs like the above. So we need to clean this up! And it needs to be repeatable and automated…
For this, I have created a PowerShell script. Here is a description of the logic in the script:
it takes a list of BIM 360 Docs folder paths (the local folder path from Windows Explorer address bar), these are ‘monitored folders’
those folders need to be ‘synced’ prior to the script running (I’m still looking for a way to call the Autodesk Desktop Connector sync from a Powershell script, for now you have to right-click in Windows Explorer first)
it will process the folder list and:
create a subdirectory called “Current”
create a logfile in that subdirectory called deepSpaceSync.log
split the filenames at the _REV_ part
process each available Revision number individually in a loop (to ensure Aconex revisions are stored sequentially into BIM 360 versions)
check if the file was already copied – and skip it (using existence of that filename in the log folder)
or, copy the file to the “Current” subfolder
Sleep 5 minutes between each loop to allow Autodesk Desktop Connector sync to catch up.
So this script essentially merges the messy “REV” filenames into a nice clean SheetNumber.pdf filename structure AND actually creates BIM 360 file versions in the cloud (due to the sleep functionality).
Step 2b – Revizto 2D Sheet to BIM 360 PDF Connection
Now that we have a nicely named, version-rich PDF on BIM 360 Docs, its time to connect that up to Revizto.
Firstly – you should always publish 2D sheets from Revit BEFORE setting up the Docs connection if possible, as this is the only way to get the automated viewport overlays (Note – you can export with “Sheet coordinates only” option in Revizto Sheet Exporter from Revit).
Secondly – you then
open Revizto
ensure you have connected Docs to the right BIM 360 hub in Revizto
browse to the “Current” folder for a specific disciplines PDFs
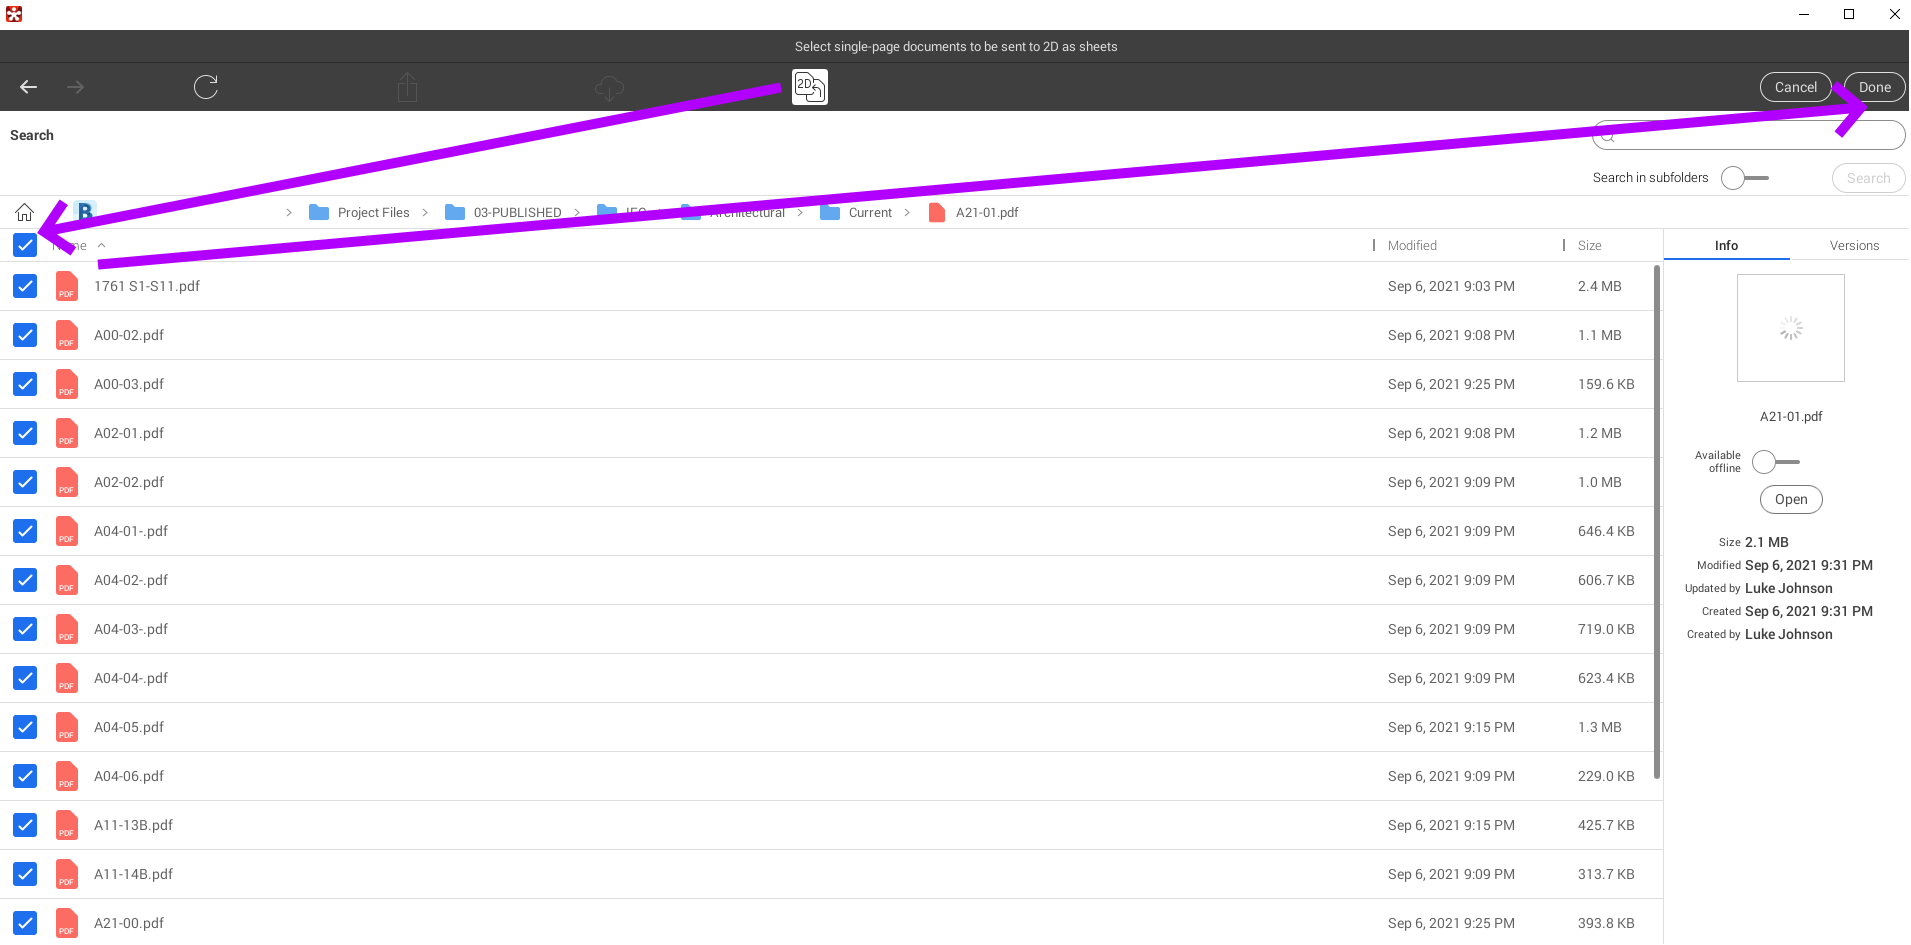
click “Send to 2D”
select all and Done
Connecting Docs to Revizto 2D Sheets
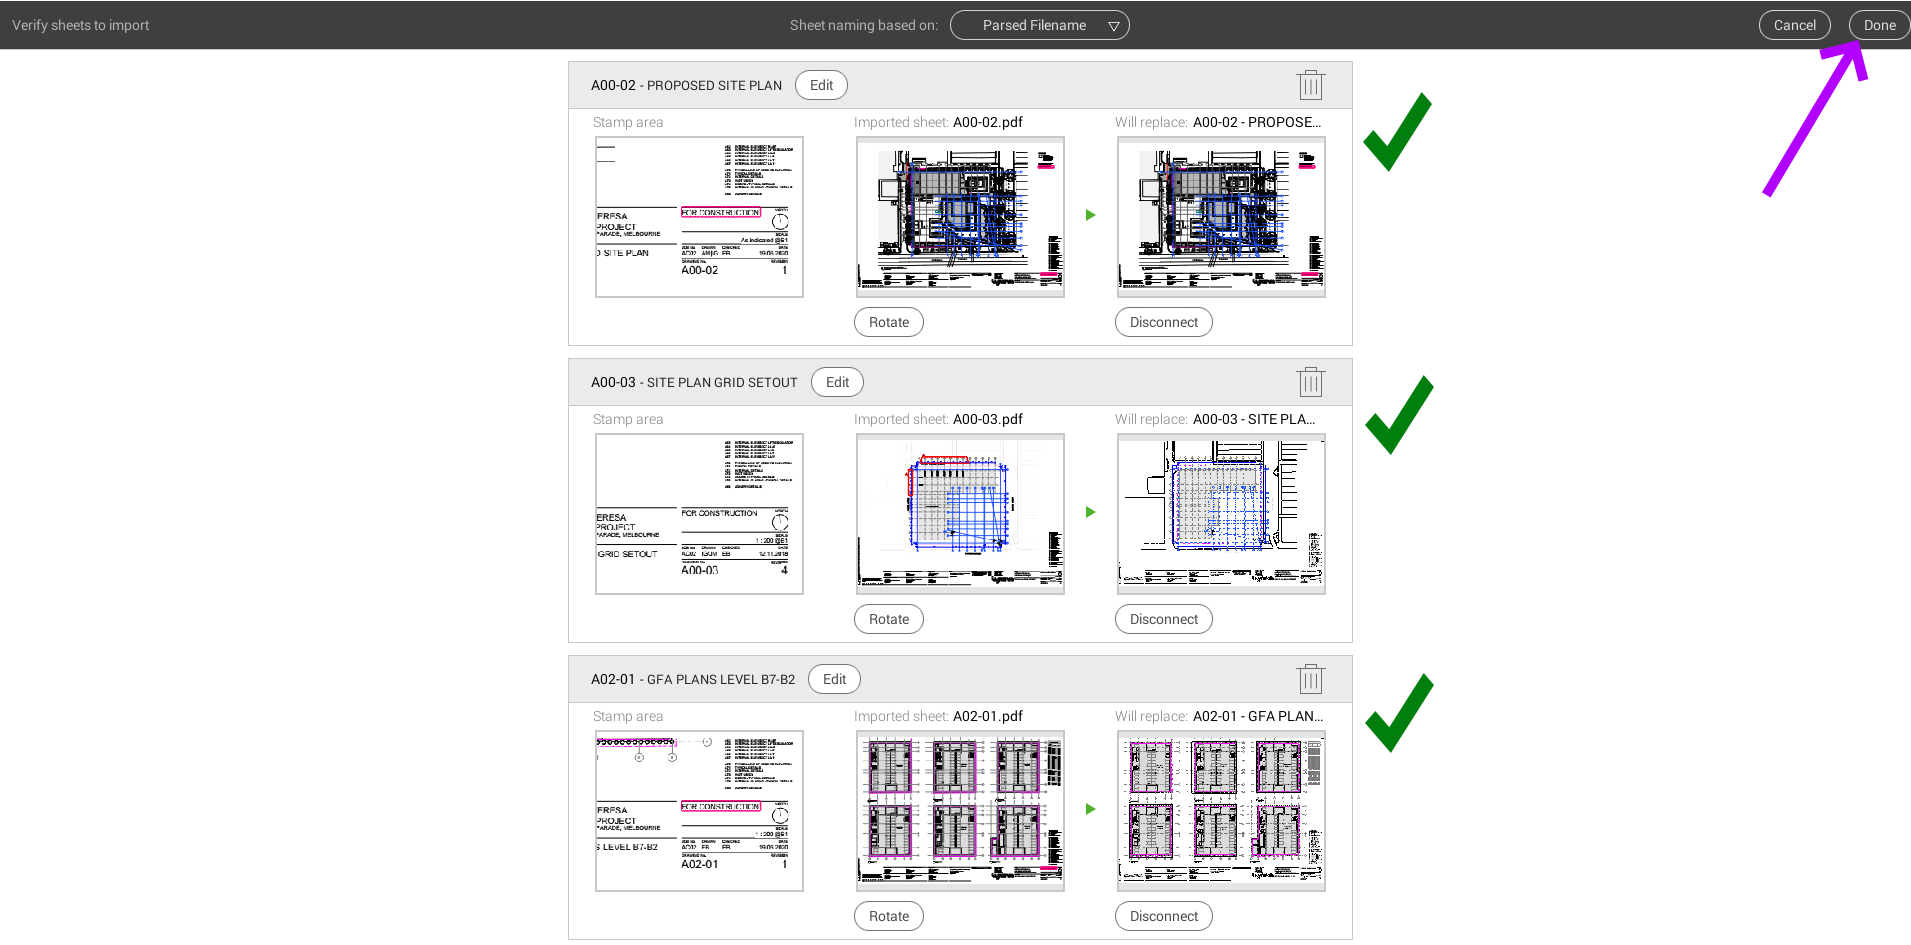
then review that the correct sheets are going to be replaced and connected to the BIM360 PDF
Confirm that sheets are correctly connected using the Sheet Number
Final steps
Once your PDFs are flowing well between platforms, you may want to automate further. For example, the PowerShell script provided above could be set to run as a Windows Task. You would want it to run as soon as possible after the Aconex scheduled sync to BIM 360. As always, you should monitor your inputs and outputs for any problems or gremlins.
Done! You now have official documents from Aconex flowing regularly into Revizto via BIM 360. This means your site teams using Revizto on the iPad can now be accessing the official For Construction PDF Drawings (synced from Aconex Doc Register) while in the Field!
When a recent update to Autodesk Desktop Connector forced a migration to Autodesk Docs, file paths were generally change like this:
FROM – C:\Users\USERNAME\BIM 360\YOURFOLDERS
TO – C:\Users\USERNAME\ACCDocs\YOURFOLDERS
If you were doing some interesting tricks with BIM 360 Docs, and sharing and federating Revit models as non-initiated files on BIM 360, you may find that links were broken and “Not Found” in Manage Links after that latest Desktop Connector installation.
But don’t worry! You can just set a symbolic link to point from the old BIM 360 Docs location, to the new location. The Command Prompt script looks like this:
The moment after this script was run, I was able to hit Reload from Manage Links in Revit and the new location was detected and links were loaded successfully. Note that they still appear in Revit as if they are in the old location, but really it is reading the latest data from Autodesk Docs, and that new location is being updated by Autodesk Desktop Connector.
At this stage it appears those links are still working, as the Revit CollaborationCache is a different technology to the simple file sharing mechanism of Autodesk Docs.
What happens if you enable BIM360 Design Collaboration on a project, but would then like to switch it off? I asked Autodesk this question, and here is part of the response (in italics):
Unfortunately we cannot disable active services on specific projects. Once a service is active, it remains active.
…
If the project is underway and there is information that cannot be moved (such as issues/ RFI’s, etc), then my recommendation would be to make sure no one has access to the Design Collaboration module on the project.
…
If you would like to see a feature implemented that allows the ability to deactivate a service, you can share your thoughts and request it via the Ideas Board using this link: https://forums.autodesk.com/t5/bim-360-ideas/idb-p/2032
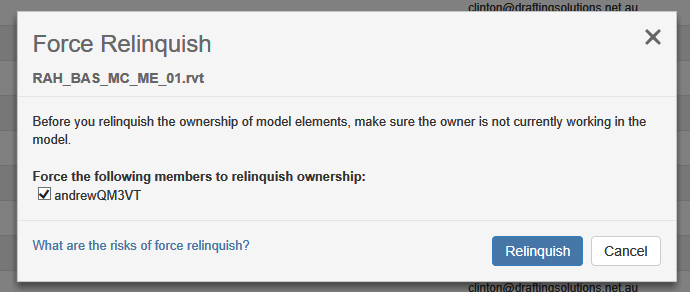
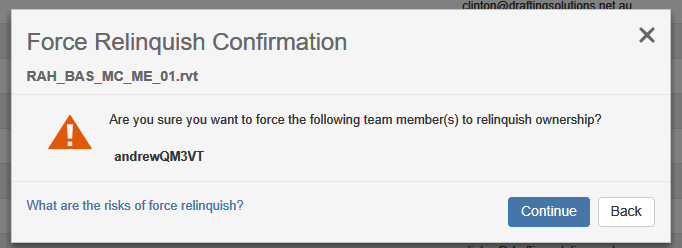
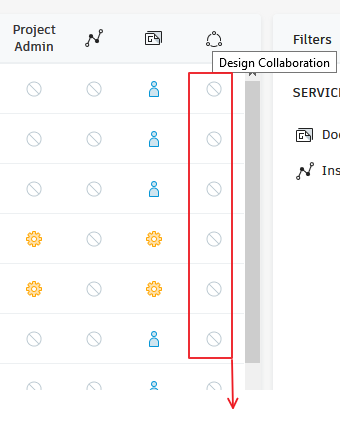
In light of the above, if you do want to make sure no one has access to Design Collaboration, switch it off per-person in the Project Members page as shown below:
Having recently installed some more storage hardware, and previously posted about moving folders with symbolic links, I then decided to move my BIM 360 Glue cache folder and Navisworks Cache folder to a secondary hard drive. I did this using symbolic links.
You need to:
start a Command Prompt as Administrator
use the commands shown below
Moving BIM 360 Glue cache storage location:
if exist "%localappdata%\Autodesk\Bim360Glue 2016\LocalCache" rename "%localappdata%\Autodesk\Bim360Glue 2016\LocalCache" bim360glue2016.old
mklink /d "%localappdata%\Autodesk\Bim360Glue 2016\LocalCache" R:\BIM360Glue2016
if not exist R:\BIM360Glue2016 MD R:\BIM360Glue2016
robocopy /mir "%localappdata%\Autodesk\Bim360Glue 2016\bim360glue2016.old" R:\BIM360Glue2016\
Moving Navisworks cache storage location:
if exist "%localappdata%\Autodesk\Navisworks 2019\LocalCache" rename "%localappdata%\Autodesk\Navisworks 2019\LocalCache" Navisworks2019Cache.old
mklink /d "%localappdata%\Autodesk\Navisworks 2019\LocalCache" R:\Navisworks2019Cache
if not exist R:\Navisworks2019Cache MD R:\Navisworks2019Cache
robocopy /mir "%localappdata%\Autodesk\Navisworks 2019\Navisworks2019Cache.old" R:\Navisworks2019Cache\
After you have run the scripts above, you can delete the old folders with the .old suffix (Navisworks example shown below).
If you have Desktop Connector installed, you probably realise you can ‘upload’ Revit models and other files to BIM 360 Docs by dragging and dropping to the folder in Windows Explorer (using Desktop Connector). However, when you try and link this using the BIM 360 shortcut in Revit, you might not be able to see the file…
Here is a workaround that may allow you to link a non-initiated Revit model into your Revit file:
Ensure you have Autodesk Desktop Connector installed
Start Link Revit command from the ribbon
Update: Click on the Address drop down
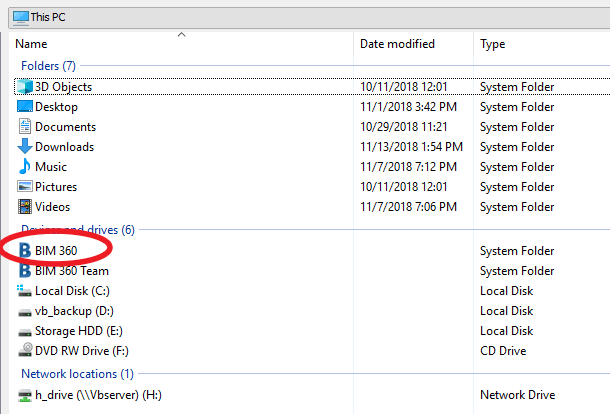
Click on This PC
Browse to BIM 360 from the window below:
Select the file (non initiated) that you want to link
You should get the BIM 360 prefix in Manage Links:
Here is a video of this process (with audio, This PC – BIM 360 workflow):
I have developed a working BIM360 to on-premises backup mechanism. There were a few different ways to go…
I initially considered:
Hacking Windows Explorer to touch the files in the BIM 360 node and try and trigger the BIM360 Docs download and copy to local PC or network location
Developing a Forge app that essentially pulls the desired models out of the BIM 360 cloud to desired location?
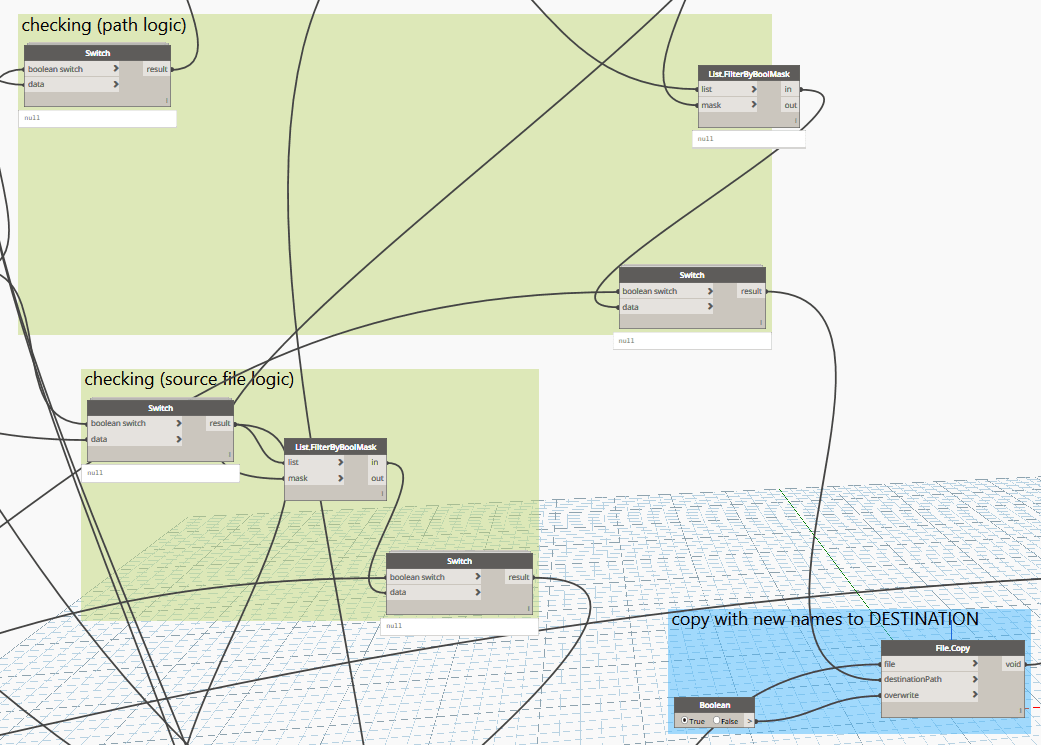
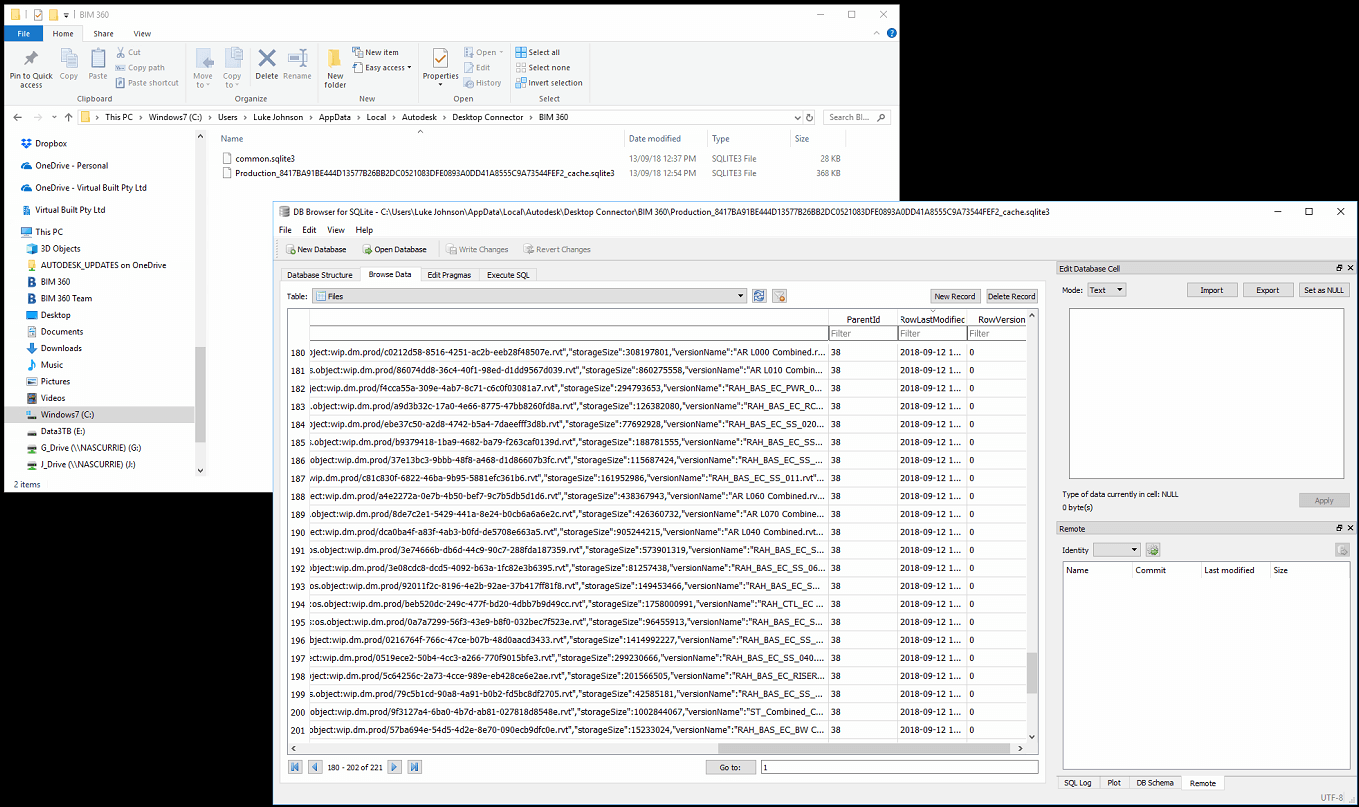
In the end, I decided to use the Revit API (Dynamo and Python), along with VirtualBuiltApp, to essentially reverse engineer a folder structure from the local CollaborationCache folder. These ideas are hinted at here.
In simple terms, the BIM 360 Docs on-premises backup workflow is:
Create a super federated BIM 360 model (with all other BIM 360 models linked into it)
A Dynamo script reloads all links in order to cache them locally
The same script interrogates, then determines the target file name and folder from VirtualBuiltApp
Dynamo then copies the files into their ‘backup’ location on the local network
Some more detail is presented below:
A) Cache Cleaner CMD Script (may not really be necessary, as the ‘reload’ should overwrite superseded cache anyway):
Kill Revit if Open… be careful of below steps, particularly if Revit has crashed recently. You might need these local copies 🙂
cd "%LOCALAPPDATA%\Autodesk\Revit\Autodesk Revit 2018"
cd CollaborationCache
rmdir oldCache
mkdir oldCache
for /d %i in (*) do move "%~i" oldCache
B) Manual steps to setup Revit model environment to run the script:
Open Revit
Open Federated BIM 360 file (worksets closed)
Unload all links
Open all Worksets
C) Dynamo Script:
Run Dynamo (Python) script that reloads and unloads all links (this collects .rvt into cache). Key Python commands to use are: RevitLinkType.Load() and RevitLinkType.Unload(None).
Potential Problems:
Coordination Monitor alert, no longer exists
Instance of link needs Coordination Review
“Some numerical data within the imported file was out of range. This numerical data has been truncated.”
“Geometry in the file … has extents greater than 20 miles (33km).”