Revit natively supports importing Sketchup up to version 8. If you want to import ‘new’ Trimble Sketchup files, like some nice content you have download from 3D Warehouse, you have at least 2 different options:

  1. Open the file in a new version of Sketchup and save down to version 8, then import to Revit

  2. Import to AutoCAD first (IMPORTSKP), then save as DWG, and then bring it into Revit. You may need to install the Sketchup Import addin for AutoCAD to import 2016 and newer versions of Sketchup.

Based on some preliminary testing, I think option 1 is probably the better / easier way to go at the current time.

https://wrw.is/wp-content/uploads/2017/03/materials.png

There are two additional recommendations I would make to the Autodesk solution below: use a Generic Model inplace family, and the import can be placed on an additional Subcategory to allow for easier control over visibility in the project environment.

Here is the Autodesk solution:

Issue:

You want to display cut 3D drawing models in section views. Revit displays the entire drawing without regard to cutting plane, both in section and floor plan views. 


Causes:

Revit cannot currently display cut 3D drawing models in section views.

Solution:

  1. In AutoCAD, run EXPORTTOAUTOCAD to export a DWG file.
  2. Import or link the DWG file into an in-place family.

Support page:
3D drawing is not being cut in section or elevation in Revit | Revit Products | Autodesk Knowledge Network

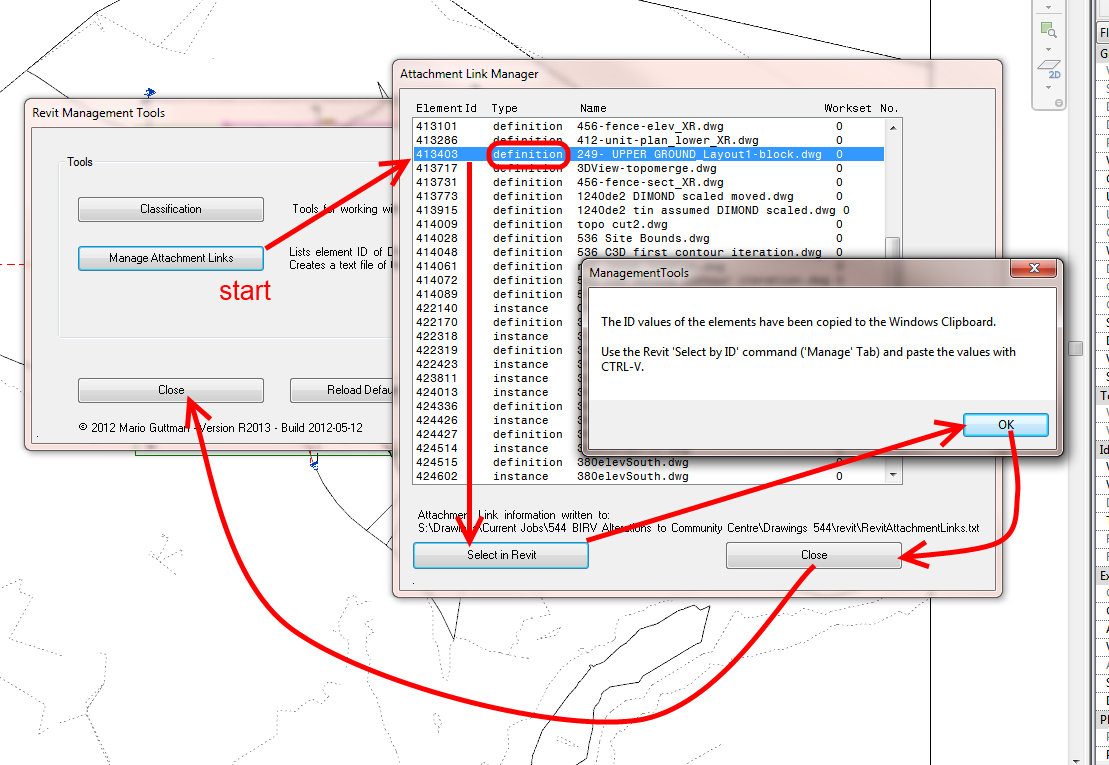
If you want your entire geographically separated team to have access to the same linked files, you need to upload them to Revit Server. This also goes for CAD / DWG files, which will need to be imported into an RVT if you want to save them directly to RS.  2D DWG files can be referenced by Linked View in the host project if necessary.

Here is a bit of a workflow that may help:

1 Open the consultant model in appropriate version of Revit
2 Enable Worksharing (if it isn’t already)
3 Save As … 
a) if this is the first “save” of the consultant model to Revit Server, use a generic name like link-Structural.rvt and save onto Revit Server in the appropriate folder (if you have one for links)
or/ 
b) if this is an updated model, overwrite the existing consultant model, using current name in the Revit Server Link folder
4 Use Reload on this new Consultant model in Manage Links of Architectural (our) host model
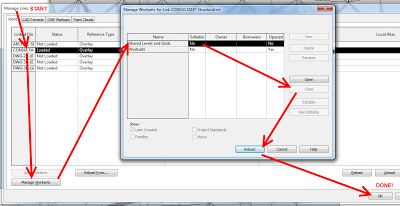
5 Close the Shared Levels and Grids workset for the Consultant Model, like this:
 
6 Sync with Central.  The Consultant model has now been imported / updated onto Revit Server, and other team members should be able to access it.

More info:
Help: Linking Server-Based Workshared Models

Other links and info:
This RFO post details what some firms are doing with Revit Server and links:
Revit Server & Linked Consultant Files

Revit Server Administrator 2013 displays “Server Error” upon loading the GUI

10 Things to Know About Revit Server – The Revit Clinic

Removing and Replacing Models on Revit Server – The Revit Clinic

Have you noticed that (typically) Revit 2014 will only show Import Categories for those imports that actually exist in a view?

I think this is a great feature that makes things a bit cleaner when navigating Visibility / Graphics and looking for Imports etc.

Short post, but you know, there is always more to come 🙂  Over 250 draft posts, and about 100 more in my ‘to blog’ email folder…

Sometimes you will have some junk imported DWG definitions residing in your project.  These may be present due to the long history of the project, perhaps using Transfer Project Standards – View Templates, or just poor RVT model management.

How can you get rid of them?

There are various paid tools that will let you do it, but if you already have access to the Whitefeet Tools, you can use them to easily delete any import definitions (they don’t have to be DWGs) that you no longer want in the model.

Here’s how to do it:

  1. Install the WhiteFeet Tools, if you haven’t already.
  2. Open Revit
  3. Go to Add-Ins, Utility Tools (the W logo) and click on Management Tools
  4. Click on Manage Attachment Links
  5. Select the definition you want to remove.  Make sure to select a line with the Type ‘definition’. (See image below).
  6. OK and close out of the dialogs
  7. Once back in Revit, use the Manage – Select by ID tool and press Ctrl+V.  This will paste the element ID for that import definition.  The Properties Palette will show the proper import name, but everything will be grayed out.
  8. Press the Delete key on your keyboard
  9. Done!

Now, when you go to your VG – Imported Categories list, that particular Import will no longer be present.

Congratulations, your model just got cleaner!

Boost Your BIM has been posting some awesome stuff.  One older post shows you how to quickly purge your Revit model of Imports:
a FilteredElementCollector, a bit of LINQ, a transaction, and Document.Delete to get the imports (but not the links) out of the model.

Check out the code at:
Delete Imported DWGs and Other CAD files � Boost Your BIM – making Revit even better

If you want to learn how to set-up and use macros in Revit, check out:
Setting up your Revit project for inputting macro codes – Benjamin Malone

His detailed post covers:

  • Revit Macro Manager
  • Module creation and choosing a language
  • SharpDevelop
  • Building and running the macro
38ogak1it668sk4c-4346272

Steve made a few interesting points today about Revit and DWG (Import) extents.  I previously posted about Revit accuracy and precision here.

However, did you notice this new setting when importing a DWG in Revit 2013?

If you UNtick the box that says Correct lines that are slightly off axis, then Revit 2013 will bring in the DWG as-is.  It won’t try to straighten things up to make the DWG more Revit-friendly.

Obviously, use this with care.  But for me, 9 times out of 10 I want the DWG to come in EXACTLY as it was drawn.

Oftentimes, you will want to flatten a DWG file before bringing it into Revit, so that Revit isn’t confused by all the Z-values… you can use FLATSHOT or the DXB plotter methods, as described below:

Issue
You want to create a flattened two-dimensional (2D) drawing of a three-dimensional (3D) model.

Solution
If you are using AutoCAD 2007 and higher, the FLATSHOT command is available to convert 3D solids to flattened 2D views. (Note this command is not available in AutoCAD LT.)

The other method to create a 2D drawing from a 3D model is to:

  1. Configure a DXB plotter using the Add-A-Plotter wizard

Read the rest at:
Autodesk – AutoCAD Services & Support – Flatten 3D model to 2D