You may want to do a very aggressive cleanup of your Revit file, getting rid of all Views while retaining all 3D elements as proper Revit elements.  You can use the ‘Save to New File’ function to do this. (Note: when I say aggressive, I mean it – use at your own risk, and be sure to verify the contents of the output file).  Thanks to the revitogbim blog for this tip.

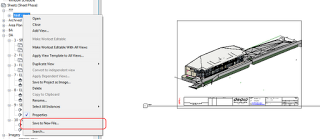
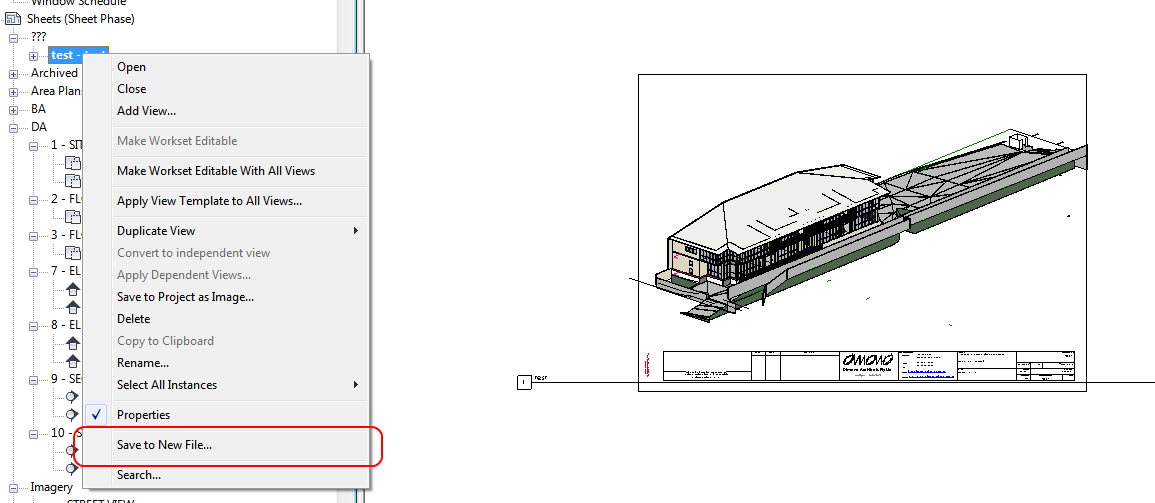
This is the trick: when you right-click a 3D view, the Save to New File option is grayed out, but when you put it on a sheet – its back!

Here’s how to do it:

  1. Create a Sheet and place a 3D view on it.  The 3D view has to ‘contain’ all of the elements you want to keep in the new file.
  2. In the Project Browser, right-click on the created sheet and select “Save to New File …” (it will take a while as it collects the elements, then it will prompt you to save the RVT file somewhere)
  3. Open the exported file and Transfer Project Standards for Line Weights / Patterns / Styles and also Object Styles (and anything else you want)

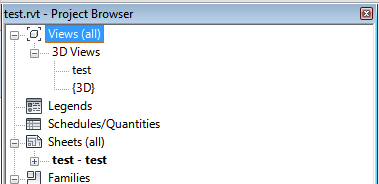
Views in the resultant file:

     (the following lists are not exhaustive)
    Things that are removed:

    • Design Options
    • Floor Plans – well actually, the only view that remains is the ‘export’ view and the Default 3D view
    • Everything else that was unused or not visible

    Things that are retained:

    • Floor levels
    • The 3D Revit elements that you could ‘see’
    • RVT links if they were visible in the 3D view
    • the Sheet that was exported

    To make things look right, you will probably need to Transfer Project Standards for things like:

    • Line Weights / Patterns / Styles
    • Object Styles

     For my test case, I also turned off all Annotation Categories in the original 3D view, and I scaled it so it would fit the sheet.

    This workflow and the basic steps were from:
    Translated version
    of
    http://revitogbim.blogspot.com.au/2012/10/model-export.html

    Interesting video on AutoCAD Exchange over at this link.

    The main point of the video is – if you want to work with Solids in AutoCAD effectively, you should correctly set the DELOBJ system variable. What does this variable mean?

    From Autodesk online help:

    As Revit users, if we ever use AutoCAD for 3D modeling, we want to try and create a form that is a true ‘solid’, something that Revit can understand properly (as opposed to messy meshes).

    It seems that this workflow is becoming easier. Of course, Revit itself is becoming a more powerful 3D modeling tool. Check out my post on Bending the Rules with Adaptive Points.

    Revit doesn’t want you to copy lines between Annotation and Model Families (see below)

    However, it can be done. This is the workflow to copy lines from Annotation to Model families:
    1. Copy lines from the Annotation Family to a plan view in a Project File.
    2. Copy the lines from the Project File to a Profile Family.
    3. Copy the lines from a Profile Family to the Model Family.


    Pretty tricky workaround huh?

    Erik Egbertson over at Inside the Factory made a comment about modeling a Stealth Aircraft in a recent post, and it got me thinking. How would you go about it?

    Now, I’m sure it would be possible to do it with the Conceptual Modeling tools, but it could take a while.

    Why not utilise some existing 3D content and import it into a family? I described that workflow in my post Contextual 3D Views – Shaded vs Rendered. Basically, you need to:

    • Download a Sketchup model that you like the look of (from http://sketchup.google.com/3dwarehouse/).
    • In Revit, create a New-Generic Model family.
    • Import the SKP file using Import CAD.
    • Make sure the resulting geometry is of an appropriate size.
    • Save the family and load it into your project.

    Please note that there may be copyright on these models.So, about that Stealth Aircraft. Here is the link.