The Preview Image Generator (PIG) is a new Revit addin produced by Parley Burnett, a guy that has been in and around Revit and BIM for a long time.

Out-of-the-box Revit has been producing family preview images of varying degrees of quality for some time now. I think you would agree that a good preview image can assist in selecting the right family, right? Also, the preview image shows up with ‘vanilla’ Revit right in the Load Family dialog, so it can be immediately useful for your team – if the image is good. This app aims to automate that process and give you better preview images everytime.

Through this new free app, you can not only save your family with a better image in a single click, but control the appearance settings automatically by category every time. You can get the free version here:
Preview Image Generator (P.I.G.) Free Version

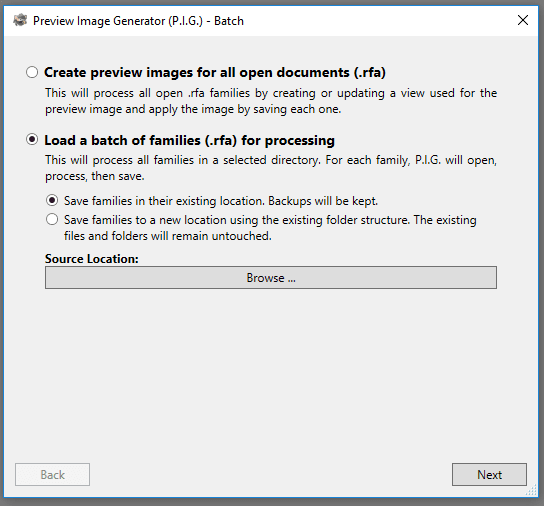
There is also a paid version called PIG Batch that allows you to batch process your entire library with a single click and it runs automatically every time you save a family.
Preview Image Generator (P.I.G.) Batch

Here is a link to download the current version of P.I.G. Batch. You will need a purchased license key to activate.

www.thepig.io/Preview Image Generator.zip


You can create some custom rules for how you want each category to look:


And you can batch process using those rules:


Feature Overview and Comparison:

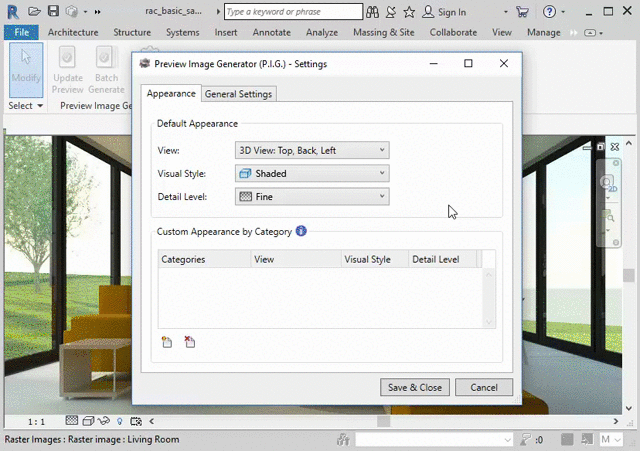
With one click, P.I.G. Free will create a consistent & clear preview image for your open Revit family. This free version offers limited functionality compared to the more fully featured app. See below for a comparison.

Free Version Features:

  • Choose your own default appearance settings & Revit category specific settings.
  • Options to hide connectors, host elements, reference planes and more!
  • Your settings are automatically synchronized with your cloud account.  Activate on up to two computers.
  • Very simple licensing system
  • Automatic notification of new feature updates


P.I.G. Batch Features:

  • **All users at your company can be set up to use the same settings.
  • **Automatically regenerates the preview image every time families are saved!
  • Batch process new preview images for thousands of families at a time!
  • Upgrade files from previous versions of Revit in the process.

 If you would like P.I.G. to silently run on every workstation at your firm, virtually eliminating the future need to monitor or batch through files, a site license is available. You can contact info@thepig.io for more information.

Video:

Updates:

Here are some of the changes in a recent update:

  • Your settings will now be stored in the cloud and appear on any machine you have activated with your Batch account.
  • We can group users together by ‘Company’. Users of the same company share the same settings automatically.
  • Added a new license type called ‘Desktop’. Desktop users can’t change company settings (only Batch users can). These users can run pig on individual families – either by clicking the button, or automatically when saving the family if that is enabled.
  • Improved the ‘Folder Picker’ dialog for choosing which folders of families to run P.I.G. Batch on.
  • Other minor UI improvements.

Under-slab insulation (fitted or fixed below a concrete slab) is a legitimate coordination item. Typically it is installed first on site, so other trades and services must fit in around it.

This means it needs to be modelled by someone, which can be a headache in Revit. The slab soffit (underside of slab) often moves up and with concrete beams and pads. If you have access to editing the structural model, you may look for a way to incorporate slab insulation into the floor items themselves. However, this still does not work well for the vertical faces of a slab setdown.

To solve these, I created two families:

  1. A line-based, face-based Generic Model family that can be simply placed and stretched
  2. A 4-point adaptive component for irregular shapes. After placement, the four corners can be selected and moved into place.

You can download them here:

Slab Insulation shapes

And this gif shows the rectangular version in action:

Fellow Expert Elite Karam Baki has posted an interesting workaround for ‘converting’ between differently hosted Revit families. The term converting isn’t quite accurate, really we are just ‘nesting’ the hosted family into another family until we get to the hosting type that we want. There are times when this will help you, but other times you may go through all of this and then decide “hey, I should have just rebuilt that family properly from the start because Revit keeps crashing now” 🙂

Here’s the basic steps:

  1. Use a special middleman family with System category elements living inside it… (Karam has provided one on Google Drive)
  2. Load your hosted family into that special family and host it onto the object that it wants (Wall, Floor, Ceiling, Roof)
  3. Work with parameters as needed, link them through etc if needed.
  4. Save As ‘unhosted’ version of your family
  5. If needed, nest this again into a new, clean family based on whatever category / hosting you want
  6. Get origins, void cuts, openings working and link through the necessary parameters…

As a general comment, I’d say you should test thoroughly in your own environment, because this whole workflow is not really ‘#GoodRevit’ in the sense that we are breaking certain rules to get the results we want.

Along similar lines, you may remember the Copy / Monitor hack that allows converting between some different types of hosting:
Convert Family from Wall to Face based

Back in 2011 I posted about some related workflows, including the necessary steps to get System family elements in a normal Component family:
Save an In-Place Family as an RFA for use in another project
Create a Component Family with Category set to Walls (or other system family category)

You can also make unhosted Doors and Windows from scratch, like this:
Making unhosted components like unhosted Doors and Windows

Original post by Karam Baki:
Revit Tip: Save Time Converting Revit Families – Autodesk Community

You can watch his video here:

There was an API addin available a while back, but in recent years I have used:

  • the Case Batch Export Family RFA’s tool
    https://wrw.is/2012/12/how-to-determine-if-family-is-in-place.html
    This way is pretty robust, as it also gives you a list of inplace families and masses that it couldn’t save to rfas. Unfortunately, it is pretty hard to get now that Case have shut down their free app downloads 🙁 Hopefully someone in your office already has it installed? Just copy all the files starting with Case between the relevant addin folders to get it going.
  • You could also use the builtin method File – Save As – Library – Family – All Families to export the rfas, and then (for 2013 version only) the free Kiwi Codes Family Categorizer to sort them into Category folders. More on that here:
    https://wrw.is/2012/11/free-utility-that-will-sort-all-of-your.html

These are the steps to export the families using the builtin workflow:

Personally, I now usually use Unifi to export and manage Revit content.

Thanks to Matt Wash for prompting me to do an update post on these different methods.

Have you ever exploded a SAT or DWG in the Family Environment, and then gone looking for the Visibility Settings ribbon button for one of the resulting freeform elements? Its not there:

But, as you can see from the image above, you can still access these settings by using the Properties Palette – Visibility/Graphics button.

Alan Moylan has posted a Star Trek Enterprise 1701 Revit family for you to download. I, for one, am glad to see a Trek vehicle added to the current interstellar Revit line-up, mostly from that ‘other’ franchise, including the Walker by Dave Light and something else that wasn’t a moon.

Download here

View it in 3D here

Source page

(Note: I have been working on a 1701D (TNG) for a while, but have just never got around to finishing it…)

via
@BIMgeek
USS Enterprise @AutodeskRevit family’s all finished. Be careful, it’s full size! Download here:http://t.co/4Iz2YZVGn6 http://t.co/zeCUWNEtZQ

https://twitter.com/BIMgeek/status/573120141808025601

Revit doesn’t like to deal with an array that has 1 instanced element or component (although there is one exception). The array will break. So, the way to handle it is to have a separate single instance of a component for that scenario, and then the actual Array for whenever you need two or more instances.

To accomplish this, you need

  • some formulas to hide or show the required elements, and 
  • another formula to maintain the array at 2 or more. 

It looks something like this:

That particular example also caters for some other ‘switches’ that may turn off the array (notice the if-or formula.)

In the Revit 2015 Project Environment, you can access the tools to Manage Selections from the Manage Ribbon:

However, this Ribbon Panel is not available on the default Manage Ribbon in the Family Environment  (Build 20141119_0715(x64) Update Release 5). What to do? Well, we can just add these tools to the QAT (Quick Access Toolbar), so then at least we can use them while building families. There are a couple of ways we can do this, but here is how you can do it while staying in the Family Editor:

  1. In the Family Environment, select more than one element
  2. Right-click on the Save Selection button that appears in the contextual ribbon (the green one) and “Add to Quick Access Toolbar”
  3. Save a Selection
  4. Select more than one thing
  5. Right-click on the Load Selection button that appears in the contextual ribbon (the green one) and “Add to Quick Access Toolbar”

You can also just add these items from the Project Environment, and as the QAT is shared with both environments, they will show when you edit a family.

However, while you can add the “Edit Selection” button to the QAT, it will not work in the Family Environment 🙁