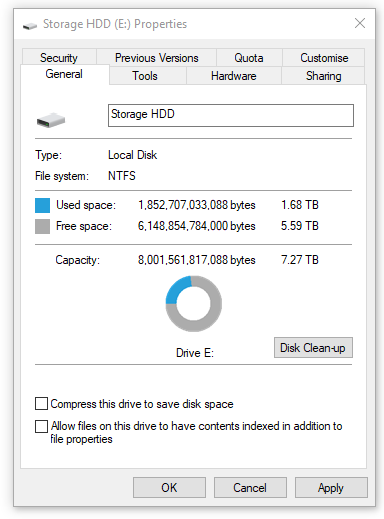
I love Box. It is an incredibly robust file sharing tool and it has rarely let me down even though we have used it extensively on many large BIM and VDC projects. Recently, Box has been pushing people away from Box Sync and into Box Drive. I was syncing over 1 tb of data across many thousands of project files, so I could see the advantage of a more ‘on demand’ system. Box Sync actually struggles to scan through the entire folder structure – so much so that it sometimes never quite catches up in a 24 hour period. On the other hand, Box Drive uses a 25 gb transparent cache, and you can still mark certain folders to keep them offline. Another key difference is that Box Drive will always show you all of your files and folders, and it will download them on-demand (unless set to keep offline). This means that there is no web-based control for ‘Sync Folder’ or similar, the setting is basically on the client device.


Having a very established Box Sync workflow, that included ‘absolute file pathing’ between team members, it was a bit scary to make the switch to Box Drive. But I got there in the end 🙂


Here’s how I did it:

  1. Install Box Drive from here https://www.box.com/resources/downloads/drive
  2. A mini-install will run, and then you will be prompted to login
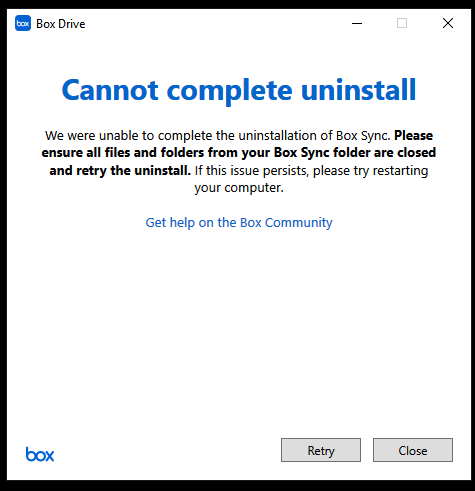
  3. After you login, you will be prompted to uninstall Box Sync. You will have to make sure any files in Box Sync are closed.

    uninstall Box Sync

    I received this annoying warning a few times:

    problem uninstalling Box Sync
    As it kept failing, I did have to restart my computer. The uninstall picked up automatically after the restart. Even after a long time ‘restoring disk space’ did not complete…

    My workaround was to:
    – boot into Safe Mode
    – rename the existing Box Sync folder to “Box Sync.old”
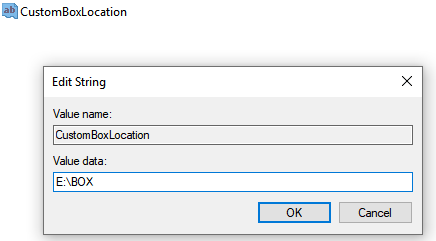
    – upon reboot, the Box Sync uninstall script thinks that it got the job done, even though I helped it along

  4. Following this step, I wanted to move the Box Drive to the same absolute folder location I had previous, which was E:\BOX\Box Sync\contentfolders .By default it was pointing to a user location, that is C:\Users\lukes\Box\ .There are some notes here on how to do change the Box Drive folder location.
  5. Restart Box Drive after setting the CustomBoxLocation Registry key shown below:
    changing the location of Box Drive
    changing the location of Box Drive


  6. Unfortunately, this did not have the desired effect. It resulted in a folder structure like:
    E:\BOX\Box Sync\Box\contentfoldersAnnoying! So you can’t actually rename the \Box\ piece of that folder structure…
    My next plan to work around this limitation was:
    – put Box in a different folder, and
    – make a symlink to the new folder.New location in Registry:

  7. Finally, I made the symbolic link like this:
mklink /d "E:\BOX\Box Sync" E:\BOX\Box

Job done!

command line to create symbolic link

Now, I can use all of my legacy Box Sync links with Box Drive, and they will all correctly redirect to the new Box Drive location.

Obviously, you have to go through now and ‘Mark Offline’ any folders that I want to keep permanently syncing to that device.


Update: Changing the Box Drive Cache Folder location

I discovered the Box Drive cache was using heaps of hard drive space

windirstat
windirstat

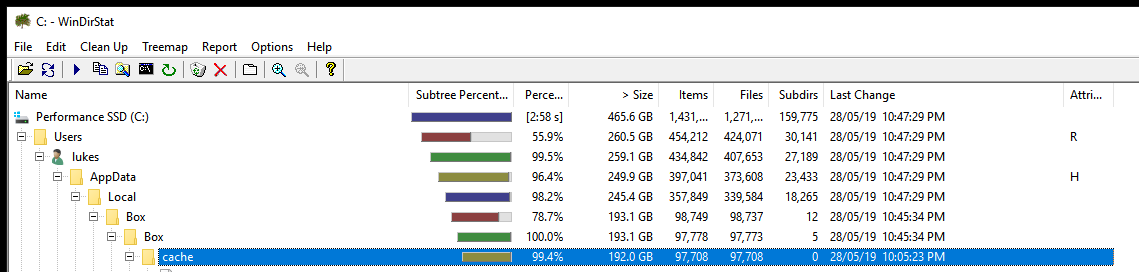
So I decided to move that cache folder using yet another symbolic link… Here’s how:

  1. Close Box Drive
  2. Rename to cache.old
  3. mklink /d C:\Users\lukes\AppData\Local\Box\Box\cache R:\BoxDriveCache
  4. Restart Box Drive

Further reading:

Upgrading Your Hard Drive while Keeping Box Sync Data, and Adding a New SSD to Your Laptop


Using Box Sync to Share BIM Files and Retain Links and File Paths


Box is great, and Box Sync is still the most robust file sync tool I have used for huge datasets. In BIM and VDC, our data is getting bigger, primarily due to the prevalence of point clouds. It is not uncommon to have 50gb of scan data for a single site scan. Moving that data to the cloud is challenging, and a lot of data processing and point cloud indexing work still happens on local machines. This means we have to upgrade our local storage devices (hard drives) to handle those tasks.

Recently I went about upgrading the storage on both my Workstation and my Laptop (a Metabox). I wanted a relatively huge platter drive in my workstation, and a relatively huge SSD in my laptop. I had a look online and after a bad experience with Umart, I ended up buying an 8tb Seagate Barracuda from MSY, and a 2tb Samsung 970 EVO from an eBay vendor. Both drives come with a 5 year warranty.

I’ll describe both of these upgrades in detail below

Samsung 970 EVO NVMe M.2 SSD 2tb
Seagate BarraCuda Pro 8tb – and a new SATA cable

Upgrading the Box Sync Hard Drive on my Workstation

Box recently released ‘Box Drive’, but it has a local cache limit of 25GB, which is quite useless for BIM in my opinion.  That means I still wanted to keep using the old faithful Box Sync.  But…

Box Sync does not allow you to move or change the folder location of its data (actually you can, but you only get one chance when you first install it).  After installing, you can’t move the Box Sync root folder without some kind of hacky tricks like pointers, and I didn’t want to go down that path.  We have been syncing Box to a folder on our E drives (secondary hard drive), and now it was time to upgrade that 2tb secondary drive to something bigger.

Here’s how I kept all my Box Sync data and upgraded the hard drive:

  1. Shut down computer
  2. Install the new hard drive (it was a simple SATA drive with data and power cables)
  3. Boot up the computer
  4. Initialise the drive with GPT Partition Style

    GPT Partition Style


  5. Use Macrium Reflect to clone the partition from the old drive – including all Box data – to the new drive

    Cloning with Macrium Reflect
  6. Reboot into Safe Mode
  7. Use the video below to ‘swap the drive letters’. This step basically tricks Windows into using the new, larger hard drive (as the ‘E’ drive in my case). And Box Sync works perfectly, it just picks up where it left off.

Now we have lots of room for Box Sync and more:

New hard drive capacity

One final thing I had to do was “uncompress” the drive data. I had used NTFS compression with the previous drive but now I no longer needed the compression. Just go to the file or folder properties and untick “Compress this drive”.

Adding a New SSD into My Metabox Laptop

The next thing I did was add another SSD to my laptop. I looked up the manual and it said I had another M.2 2280 (22mm x 80mm) slot available. In the first slot I already had a Samsung 950 Pro 512gb as my primary drive. I did some research and decided to go with a Samsung EVO 970 2tb drive. After waiting patiently for my ebay order to arrive, I then cracked open the Metabox to install it.

Here is what I did:

  1. Removed the back cover of the laptop

    This is under the back cover of the Metabox


  2. Looked around everywhere and couldn’t find the M.2 slot – in fact I couldn’t find my primary drive. After a moment of panic, and then a quick look on YouTube, I realised I had to remove my keyboard. So I removed the KB screw and carefully pried the keyboard off, then there it was – my spare M.2 slot!

    Additional M.2 slot under the keyboard


    New drive ready to install
  3. I carefully installed the 2tb SSD and then closed up the laptop
    Installed
  4. The system booted up fine, then I went into Disk Management and initialised the disk with a GPT record,
  5. Created a new partition with NTFS default sector size, and
  6. We are good to go!

Now that I had a much bigger SSD to work with, I immediately moved my Revizto Working Folder onto that new 2tb SSD. This will allow me to fully utilise a lot of the great new Revizto Point Cloud features and at the same time have full M.2 SSD performance.

Update:

Out of interest, I have added the Samsung Magician performance scores for the Samsung SSD 950 PRO 512GB and Samsung SSD 970 EVO 2TB below:

Samsung SSD 950 PRO 512GB Performance


Samsung SSD 970 EVO 2TB Performance

Aconex is a CDE (common data environment) used a lot through some regions for managing AEC correspondence. It is also used to register and share some BIM-related files and documents, although I don’t personally think Aconex is a great tool for that particular job.

In any case, if you are using it regularly it makes sense to automate the process. RTV have built a tool that allows you to connect with Aconex, and publish and transmit documents through the official register.

You can get it here:

Direct link

or

https://www.rtvtools.com/product/rtv-aconex-uploader/

Just fill out the form and checkout, and you will get a link in an email. The current version is RTV Aconex Uploader 2017. You will be able to activate the software for free.

The form creation engine in Revit does not really know about flat vertical zero thickness surfaces. However, with DirectShape, we can make almost any type of mesh geometry. One interesting idea coming out of the RTC ANZ event this year was creating these flat surfaces to display grids in 3D. This lets us do things like dimension easily in Navisworks or Revizto. I wanted to use them to add some flat datum lines to a construction setout point family.

Here is the Dynamo Script that I used (Download Make Flat DirectShape From Line):

Basically, you select a Detail (Symbolic) Line and run the script. In action:

Playing around with the lines a bit, I built this geometry for use in the project:

Under-slab insulation (fitted or fixed below a concrete slab) is a legitimate coordination item. Typically it is installed first on site, so other trades and services must fit in around it.

This means it needs to be modelled by someone, which can be a headache in Revit. The slab soffit (underside of slab) often moves up and with concrete beams and pads. If you have access to editing the structural model, you may look for a way to incorporate slab insulation into the floor items themselves. However, this still does not work well for the vertical faces of a slab setdown.

To solve these, I created two families:

  1. A line-based, face-based Generic Model family that can be simply placed and stretched
  2. A 4-point adaptive component for irregular shapes. After placement, the four corners can be selected and moved into place.

You can download them here:

Slab Insulation shapes

And this gif shows the rectangular version in action: