I have posted about SysExporter a few times before, but here is a little reminder… You can use SysExporter to grab text from almost any dialog box in any program in Windows. Let’s say you have a list of missing materials in a Revit Render dialog box. You can use SysExporter to grab that list so you can find the material images and rectify the problem.

Here’s how:

  1. Render a scene
  2. When the missing material dialog pops up, start SysExporter
  3. Find the dialog in the list (you can use the target to drag and drop onto the Rendering dialog)
  4. Once you find the list of names, you can copy / paste them, or export to a file
  5. Find the missing materials and point your Revit install at them using the Render Appearance Paths in Revit Options.

You can get it here.

Translated quote:
Please download the macro down here: Download DeleteStandardMaterials

  1. Connect Revit.
  2. Unzip the zip file. The ZIP contains a DeleteStandardMaterials folder with two subfolders (AddIn + Source).
  3. Copy the addin + Source folder on the following path: C: \ Program Data \ Autodesk \ Revit \ Macros \ 2015 \ Revit \ AppHookup \ DeleteStandardMaterials
  4. Start Revit.
  5. Open the file.
  6. Open Manage / Macro Manager / Application tab: The macroDeleteStandardMaterials” appears under the Application tab.
  7. Select “Execute” and start the “Run” command. > The standard materials are removed.

via
http://translate.google.com/translate?u=http%3A%2F%2Fbimblog.typepad.com%2Fautodesk_bim_blog%2F2014%2F08%2Fdatei-performance-issue-in-revit-2015.html&hl=en&langpair=auto|en&tbb=1&ie=UTF-8

unusedmats-2670369

Interestingly, this hotfix comes in the form of a macro to clean up your files. The issue as stated on the Autodesk Knowledge Network is:
In Revit 2015 the performance of some file is very slow. This means that
opening material browser may take an extremely long time or Revit will
hang. Typically you cannot execute the “Purge unused elements” command
as well, because Revit will freeze. 


Every time you edit a family and load it back in > overwrite > the
number of materials will grow substantially. For example after 5 or so
subsequent reloads in our sample file it jumps from 15551 to 186623
materials.

We have seen this most commonly when editing titleblock familes in the German and Japanese version of Revit. 


Download the macro:
DeleteStandardMaterials.zip

Please go through the process below to clear out the extra materials:

  1. Close Revit.
  2. Extract the zip file: It will contain a DeleteStandardMaterials folder with two subfolders (AddIn + Source).
  3. Copy the AddIn + Source folders on the following path:
    C:ProgramDataAutodeskRevitMacros2015RevitAppHookupDeleteStandardMaterials
  4. Start Revit.
  5. Open the file.
  6. Open Manage/ Macro Manager/ Application Tab: The macro should
    show up in the Macro manager under application > macros as
    “DeleteStandardMaterials”.
  7. Select here “Execute” and start the command “Run” > This will delete Standard Materials.

After these steps use Save As to save the file with a new name.

Here are 2 videos showing the steps:
https://screencast.autodesk.com/Main/Details/5bfa2fff-3443-45e0-a156-4c530c594c28
https://screencast.autodesk.com/Main/Details/fb7eaa0a-b529-47b7-9e35-7d42c3944a0b

Main page:
File performance problem in Revit 2015 | Search | Autodesk Knowledge Network

Heads-up:
Be Revit – Do Family Planning: Revit streikt / Datei wird immer größer und reagiert nicht mehr?

Jeremy Tammik has done all the heavy lifting on this one, but here is how you can get up and running with it quickly:

  1. Download this
    (or you can also go here https://github.com/jeremytammik/AddMaterials, Download ZIP, Extract and Open in Compiler, Build Solution etc)
  2. Put the addin and dll here “C:ProgramDataAutodeskRevitAddins2014”
  3. Put the XLSX here “C:RevitAPIMaterialList.xlsx”
  4. Open Revit 2014
  5. Open the sample Revit file from the zip you downloaded in Step 1
  6. Go to External Tools – AddMaterials

You should see something like this:

A couple of things to keep in mind:

  • the addin will copy an existing material from the CSI column as the ‘base’ material, and then modify the other values accordingly.  Therefore, there must be a source material in place.
  • Similarly, the Revit project file will need Surface and Cut patterns with the appropriate matching names already in the file prior to running the addin.  The addin won’t import new Cut / Fill patterns into the project for you.

Recent post by Jeremy about this addin:
The Building Coder: Adding New Materials from List Enhancements

Other posts:
http://thebuildingcoder.typepad.com/blog/2014/03/adding-new-materials-from-list-updated.html
http://thebuildingcoder.typepad.com/blog/2014/03/adding-new-materials-from-list-updated-again.html 
http://thebuildingcoder.typepad.com/blog/2014/04/wpf-fill-pattern-viewer-control.html
http://thebuildingcoder.typepad.com/blog/2014/04/getting-serious-adding-new-materials-from-list.html

I posted about Randomizer a while back.  I have since seen it used to randomize the colour of panels.  One way to do this is to use a integer or numeric Shared Parameter and View Filters (ie. randomize from 1 to 5, have your View Filter apply Red to 1, Yellow to 2 etc).  However, could this principle be applied to change the actual Material too?

Philip Chan provides one answer:
In the component family environment, Revit won’t allow you to formulate the material parameter. All you can do is to set the material as a parameter; in the formula field, you won’t be able to input formula like you can for other type of parameter (e.g. Length). I recall a trick from Alfredo Medina that you can parametrize a material with conditional statement using nested family. So, I ended up rigging up a curtain panel family with a setup that looks like this:


you can download it from the link below:Randomized Panel rfa

Read the whole post:
link here

Daniel Stine hosted the interestingly named RTC class:
Mastering Materials: Getting What You Want from Revit

In a recent Cadalyst article, he gives a few good material tips.  Here are just 3 of them:
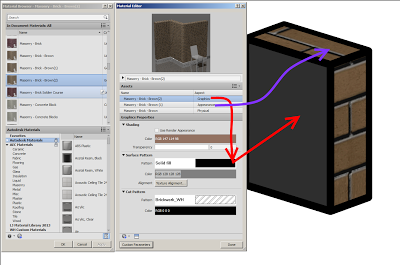
1) Material Assets
Think of a material as a container. Some of the information represents elements you can touch and see when the building is complete, while some does not. Assets are modules, if you will, that better define a material. These modules are optional and can be added or deleted as needed; however, most materials have an appearance asset, which cannot be deleted.

2) Material Transparency in Elevations (vs 3D views)
In any elevation view, materials are not transparent, as you can see in the left-hand image below (regardless of what Visual Style is set to). Even turning off the glass material in a view’s Visibility Graphics Overrides (VG) will not allow you to see through the “opening,” as seen in the second image. The trick here is to edit the opening in the family so it is transparent in elevation, as shown in the third image.

To achieve that, simply select the opening and check Elevation on the Options toolbar.

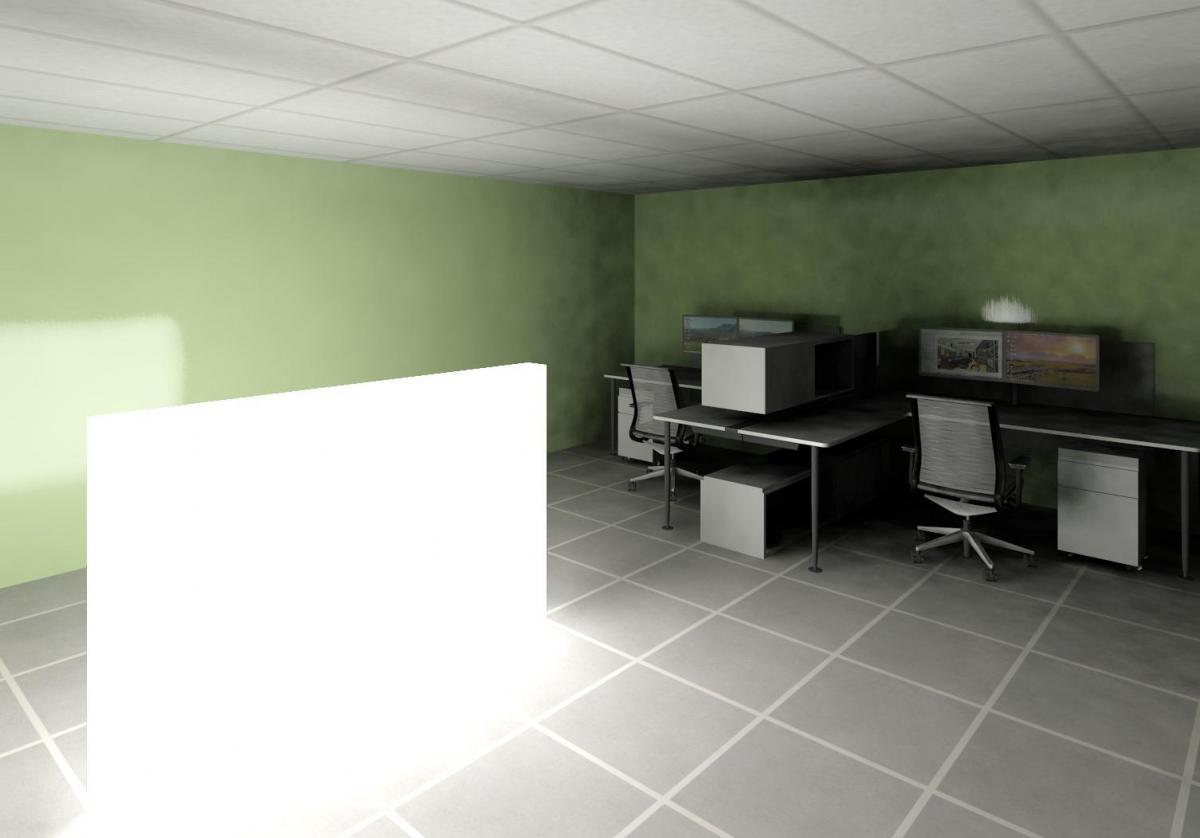
3) Self Illumination
 A surface with a self-illuminating material will actually add light to a scene. In the image below, the self-illuminating low wall in the center of the room is the only light source. This material can also be used to get a very white surface when nothing else seems to be working.

Read more / via
http://www.cadalyst.com/cad/revit/understanding-autodesk-revit-materials-17422

Great tip from Philip Chan.  Basically:

  1. Make a Material Take-off / Multi Category
  2. Add the Material: As Paint parameter
  3. Filter by this parameter = Yes (now the schedule is only showing painted surfaces)
From here, you can right click on a row in the Schedule and click “Show” – this will open a relevant view and highlight the element that is hosting the Split Face.  Nice!

Here’s his workflow:
Next window allows me to add fields to my schedule, I then notice there is a field/parameter called “Material: as paint”. Sounds like something suitable in this occasion.

As I move on to the filter tab, something interesting shows up…
I can now set the “Material: as paint” to equal to “Yes”, which means I tell Revit that this schedule only look for the “Paint” surface on all walls; the next filter rule, I can even set it to a specific material to be included in this schedule.


The last thing is to tell Revit to calculate total area for this particular material.

Once this is done. Volia! I can now let Revit to keep track on all my “paint” surface.


via

Ever noticed how the Graphic Surface Pattern of a Material will override a Walls surface in a Realistic (ie. materiality / render check) view, but not the edges?

Firstly, I don’t think Graphics values should affect Realistic view at all.  Secondly, it should at least be consistent: either override wall faces and edges, or don’t override at all, yeah?

Anyone know if this was fixed in 2014?