I put this presentation together about 6 months ago, which is forever in DynamoWorld. But I thought I’d share it anyway, just as a general and basic introduction to Dynamo.
I recently had the pleasure of presenting at the 1st Build SA event of the year. Overall, it was a very informative event that packed heaps of useful content into a half-day of presentations, labs and discussions of real world case studies.
You can get tickets for BuildSA Event 02 – Documentation and Deliverables Part 1 here at this link.
(The one missing piece that you don’t get access to is the larger resource download package. If you want to get hold of some of these extra goodies, may I suggest that you attend Build SA Session 2 as per link above? )
In times past, I had this dream that Revit would be the sole answer to every single architectural and modelling question. Due to the proliferation of excellent addins and addons, I now realise that Revit is positioning itself as the operating system of the BIM environment. It has a solid parametric, data and intelligence engine, which can be extended in many ways through the expansive API. One area in which Revit has sometimes wavered is in pure visualization, particularly of the real-time and photorealistic variety. Using RPC and Realistic display modes within Revit can achieve a certain result, but here are some questions:
Is using an additional presentation package, like Lumion, worth it?
Will it result in a better visual result?
Will the performance be acceptable?
I received a review copy of Lumion 5.3, and tested it using Revit 2015 Update 7. As usual, I have reviewed the software, but at the same time I am sharing practical tips and guidance on how to get up and running with Revit and Lumion.
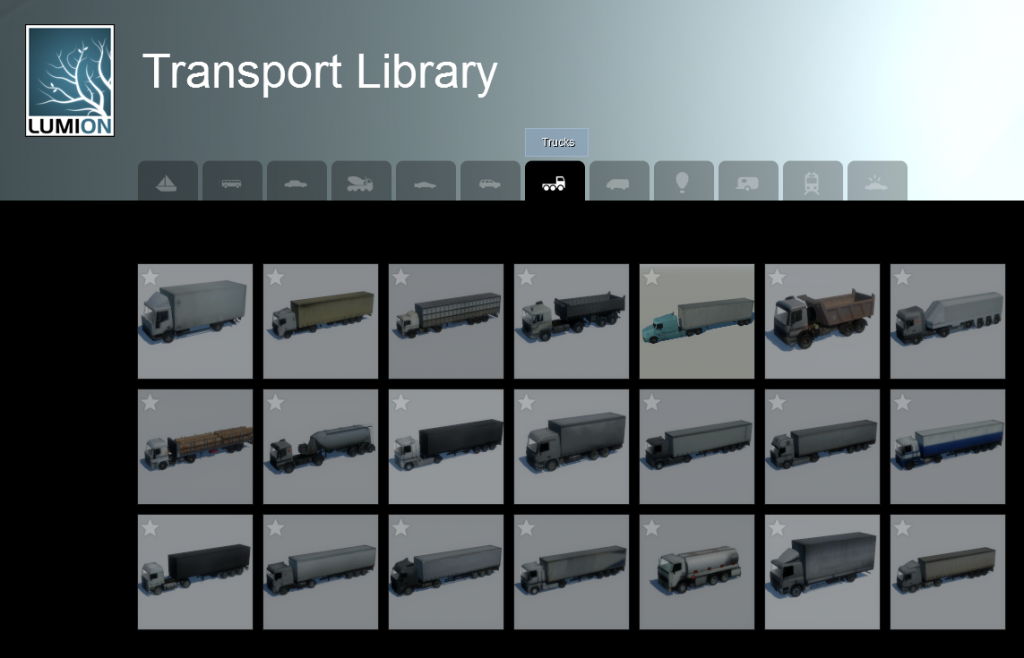
To start with, let’s consider whether Lumion can really add value to your current design and development pipeline. You may be thinking “I don’t have a clue how to make a fly-through animation“, but that is where Lumion lives. It makes it easy for you to take your BIM geometry, and put it into a real, living environment. In a sense, it is a ‘complete’ visual presentation package, as it includes things like environments, backgrounds, materials, weather effects, water, entourage, vehicles, people, trees, landscape, furniture, terrain modelling, and it is all in a package that allows you to modify, manipulate and tweak basically everything in real-time. It has a clean UI and extremely fast rendering capability. For output and deliverables, you can easily export still images or rendered videos of the scenes that you have composed.
You might be thinking “I don’t have time to learn yet another modelling tool“, but if you spend any time at all in post production software like Photoshop, 3ds Max, After Effects or something similar, then Lumion does not represent a steep learning curve. The interface is relatively unobtrusive and simple to understand. The Lumion addin allows for building models to be exported from Revit, but it also allows models to be updated and reloaded into the Lumion scene. As one person put it, “Use Lumion and Revit together and you will enjoy the synergy.”
You can check out a very concise ‘getting started’ style video here:
To put it simply, when you pair a powerful and parametric building design tool like Revit, with a free-flowing, smooth, flexible presentation software like Lumion, you have a very formidable design and presentation pipeline at your disposal. So, let’s learn a bit more about Lumion…
This remainder of the review has been divided into the following 5 sections:
Download, Installation and Deployment
Workflow (BIM friendliness)
Performance
Quality of Output
Real-world applications and Case Studies
Download, Installation and Deployment: Installing the Main application
You will receive an activation email, with a unique download link
Download and run the ‘download manager’
Copy the activation code from your email to the download
It will now automatically download Lumion, usually to your Downloads folder (about 4.94gb)
You should copy the installation .exe and .bin files to some safe location – these are what you will use to install Lumion on other PCs
The installer should run automatically – all you need to do is set the install path
Start Menu – Run Lumion 5.3
Agree to the Licence Agreement
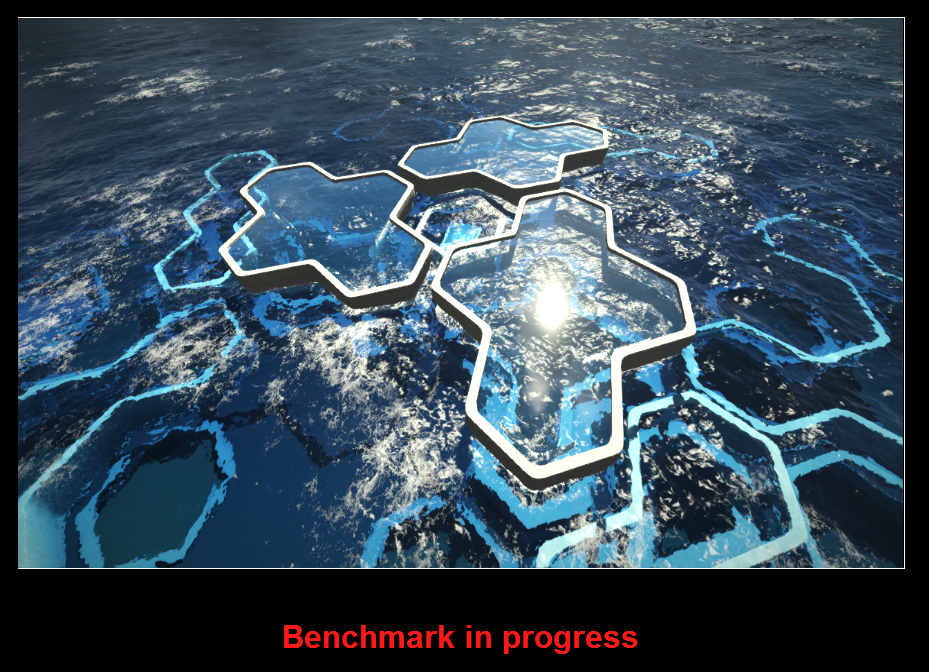
Lumion will now run some benchmarks and initialize itself
Once the next screen appears, you will get a ‘system speed’ rating
Note: I was expecting to see a Revit addin automatically installed… but I have since realised that this is an additional step… see below.
Examples of cards with about 2,000 PassMark points: GeForce GTX 745, Quadro K4000M, GeForce GTX 570M or faster.
Harddrive: 20GB of disk space
Using Lumion and Lumion Pro via Remote Desktop or similar virtual desktop solutions is not supported.
Lumion and Lumion Pro require an internet connection.
Workflow (BIM friendliness)
There are a number of ways to move data from Revit to Lumion, such as using DAE format via Exporter, or FBX via built-in export. The dedicated DAE exporter addin from Revit is the recommended method.
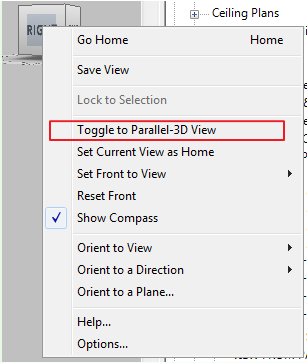
The Exporter addin (Revit to Lumion Bridge) works in orthographic 3D views and takes all visibility filters for the view into account. If you try to export from a Perspective view, the Lumion export addin will be disabled. However, in Revit 2015 R2 you can easily convert a Perspective 3D view into an orthographic or Parallel-3D View to allow export to proceed. Here’s how:
Ensure that a Crop Region is applied and Visible, and the view is “unlocked”.
Then, right-click on the View Cube and switch to Parallel-3D view, like this:
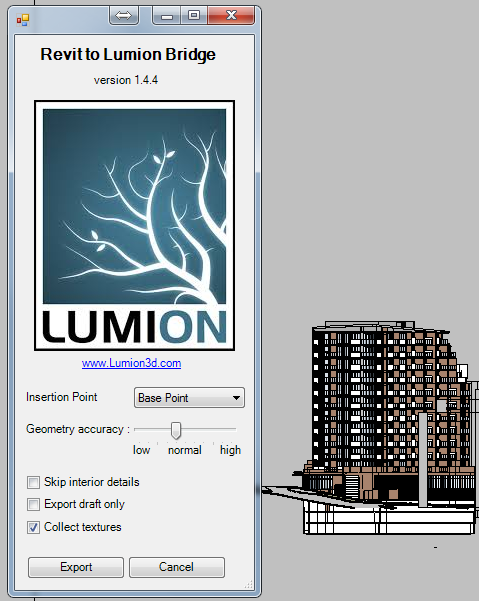
Then, run the exporter. The UI is relatively easy to follow:
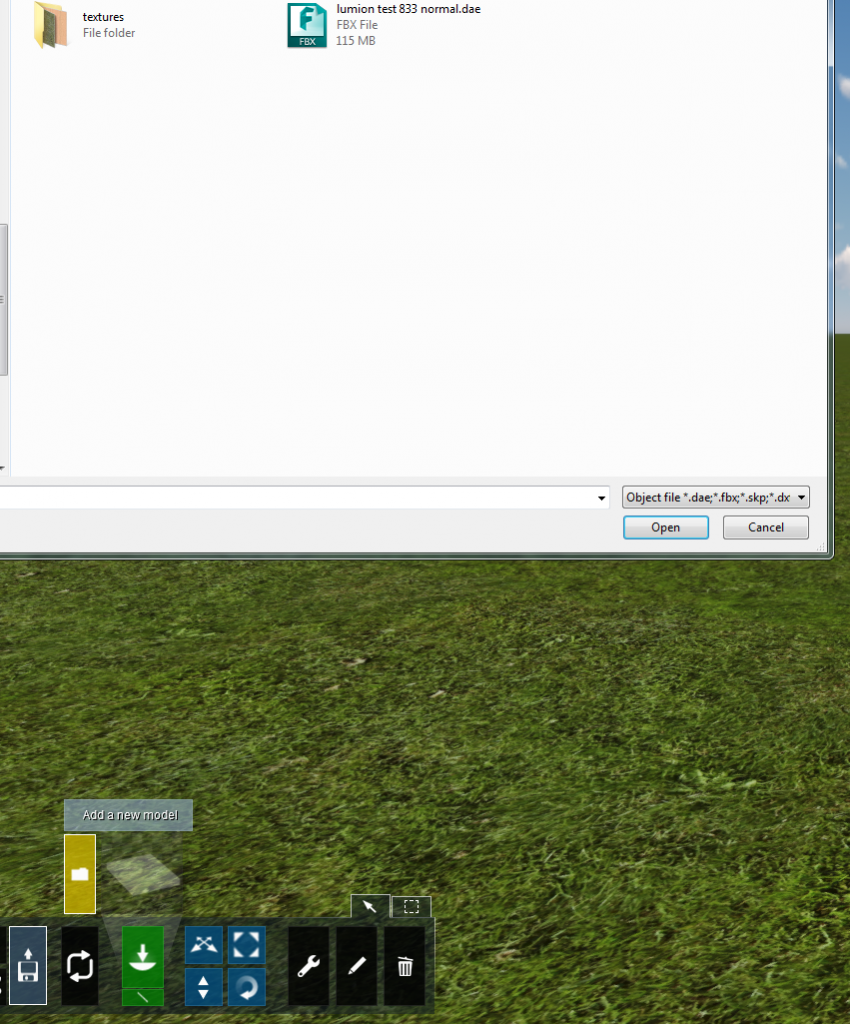
I tested using ‘normal’ accuracy, and the file size result was like this:
You can then easily open or create a scene in Lumion, and then import the model you just exported from Revit:
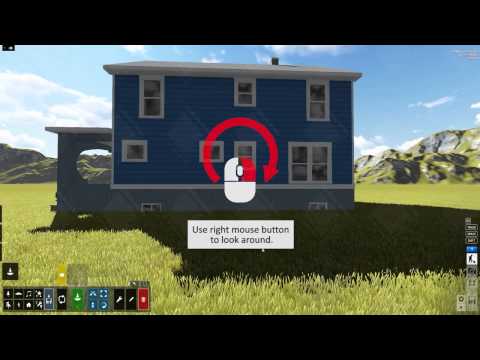
Navigation
Once in Lumion, you can use the WASD keys to walk around, and QE keys to move up and down. If you hold the right mouse button and drag, this will change your view direction. Holding Shift will speed up your movement. It is quite a fluid navigation system. F1/F2/F3/F4 turns shadows on and off and makes other quality vs performance changes.
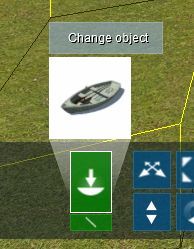
Click the category (people, transport, landscape etc)
Click Change Object to select desired model
Click to place in the scene
To bring in external models, like DAE or FBX exported from Revit, use the Import models option.
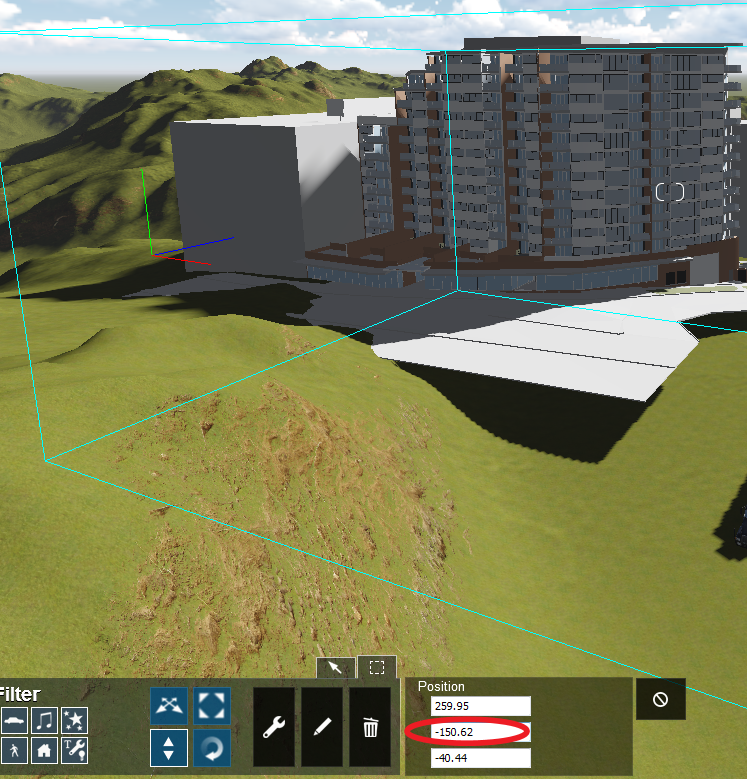
Depending on how your model heights were configured in Revit, you may need to move your model downwards in Lumion. In my case, I had to move the model downwards in the Y-axis by about 150m (yes, Lumion understands the vertical to be the Y axis, not the Z):
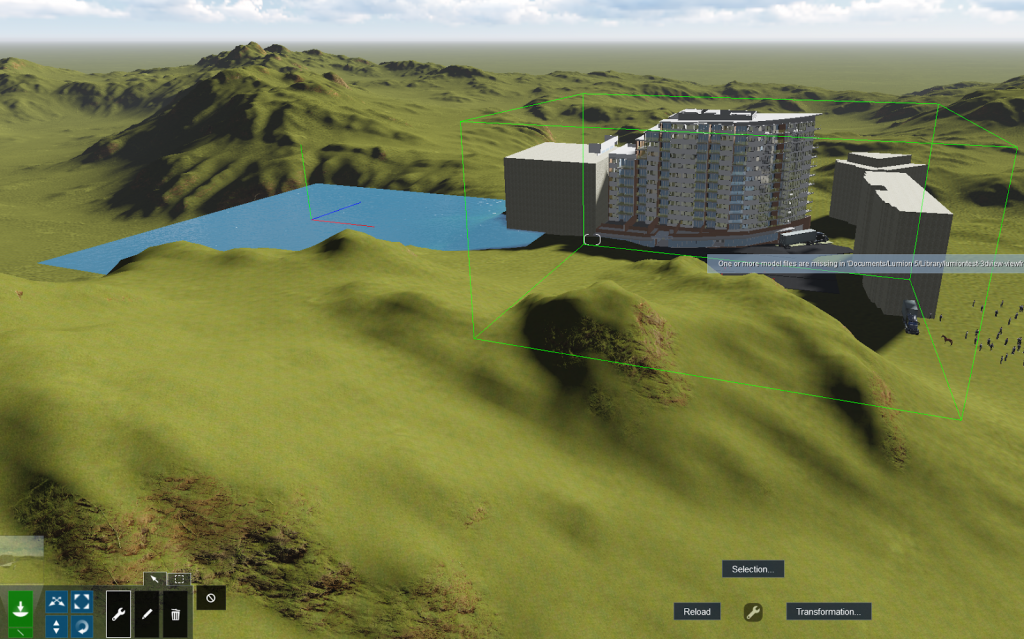
To update the model, just re-export the DAE file from Revit. You can reload by: going to Import mode, selecting the spanner for ‘context’ menu, selecting your Model and then clicking on the blue circle, which will open up the context menu with the reload option:
It is interesting to note that even new objects (ie. newly added to the Revit model) that have a Revit material name matching a currently overridden material in Lumion, will then adopt that Lumion material when the import is reloaded. Nice!
There is a brief tutorial video on the Lumion to Revit workflow here:
So, is Lumion able to do anything that Revit can’t do? In a word, yes. For example, it can handle things like sculpting large-scale terrain models very easily, as this demo shows:
Add to that: movie effects, ocean / water, the large model and material libraries, lighting effects, render quality, and the overall ability to transform a scene from a collection of polygons into something that more effectively represents the real world.
Performance
The Collada DAE export was very, very fast – under 1 minute for a 150mb Revit model. Accordingly, of all the file types that can be used to get data from Revit to Lumion, I would expect that the recommended and preferred method is via the DAE export in the free addin.
Quality of Output
Lumion is targeted at rapid, real-time, moving animations with models that may also be animated. So the result is usually something that looks very ‘alive’. Coming from an architectural background, you may initially be surprised at the overall ‘look’ of things and you might find it slightly cartoonish. However, I recommend that you give it a try and have a go at tweaking a few of the display settings.
It is very easy to create a flythrough or fly around animation. Just start the movie tool with the film icon, then create a number of keyframes as you would with other animation tools. Then, you can easily export to mp4.
Real-world applications and Case Studies
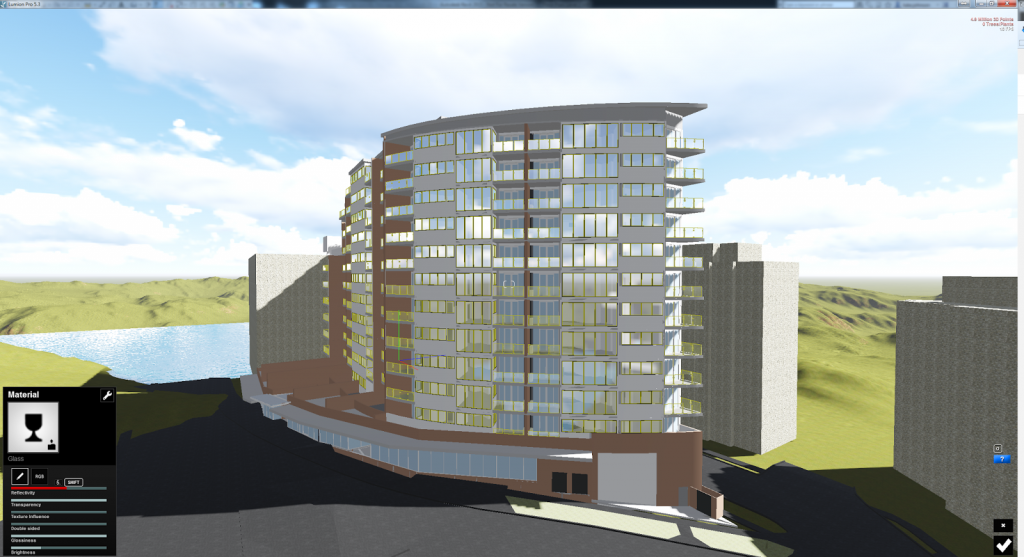
I tested using a medium rise model:
Once the model was imported, it was very easy to select entire materials and replace them with more appealing versions:
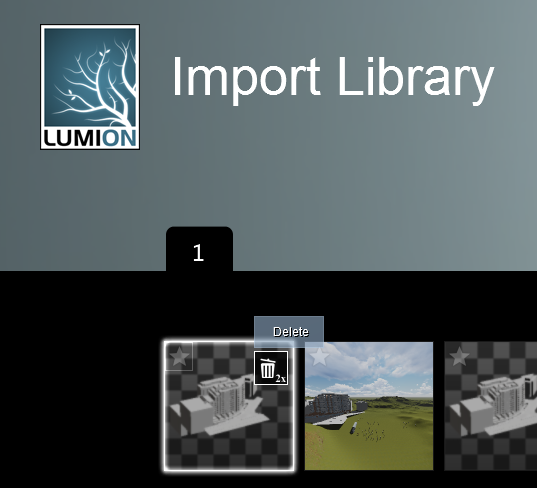
To delete models, you can remove them directly from the library and they will disappear from all scenes that they are currently placed in. However, you can also delete the model only in the scene you are currently working on, and it will remain available in the library for use in other scenes:
Children´s hospital with more than 15,000 plants and trees
Summary of Lumion 5.3
In review, let’s consider some of the questions raised at the beginning:
Q. Is using an additional presentation package, like Lumion, worth it? A. Yes, it would be very difficult for plain Revit to deliver the same speed, quality, and content
Q. Will it result in a better visual result? A. When it comes to real-time scene export, a Lumion visualization can be much more alive and animated than a Revit equivalent. You can also easily deliver your scene as a selection of high quality images, or as a rendered video.
Q. Will the performance be acceptable? A. Yes, provided you have a decent CPU and graphics card (refer to requirements above)
Summary of each section:
Download, Installation and Deployment – 7/10, necessary to manually install addin
Workflow (BIM friendliness) – 8/10, support for updating changed models
Performance – 8/10, much improved in more recent versions and fast export to DAE
Quality of Output – 9/10, smooth and appropriate for the visual style
Real-world applications and Case Studies – 9/10,
(see links above to see how companies are using Lumion)
My overall software score for Lumion 5.3 is 9/10.Its definitely worth a look if you do any kind of presentation work with 3D models!
In a future post, I want to look at the large-model workflow from Infraworks to Lumion via FBX. Other links, tips and resources
Important notice:
If you migrate your work from earlier Lumion versions take into account that the material system has been changed in Lumion 5. This requires you to re-apply the materials to your objects.
Tips
If you select option “Skip Interior Details” then these Revit Categories are skipped:
Casework
CommunicationDevices
DataDevices
DuctTerminal
ElectricalEquipment
ElectricalFixtures
FireAlarmDevices
Furniture
FurnitureSystems
GenericModel
LightingDevices
LightingFixtures
MechanicalEquipment
NurseCallDevices
PlumbingFixtures
SecurityDevices
SpecialityEquipment
TelephoneDevices
How to delete objects? You delete imported objects by using the Imported Objects Library. It cannot be deleted from the Library if you have a scene open and using that object, so first clear and start a new empty scene.
Then in Build Mode click on Import button –> Change Import Object –> locate your object to delete and doubleclick the Rubbish bin. That will permanently remove the object from the library and the files.
from here
Editorial note: “In the interests of editorial disclosure, I would like to note that this review was completed with some financial consideration from the developers of Lumion. Luke Johnson”
Information related to older versions
I have been familiar with Lumion for some time. A full scale Lumion review has been on my radar for a while, but like anything, it takes time to have a proper look at a piece of software.
My past experiences with Lumion had been hampered by less-than-stellar hardware. You really do need a decent workstation to have a fluid and productive time with Lumion. In my case, my new workstation at Virtual Built has 64gb of RAM, a 6 core (12 hyperthreaded) processor, and a Quadro K4000 video card.
I’ve had a chance to work with Lumion rendering software tonight and a Revit model. Lumion is very impressive. http://t.co/UiUJSIxUd6
— Brian Myers (@BIMfacts) August 10, 2013
When it comes to Revit visualization during early design phases, in the past you had to pick from one of these options to add Entourage to your presentation:
Use RPC and re-Render the view everytime you want an output, or
Export or Render a view as an image file and then open it in Photoshop to add extra Entourage.
But now, there is another way…
This new way allows you to leverage your current RPC library and modify the visual style or “look” of the Entourage families. In turn, this makes the use of your current RPC content much more flexible, and more applicable to the constantly changing, day-to-day design iterations (and visualizations) that Architects and Designers are required to produce.
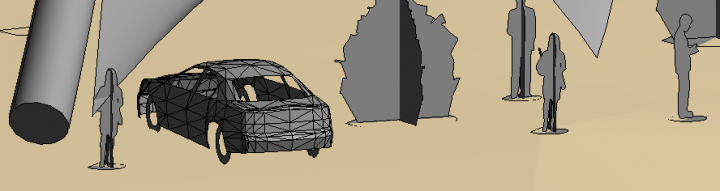
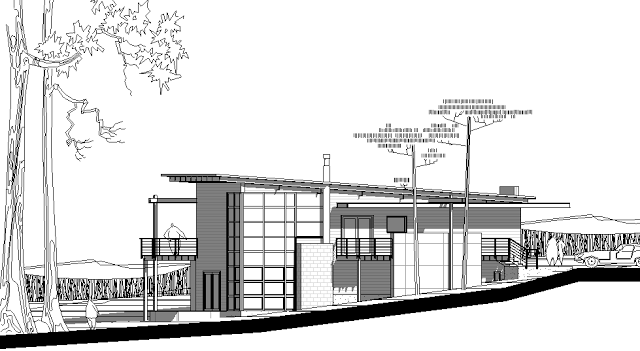
In other words, we can take something that looks a bit like this:
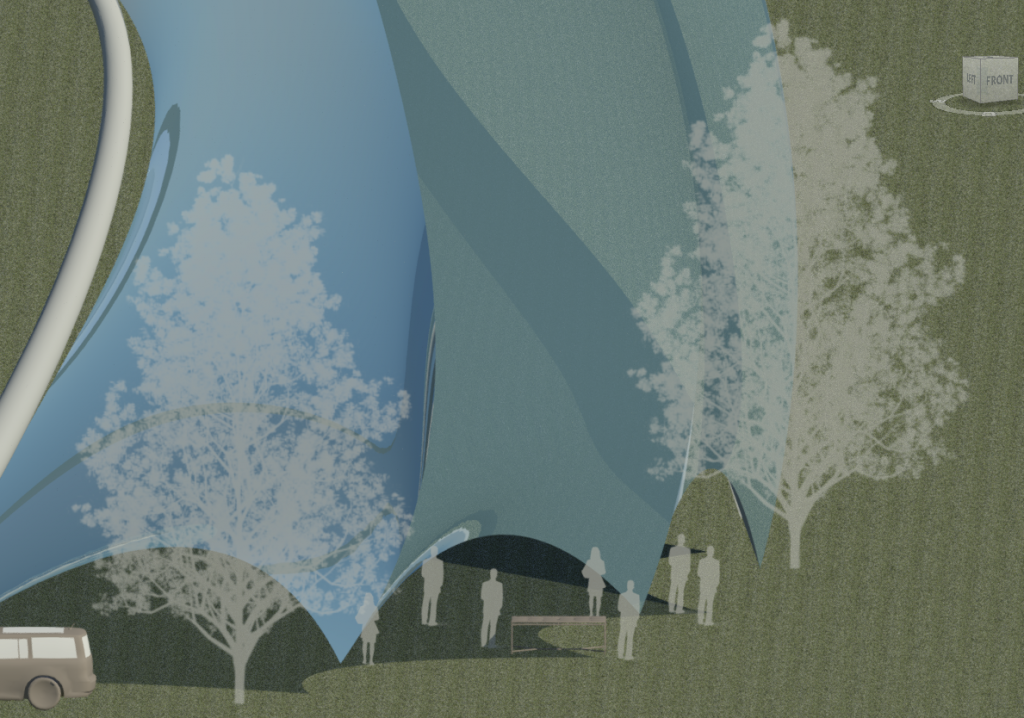
And make it into something a bit more like this (Stylized Textures mode):
Archvision are the guys behind RPC technology – that’s the tech that allows you to add photorealistic people, trees and entourage to your Revit renderings. Recently, they released a new addin for Revit called Entourage Workshop (I previously posted about this back in November 2014). It is built to work with content downloaded using Archvision Dashboard, which is a paid offering that can manage, search, download, create and load photo realistic families into your Revit model.
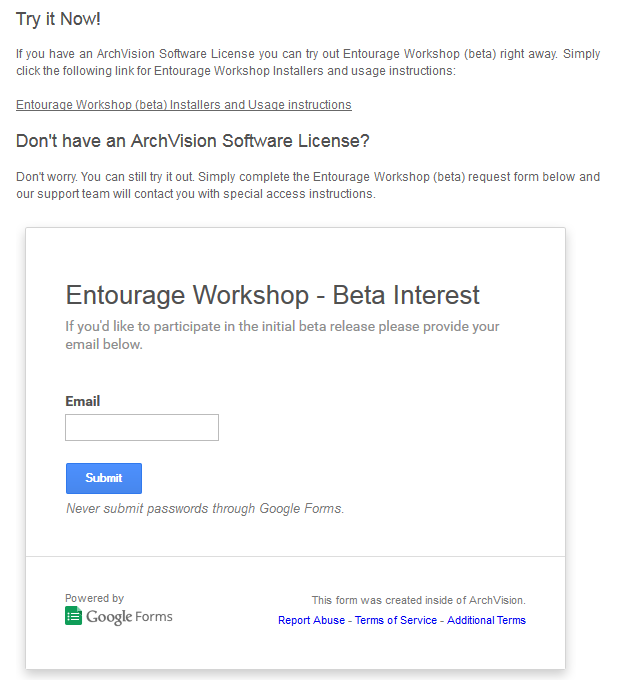
I recently had a web meeting with Archvision CEO Randall Stevens, and we agreed to make you all aware of a special opportunity related to Entourage Workshop. Basically, Archvision is willing to give you access to their very powerful Dashboard, along with Beta access to the Entourage Workshop. All you need to do is go to this page, scroll down to Don’t have an ArchVision Software License? and enter your email address. The guys over at ArchVision will then issue you a temporary license of Dashboard to use while you try out Entourage Workshop.
Now here is something to keep in mind… the more you use the Dashboard and beta Entourage Workshop features, the more likely it is that you will be able to retain your ‘free’ access for a longer period. If you don’t use your license, you may lose it 🙂
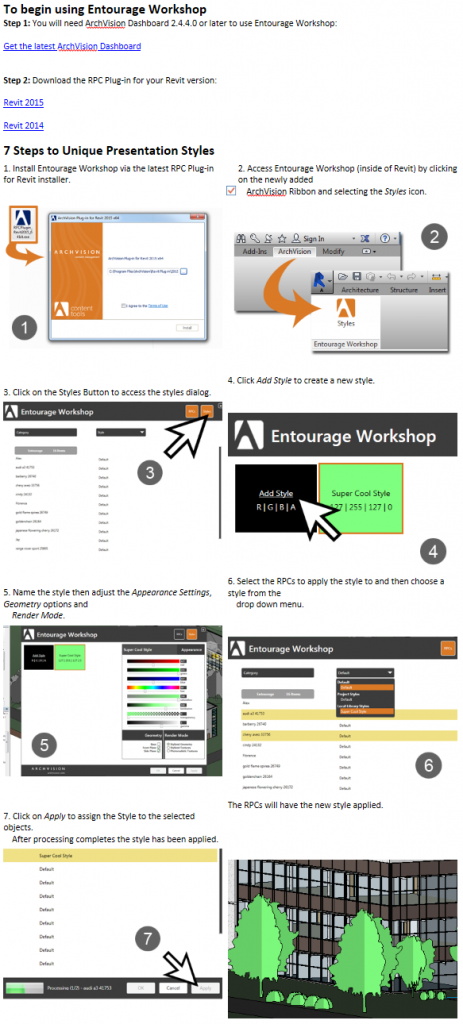
How to apply styles to your Entourage in Revit:
Install Archvision Dashboard and Entourage Workshop
Open a project
Place some RPC using Archvision Dashboard
Start the Entourage Workshop addin from the Archvision ribbon
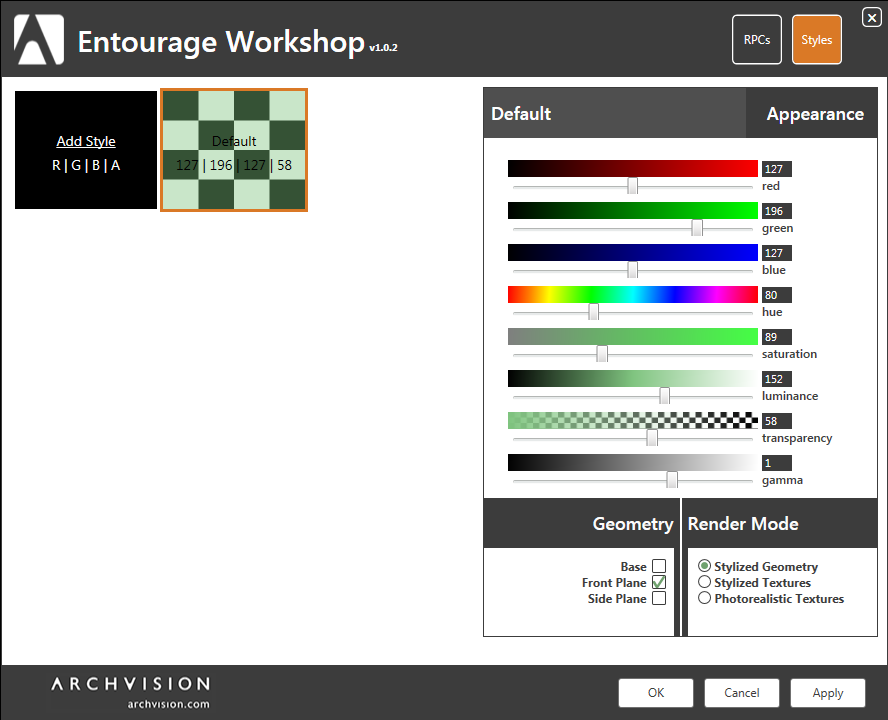
Click the Styles button at top and add a new style
After you add style, click in the Name area at the top of the color sliders and give it a descriptive name, then click Apply
Click on the RPCs button at top and apply that style to selected Entourage families in your current project
Switch to a Revit view and change to an appropriate display mode (Shaded, Consistent Colors, Realistic etc)
Short list of tips, tricks and features:
you can now have non-rendered but still “stylistic” presentation views using RPC Entourage (Shaded Mode, Consistent Colors etc)
it won’t work without a Archvision Dashboard license
“Gamma” slider gives a level of brightness control directly over Entourage RPC that was not available before
Geometry tick boxes – you can easily turn off base and one side view of the ‘placeholder’ representation
In the UI you need Apply after making the Style, then apply to items after pressing the RPCs button
Silhouette textures will face the Camera. This is when you take a rendered photo representation and override it with Transparency, effectively ‘ghosting’ it
If you want to create Style definitions and pass your Styles.xml file to someone else you can do that too. The Styles.xml file should reside in your local profile AppDataRoamingArchVisionEntourage Workshop directory. The easy way to get there is to type %appdata% in your Windows Explorer and it will jump to the roaming directory where you can then browse to ArchVision and then Entourage Workshop.
If you do use a silhouette style, you can trial various Line colours for the Entourage by Overriding the Projection lines by category or element
If the Photorealistic Textures radio button is used, then only Transparency and Gamma modifiers will apply
Some current limitations: – the ‘placeholder’ geometry does not automatically face the camera (although the rendered representation does, and you can still manually rotate the family to get it facing the direction you like – only works on Entourage that is RPC based (not geometric) – does not work with Autodesk Cloud Rendering (yet) – currently it only modifies Entourage Category representations
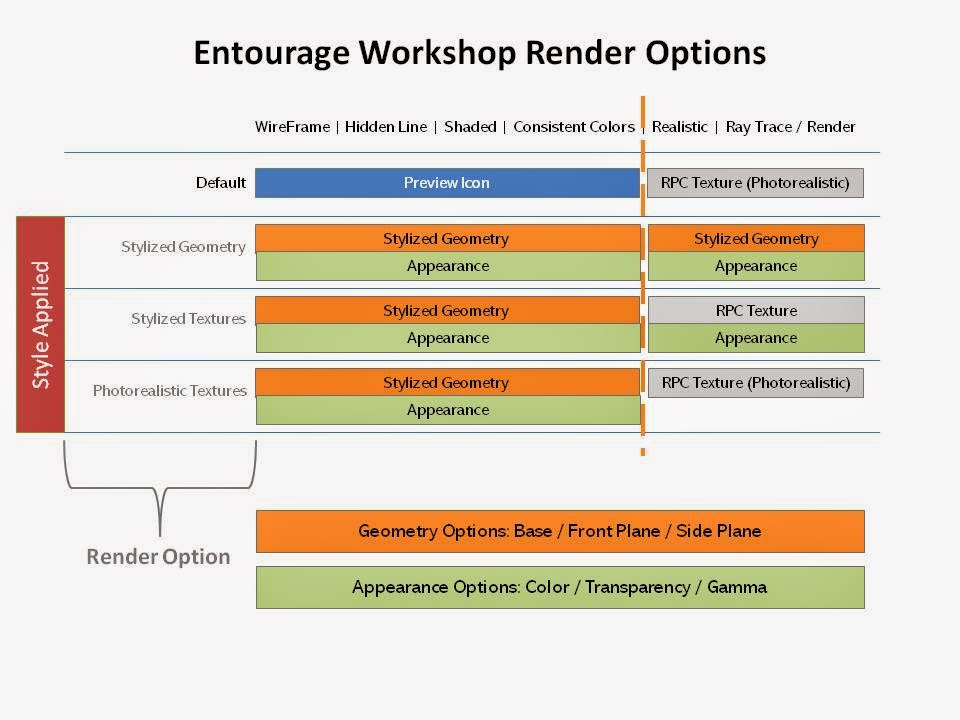
Here is a matrix that describes how the various Revit display modes are affected by the Render Mode options in the Style definition:
Here is a demo video:
And here is a step-by-step from Archvision to use as a guide to get you started:
From MRUG: You can download the back catalog of video Revit tips and tricks from both the Manchester and Midlands (now wound up) Revit user groups from prior to meeting 8. After meeting 8, tips and tricks are uploaded on an individual meeting basis. Videos are not narrated Tips and tricks archive download (586mb)
There is lots more good stuff, videos and presentations on many Revit topics including Adaptives, Revit Standards, Revit and Construction and more at the main events page: Manchester Revit User Group – MRUG
I’m honest enough to admit that Revit has the unfortunate reputation as a tool that is “bad” for presentation. Happily, BIM After Dark aims to correct that – by making all of us better at using Revit for a variety of presentation tasks.
BIM After Dark is essentially a training video series prepared by Jeffrey A Pinheiro, who many of you know as the author of the excellent, long-standing Revit blog The Revit Kid!
I had the opportunity to preview this video series prior to its release, and I must say I am impressed. Firstly, I’m sure you all realise that as good as Revit is, we still need to use other tools for certain presentation tasks, the foremost being Photoshop. It’s great that Jeff covers the effective use of Photoshop in considerable detail, and provides task-specific and industry-specific tips that will give you a real head start over the competition. Jeff covers some truly advanced, unique methods, and at the same time he includes some basic stuff that will help you if you are just starting out with Revit.
The plethora of included content and samples are also of very high quality, so if you can get access to them, I recommend that you do so. It includes texture, background and entourage images, Revit library files and some Photoshop PSD files too.
Here are some examples of the tips and workflows covered in this series:
how to override the Shaded representation of RPC trees
70 50 20 method for shadows (I guess the old 10 6 10 is superseded now)
overlay method in Photoshop for images, such as section perspectives (“multiply”)
comparing 2am rendering quality for local vs cloud
“core” method for quick interior context
panel sized bump mapping for realistic glass
“screen” layer overlay for lighting rays (combine with various blurs to increase effect)
using the burn tool for ambient occlusion of entourage
These are just a few reasons why you should check out this new series. If you are serious about using Revit for presentation, BIM After Dark will definitely be worth it for you.
Jeff mentions he doesn’t quite understand something that happened with site cut pattern – this was because the extra bit of the puzzle is the “poche” setting in Site Settings
you can right click on the ViewCube to quickly align a 3D Persective view to a normal Section view
One of the main gauges of architectural space is a man. The proportions of his body serve specific module, significantly affecting the size of a work of architecture, its elements and in general on all subjects.
Robert Shamilevich, author of the blog Art Architecture, provides the following free Detail Component packages for download. Each link is a RAR file with multiple Detail Component families inside. These Detail Components may assist you in presenting your drawings, and in giving them some sort of understandable scale:
While you wait for the recording to be published by Autodesk University, grab our presentation, handout and the dataset which includes numerous examples of entourage, analysis, annotation, site and other content as well as hours of fun deconstructing the settings to work them into your office’s best practices. Enjoy and let me know what you think…
Many of you already know how to export a combination of differently styled images from Revit and then combine them in Photoshop to create something really interesting.


