Sometimes you may want to use a Door or Window family that is not hosted by a particular wall.  That way, if the host wall is deleted, the unhosted component will still persist.  Here’s how:

  1. New – Family – Generic Model
  2. Draw something
  3. Family Category and Parameters – change to Door or Window
  4. You may wish to set to Work Plane Based (so you can schedule by Level)
  5. Save
  6. Load into project
  7. ‘Door’ command – you can choose your unhosted Door family, but it does not need to be placed in a wall.  It can ‘live’ independently.

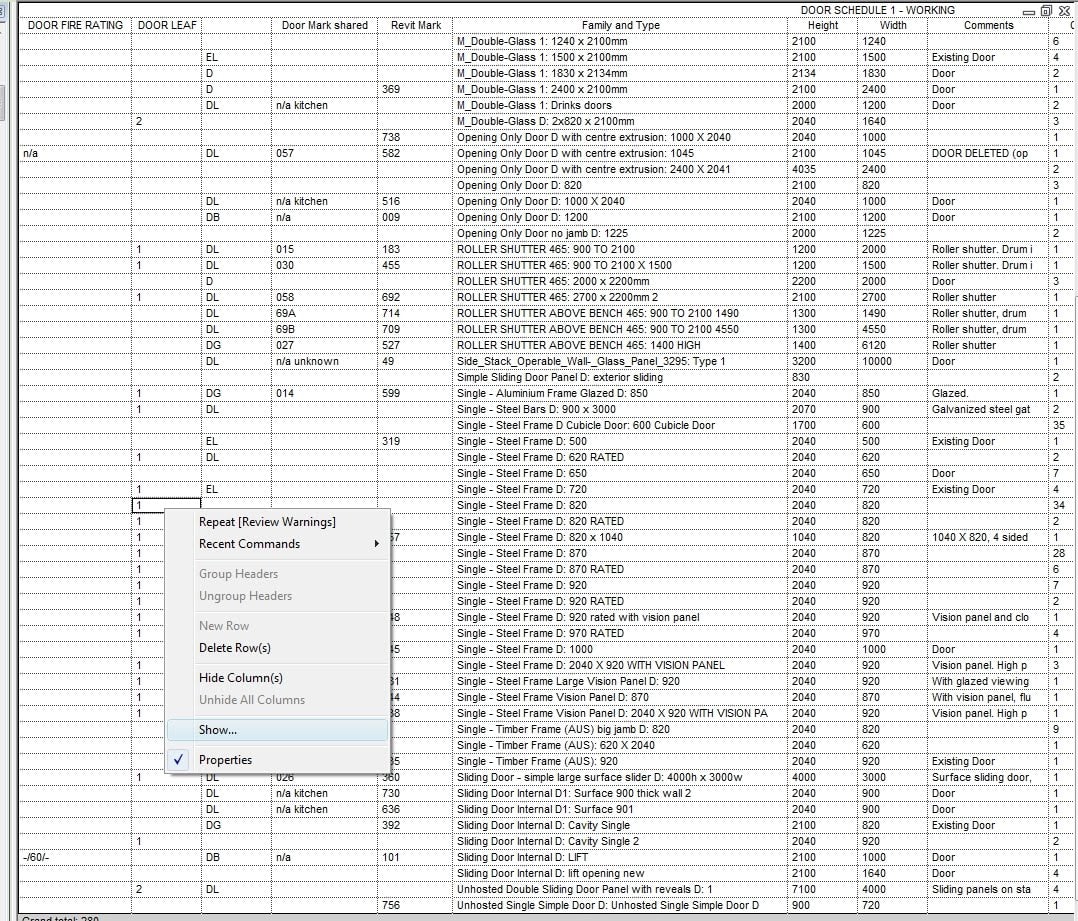
These unhosted components can be useful if you want to retain schedule information for a door that has been removed from the project design.  You can make an unhosted door that only has a few invisible symbolic lines in it – nothing that will print, but it will still schedule and can have a Description like “Door deleted from Construction Set”.

Embedded Schedules allow you to display both Room or Space data AND Data on Components that are living in those Rooms or Spaces.  Quite powerful!  They are technically only allowed in Revit MEP, not in Revit Architecture…

However…

If you using RAC and you want to use an Embedded Schedule:

  1. Open your RAC RVT in Revit MEP (if you are a Suite user, you probably already have it installed, otherwise you can install a Trial)
  2. Add an Embedded Schedule (this feature shows up as an extra tab on the Schedule creation / properties dialog for Rooms and Spaces)
  3. Ensure that you format it correctly, because RAC won’t allow you to make any changes to the ’embedded’ part of the Schedule.
  4. Save, and re-open in RAC.
  5. Your Embedded Schedule is still present in Revit Architecture:

For more information on Embedded Schedules, check out:
Applied Software Blog: Embedded Schedules in Revit MEP

There is a way to link Excel data into Revit, and retain the ability to ‘update’ that data when it changes.  Essentially, it involves using AutoCAD as a middle-man to get the job done.  In simple terms:

  1. Link Excel into AutoCAD DWG
  2. Link DWG into Revit

When you want to update the Excel spreadsheet in Revit, you have to:

  1. Save Excel spreadsheet
  2. Open AutoCAD DWG and update Data Link
  3. Save DWG file
  4. Reload DWG link in Revit

This all works surprisingly well.  Check out the video below as a demonstration:

Here is a little diagram of the concept:

Process via
RevitCity.com | Importing Excel into Revit

In words:

  1. Save Excel File
  2. In AutoCAD – Insert – Data Link – new Excel Data link
  3. TABLE command
  4. From a data link – select Data Link, Ok
  5. Use 0,0 as insertion
  6. Save DWG file
  7. New Drafting View in Revit, link the DWG in Origin to Origin
  8. Its a two step update process whenever you change Excel.  Save, in AutoCAD / update link, Save DWG, in Revit – reload. Done.

As you may have realised, you cannot add the Area parameter to a Floor Tag annotation.

Here is a workaround:

  1. Make a Floor Schedule with Area and Comments fields added.
  2. Filter By – Comments = the Comments of the Floor you want to tag (this needs to be a unique entry).
  3. Turn off Headers, Grids etc in the Schedule Appearance.
  4. Hide the Comments field in the Schedule.
  5. Rename the Schedule to something like:
    Floor TAG – Deck Area
  6. Drag and drop this Schedule a.k.a. Tag onto a Sheet, on top of the Floor in question.

OK, I understand that this is not the most manageable or elegant solution, but it may be useful in certain situations.

Martijn de Riet has pointed out something very useful when you are trying to use a Calculated Value to pull together a bunch of similar-but-different parameters.  If you come across an error, don’t forget about the ‘Add to all elements in the selected categories’ check box in the Parameter Properties dialog.

The Problem:
When you create the first (window) schedule you’ll notice a whole bunch of width parameters, all referencing the total width of different windows (fig 1)
After creating the schedule you figure: let’s create a “scheduled width” parameter which adds up all those separate width parameters. This way you can clean up your schedule (fig 2). Only to find that it won’t calculate. In this case, the family “ontwerpraam doesn’t have the parameter “breedte_vo” so in the schedule it returns no value. Therefor, the total cannot be calculated (fig 3).

The Solution:
Open the schedule properties, go to the Fields Tab, select the parameter causing problems and click Edit.
In the Parameter Properties, check the checkbox “Add to all elements in the selected category”, select the category “windows” and choose whether it should be an Instance or Type Parameter (fig 4).
The parameter is now accessible in the schedules, even with the families it’s not actually in. You can now fill in a value and the Scheduled Width parameter will calculate properly (fig 5). It will even show up in the family’s properties (fig 6).

The Original Forum Post:
Push parameters in the project environment

Thanks Martijn de Riet!!

Here’s how:

  1. Make sure each link has a ‘unique’ family with a ‘unique’ Mark parameter.  For example, put a Sprinkler family with a Mark of 1234567 into each RVT link.
  2. In the ‘Site’ RVT, create a Sprinkler Schedule.
  3. Tick ‘Include elements in linked files’
  4. Add parameters –
    RVT Link:File Name
    Mark
    Count
  5. Filter by Mark = 1234567
  6. Sort By
    RVT Link: File Name
  7. Untick ‘Itemize every instance’.

The Count field should be showing how many of each RVT Link you have in the project.

I had a bit of a problem using Revit OOTB (out of the box) parameters to group sheets by Revision, so I did it super-quickly using a custom parameter.

Here are the steps:

  1. Add a new custom parameter to sheets, such as ‘Sheet Revision Group’ or similar.
  2. Open a schedule that shows the Revision you would like to group, and add this parameter to the schedule.
  3. Modify the custom parameter on all the sheets to match the Revision (you can do this quickly by toggling the ‘Itemize each instance’ tick box).
  4. Now you can easily use this parameter to group your sheets by the Revision.

Please note that this technique forms a ‘break’ between Revit native revision data and the custom parameter, so only use this technique if you understand this issue.

I have provided a quick video of the technique:

Did you know that you can select multiple objects with similar properties using a Schedule?
You may say “well, I can just use ‘Select All Instances’…”
However, what if you want to select objects that are not exactly the same, but can be grouped similarly in a Schedule?
Its very simple.  Just set up the schedule with the Grouping you desire, then pick on the row of grouped objects you want to select.  Use right-click — ‘Show’.
Revit will select all the objects that were on that row of data.
Pretty cool huh?

You would likely agree that the Text tool in Revit still leaves a lot to be desired, not least of which would be some decent bullets and numbering features. No doubt most of you are using Key Schedules to get around some of these limitations when creating note blocks (as described in this PDF from an AU class).

However, are you aware that you can put symbols into Revit schedules? The easiest way to described how this works is to use the Character Map. To access the Character Map, go to Start-All Programs-Accessories-System Tools and open Character Map. I have created a link to the Character Map in my Quick Launch toolbar.

So how does this thing work? Well, let’s say you are using the Arial font in Revit. Select Arial in the Character Map. Now, have a look through all these different symbols. When you find one that you like, click on it, click ‘Select’ and then click ‘Copy’. Now, go into a Revit schedule or text box that is formatted with the SAME FONT (ie. Arial) and Paste (using Ctrl+V is easiest). There you go, you have a nice symbol to play with!!

The quicker and easier way is to use the inbuilt hotkeys. For instance, to add a ‘squared’ (little superscript 2) symbol, just hold down Alt and press the keys 0 1 7 8 (just type the numbers one after the other while holding Alt). You can find out which keystroke to use by looking in the bottom right corner of the the Character Map (see below).


There are quite a few things you can do once you know how to use this. See below for a Key Schedule I made with a ‘column’ containing a rightways arrow symbol.

This is one of the most exciting blog posts I have read for some time:
http://revit.blogspot.com/2010/03/accessing-project-parameters-in.html from Jay Polding at revit in plain english.

Essentially, in any schedule you can actually add Project Information parameters. This includes Sheet Schedules, Component Schedules and Material Takeoffs, but not Note Blocks. All you need to do is tick the ‘Include Elements in Linked Files’ box to expose the ‘Project Information’ option in the dropdown list. And when you add custom Project Information parameters, make sure you tick ‘Instance’ in the Parameter Properties box (otherwise you won’t see Project Information as a possible category for your new parameter).

My brain is starting to tick over as to possible uses of this in filtering and calculation… You could use it to set a provisional unit cost for flooring, use the parameter in a number of different cost schedules, and then 6 months down the track if the cost changes – you only have to change it once, in Project Information!

You could filter all of your schedules with a Yes/No Project Information parameter, lets say for ‘optional building elements’, and when the Client decides they don’t want them – just untick the box in Project Information and all the schedules hide all of these optional elements. That is cool!