Paweł Romaniuk has shared his workflow to take various parameters from a model, run the necessary algorithms and then write the area back to a parameter for use in a Revit schedule. Link to pdf download is below… Thanks Paweł.

UPDATED Download link:

Dynamo_Duct_Fittings_Calculation_V.0.1

Download:

https://www.dropbox.com/s/r1slk1sbo1eo971/Dynamo_Duct_Fittings_Calculation_V.0.1.pdf?dl=0

via
Revit MEP Dynamo – Duct Fittings Calculation | LinkedIn

Revit deals in realities.  The reality is, many Rooms are not rectangular.  So we can forgive vanilla Revit for not having a built in tool or method that could only really ‘guess’ at X and Y room dimensions for irregularly shaped rooms.

There are two workarounds that I think can be useful:

  1. A Room Schedule that calculates X and Y dimensions for rectangular rooms only
  2. A Model Family with built in nested annotation labels that needs to be manually stretched and updated to the assumed X / Y dimensions of the Room.  Just place the family and then adjust the grips.

I can’t take credit for the Calculation method.  This uses a formula based on Perimeter and Area to establish calculated values for X and Y room dimensions in a Schedule.  I downloaded an RVT back in 2008 that demonstrated this method — from … somewhere.

Similarly, I can’t really take credit for the Model Family with Annotation Labels idea for the family either.  Daryl Gregoire posted it years ago in a series of videos, and it was mentioned in this post as well.

Download this file to see both methods in action.  Be sure to review both the Floor Plan and the Schedules to see how it all works together.

I chose Casework because it has built in X, Y and Z parameters – meaning I did not have to use Shared Parameters.  I control visibility by placing these Casework families on a secondary Design Option.  You could actually use a standard Casework Tag instead of the built in annotation if you prefer.  The Casework Schedule is filtered by Type Comments, and the other good thing about Casework is that we can Schedule the Room that the Model family lives in.

Feel free to comment, even if you think both methods are a bad BIM idea 😉

Thanks to one of our readers, we have a solution for the schedule precision problem described here.

The comment below the lines gives the formula to convert an Area into a rounded number in a schedule, and the totals work!  Thanks Максим Ашихмин.

Type: Number

round(Area / 1 м² * 100) / 100 – rounding to 2 decimal place
round(Area / 1 м² * 10) / 10 – rounding to 1 decimal place

My previous post:
What Revit Wants: Area Calculation Totals – Rounding and Precision

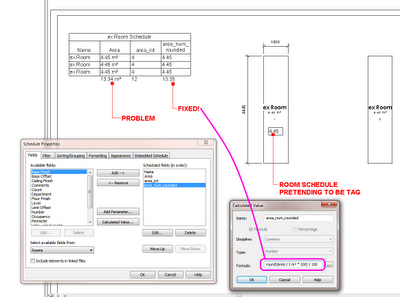
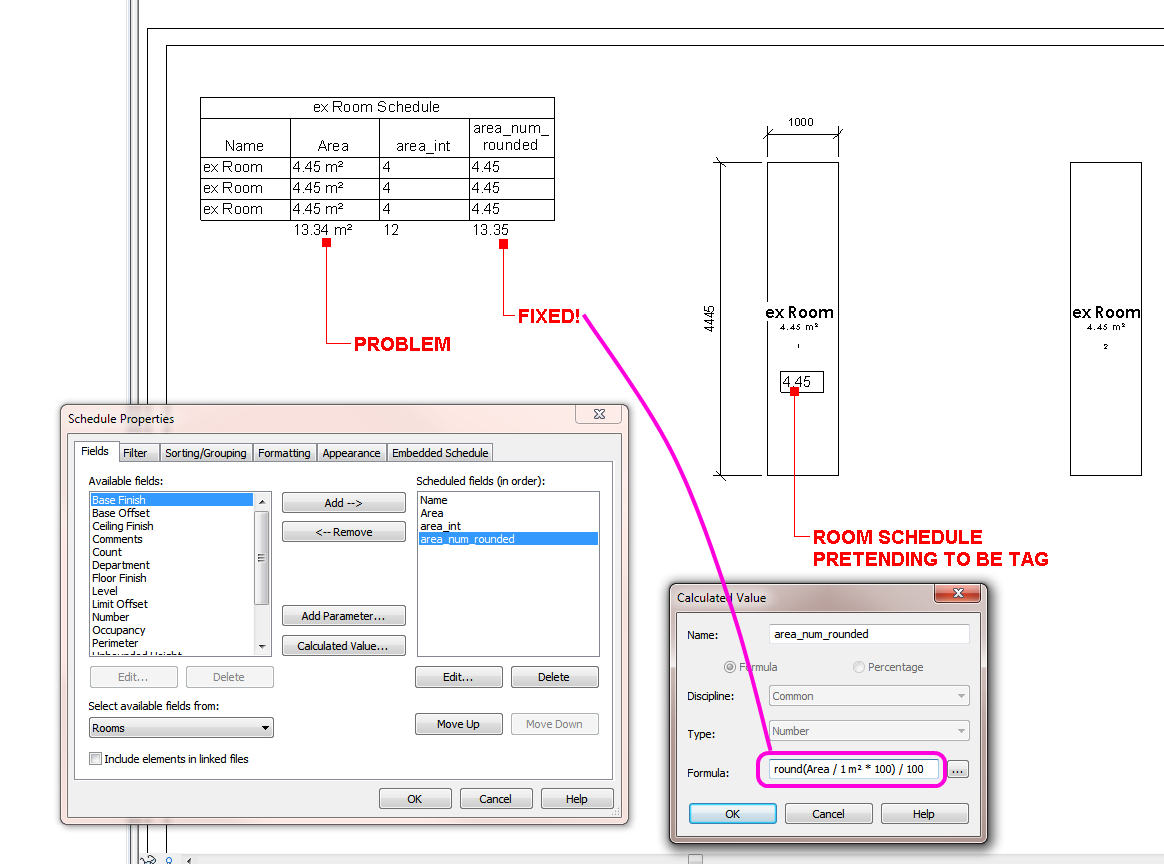
The problem – even when you use Rounding (by changing precision settings in the schedule), the totals are still calculated from the most accurate measurement Revit has available.  So, for 3 areas of 4.4m² Revit says that:
4 + 4 + 4 = 13m²

One workaround is to convert the Areas into Integers (using a Calculated Parameter), and hide the original Area column … still doesn’t exactly work sometimes.  While you get an illusion of consistency, you tend to lose precision.  The reason is that the overall rounding of the figures does not necessarily match the individual rounding of figures.

For example, lets say you have 3 areas of 4.4m² each.  Using rounding to 0 decimal places by using the precision settings, you will get 13m² for the total, but using the integer method above you will get a less accurate but more consistent 12m².

I wonder if a percentage based technique could be used?  It still wouldn’t be ideal, particularly if there were some ‘dumb’ constants that had to be added to Calculated Parameters.

What about you?  How do you solve this precision vs consistency problem?  One obvious way is to simply use more decimal places in your schedule – but then you cannot use the Integer method, and you can still run into the same problem…  For example, 3 areas of 14.45m², using rounding to 1 decimal place:
4.5 + 4.5 + 4.5 = 13.4m²

Download the example file here

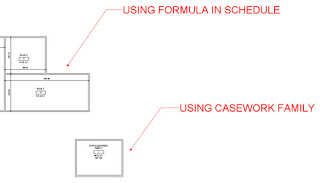
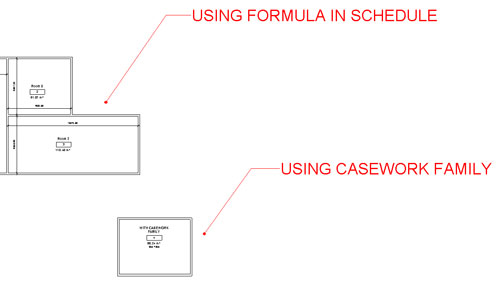
Here is what the Integer method looks like:

Some other info:
It’s possible with ordinary schedules too… There are a few things you need to do:

1. Sort your schedule on the units you want to differentiate on.
2. Add a calculated value, percentage, which calculates the percentage of a single element to the unit total (that’s why you need to sort on units, otherwise you can’t use the unit total in the percentage calculation)
3. Multiply Area by percentage in a calculated value, and check the “calculate totals”
4. Check off “Itemize every instance”. If you did it correctly it now shows proper totals.

This takes some fudging to get it right. If you can’t get it done, post an example. 
via
2012: Total Cost in a schedule – Page 2

Martijn de Riet has pointed out something very useful when you are trying to use a Calculated Value to pull together a bunch of similar-but-different parameters.  If you come across an error, don’t forget about the ‘Add to all elements in the selected categories’ check box in the Parameter Properties dialog.

The Problem:
When you create the first (window) schedule you’ll notice a whole bunch of width parameters, all referencing the total width of different windows (fig 1)
After creating the schedule you figure: let’s create a “scheduled width” parameter which adds up all those separate width parameters. This way you can clean up your schedule (fig 2). Only to find that it won’t calculate. In this case, the family “ontwerpraam doesn’t have the parameter “breedte_vo” so in the schedule it returns no value. Therefor, the total cannot be calculated (fig 3).

The Solution:
Open the schedule properties, go to the Fields Tab, select the parameter causing problems and click Edit.
In the Parameter Properties, check the checkbox “Add to all elements in the selected category”, select the category “windows” and choose whether it should be an Instance or Type Parameter (fig 4).
The parameter is now accessible in the schedules, even with the families it’s not actually in. You can now fill in a value and the Scheduled Width parameter will calculate properly (fig 5). It will even show up in the family’s properties (fig 6).

The Original Forum Post:
Push parameters in the project environment

Thanks Martijn de Riet!!