And some news:

Question from Alaa El Kabbany:
I’m asking if anyone knows how to show the local file path on the revit file interface (like autocad)…..is there a way?

Answer:
Download the Revved tool package from here.  After it is installed, on your Add-Ins bar you can click on ReVVed — Open Folder to access the “local file path” in explorer.

You can download  ReVVed 2011 or ReVVed 2012 or ReVVed 2013 for free. (via PKH Lineworks)

Query via:
What Revit Wants: Revit 2013 Direct Download Links

Also, check out my recommended Revit add-ins on Pinterest.

Top-11-Tips-Tricks-Revit-2013.pdf (application/pdf Object)

Here’s a taste:
3. Need a slope annotation on your ramp in a plan view? It can’t be done without this trick!
Why won’t it work? Okay, I’ll check with the Revit developers… but in the meantime, do this:
a. Open a 3D top-down view (click on the Top of the view cube) showing the ramp.
b. Use the Spot Slope tool to place a slope arrow on the ramp in the 3D view.
c. Select the spot slope annotation. Click Ctr-x (cut to clipboard).
d. Open the plan view. In Modify tab, click Paste drop-down and choose > Aligned to Current View.
e. The parametric slope arrow now exists on the ramp in the plan view!

Thanks to author Trey Klein.

Heads-up and link from betterREVIT:
Where’s my Chair? | betterREVIT


You are going to RTC.  Will it be amazing?  Probably.  But will you get the most out of it?  That is completely up to YOU.  Here are a few pointers.

  1. Drink lots of coffee (in moderation, of course)
  2. Talk to as many people as you can – target the people who you have made contact with online but haven’t met in person
  3. Get your own name out there in conversation – make sure you say something memorable, like “this Rivett program is cool, hey”
  4. If you get bored, go get another coffee

Here is the golden tip – for each session that you attend, make a note of 2 (two) things that you think you can use.  These may be

  • timesavers,
  • ways to customize your Revit environment,
  • online resources you didn’t know about,
  • anything that could improve your personal workflow or your company standards.

But aim for 2 points per session.  More points make it difficult to actually recall and apply them, less and you are not getting your RTC value-for-money.

Have fun!

PS – Feel free to post your own ‘survival tips’ in the comments…

I recently viewed the class 45 Autodesk® Revit® Tips in 45 Minutes (Smith, Chad) on AU Virtual.  It was an excellent class.  Here are two things that I learnt:

You can Tab BETWEEN elements – in other words, select one wall in a chain of walls, then highlight another wall in the chain and press Tab.  Only those walls in-between the two will be selected!

Pre-select when Filtering – before making a Filter, select an element first.  Then go View – Filters – click on the ‘New Filter’ icon.  The Category of the element that you select is automatically pre-selected for the new Filter!

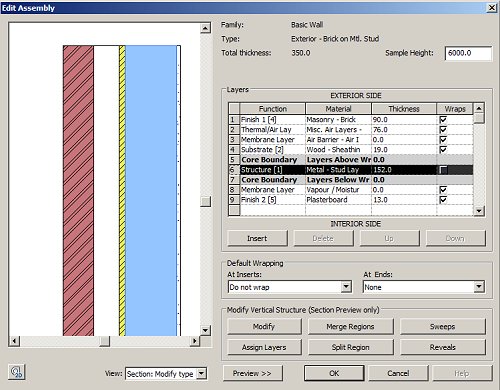
There are some basic rules of Priority, that all compound structures follow, when joining together.

1) The higher priority layers always take precedent. For example, a Priority 1 layer will barge it’s way through lower priority layers in order to join up to another Priority 1 layer.

2) Lower priority layers cannot cut through higher priority layers, during the “clean up process”- they are just stopped by them.

3) The exception to both of the above are layers that fall within the Core boundaries. A priority 2 layer “within the core boundaries” will override a priority 1 later” that is situated “outside of the core boundary”.

Tip via
Walls: Applying Functions to Compound Layers:

Image from Revit Zone