A federated Revit model is a model containing many Revit links, and they can be quite slow to work with. There are a few steps you can take to speed things up, and one of them is creating a set of fast view types and a related view template.
Here’s how:
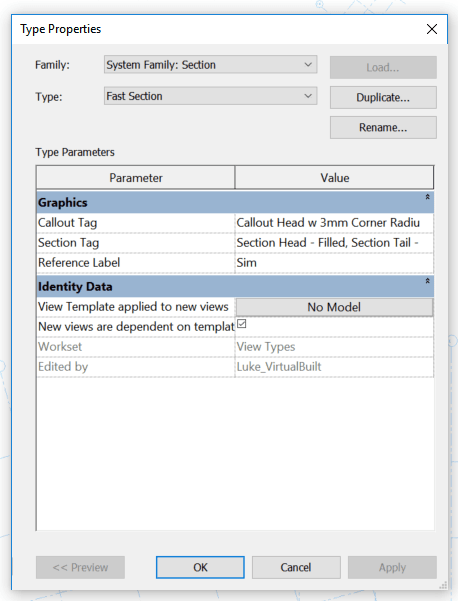
Make a View Template called “No Model” and untick all the Model categories in that Template
Make a set of View Types called “Fast Plan“, “Fast Section” and so on
Set the View Template for those Types to the “No Model” template you created
Now, when cutting sections or making new floor plans using these ‘fast’ view types, the view will generate quickly without any model elements. Then, you can decide if you want to switch view templates / types to something more useful for coordination or documentation.
Ok, two unrelated issues here, but both are along the lines of “weird stuff that happens in Revit that can be fixed but doesn’t always make sense”. If you use Revit long enough, you will certainly come across issues like this…
Firstly, certain Electrical penetration families were not tagging for height when using Spot elevations. These elements were in a model, which was linked into another model. The fix? Super weird one. Try turning on Lighting Fixtures in your View (in the host model). Then, those spot elevations worked… Even though the penetration family was a Generic Model with Nested Mechanical Equipment inside a link file. I’m thinking this one was either an upgrade error, or perhaps the families had some earlier history as a Lighting Fixture?!?
Secondly, I came across a Structural Consultant Design Model in Revit 2015 that doesn’t want to upgrade to Revit 2016. This is due to some corruption inside various families. Here are a few things to try… along with the ultimate solution.
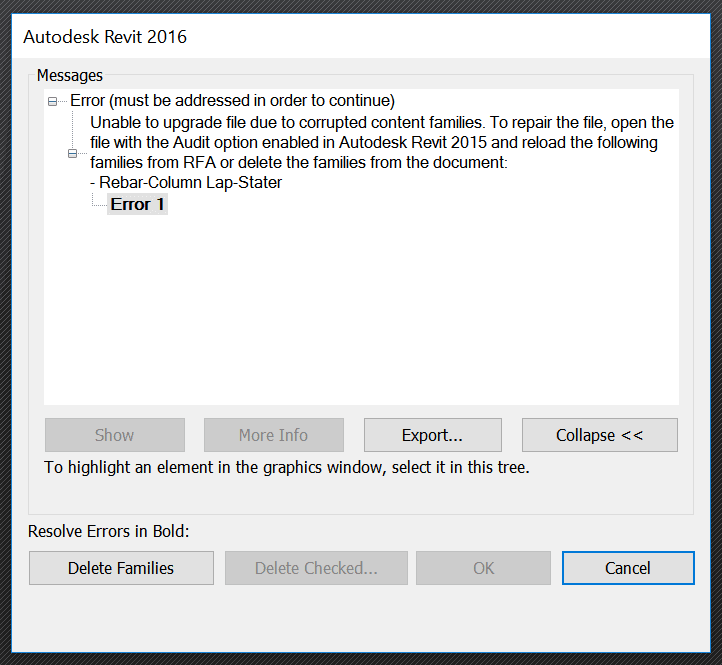
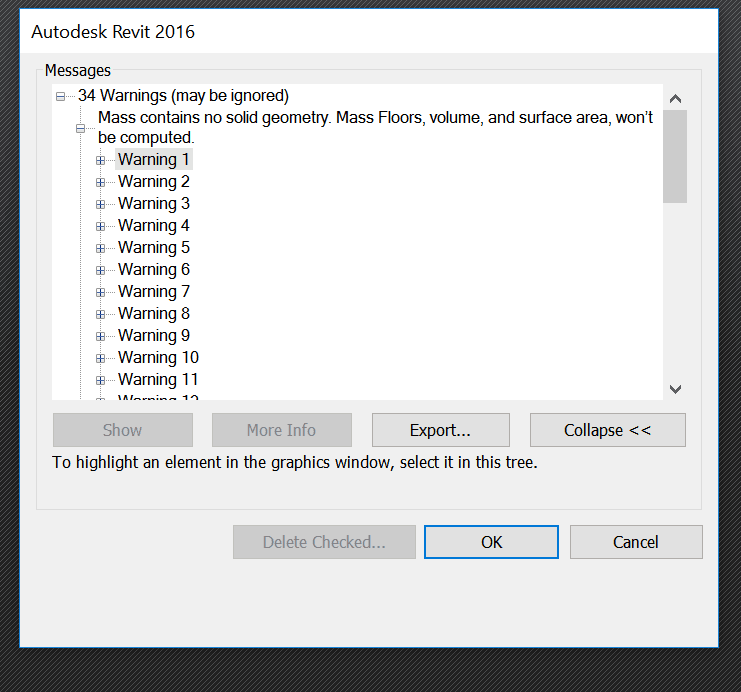
1) Try opening the model in the newer version of Revit with Detach and Audit ticked, and choose Specify from the Worksets dialog dropdown. If the Opening Worksets dialog appears, Close all the Worksets and press OK. Then, Detach and preserve worksets. You should see the Model Upgrade progress dialog.
This fails with the following error: The file cannot be opened. There are too many elements missing in it. Please contact Autodesk Support.
2) Next steps are more detailed and resulted in a successful upgrade:
1. Open in 2015, with Audit and Detach, no Worksets open
2. Save As
3. Open in 2016, with Audit and Detach, no Worksets open
a. Delete families when prompted (as you can see, it is one problem Rebar family)
b.
c. Ok to mass errors:
d.
e. Click to resolve Join errors
f.
4. Save As
5. Setup starting view…
And here are some model tidy-up steps that I did, just #GoodRevit with some Dynamo:
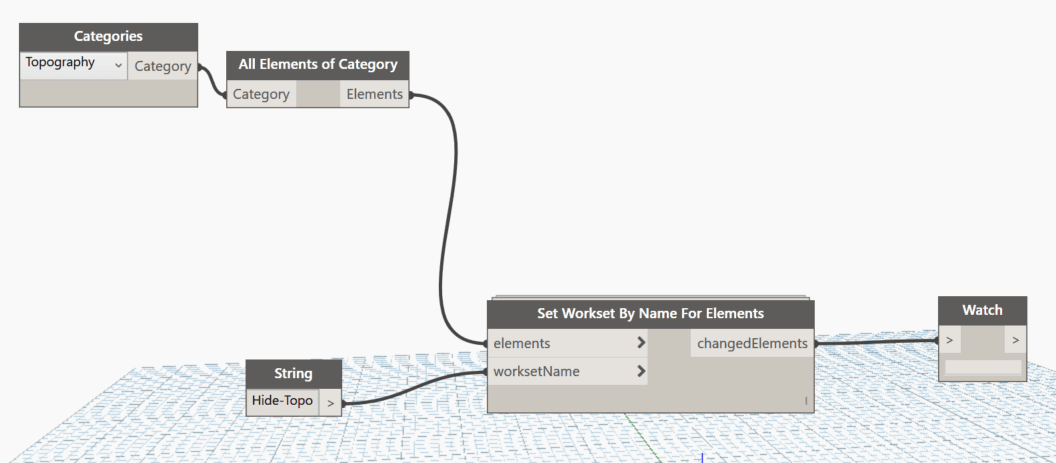
6. Make these worksets:
a. Hide-CADs
b. Hide-Topo
c. Link-Control
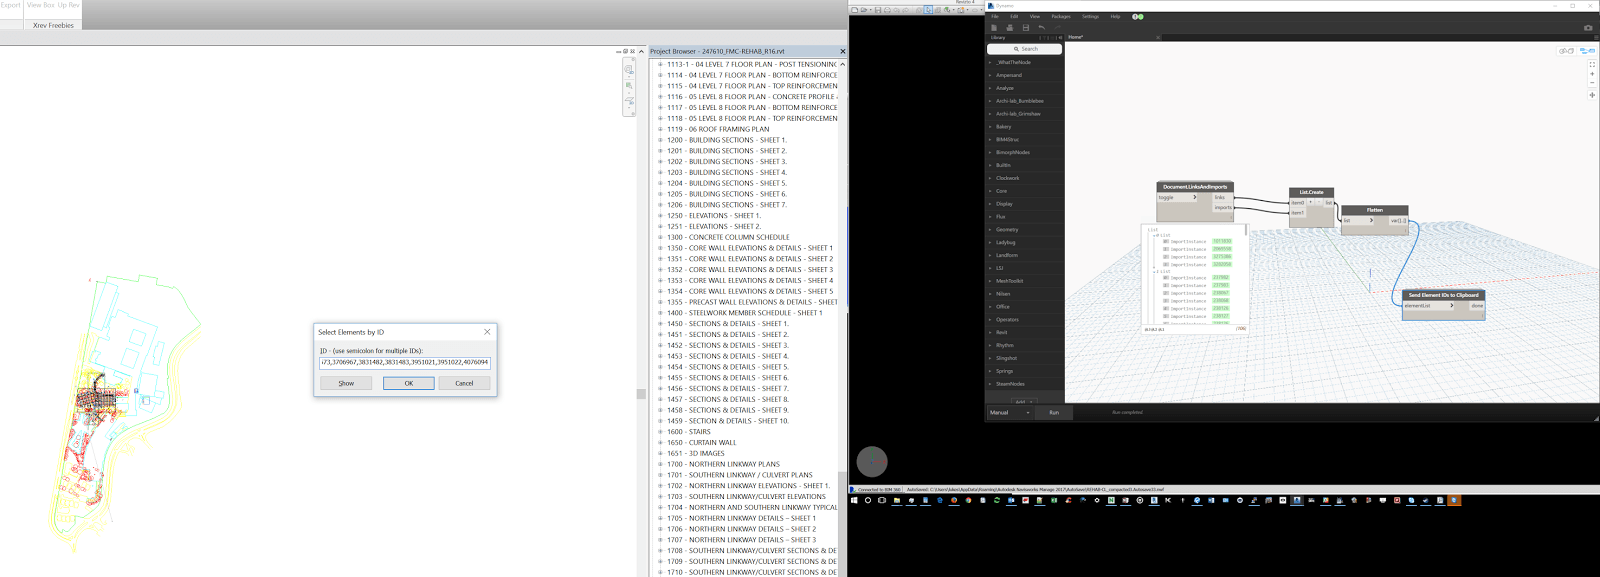
7. Move DWGs to workset by:
a. Getting Ids in Dynamo
b.
c. Group
d. Change Workset
e. Set workset invisible
8. Move Topo to workset and set invisible
9. Acquire Coordinates from Control Model
a. Copy / paste control model from current ST file to this upgraded one
b. Link neutral coordinate file
i. Acquire
c. Then acquire from BMGR control file
d. Save
Finally, sharing with team:
10. Save to Box
11. Open in Fed
12. Glue
Setting up a BIM workstation can take some time. From unboxing to actually being ready-to-work you have to go through various ‘layers’ of installation, like:
updating Windows
installing major software packages
installing addins
installing useful system utilities that speed up your day
In a large, corporate IT environment, most of this is handled by an IT department, and usually these are set up as deployment images. However, in a small or medium office, you may have to do some of this work yourself.
With that in mind, I’m sharing my notes on the steps I took to get my Metabox portable BIM workstation up and running. I may start to put links against most of these steps as time allows, because I have posted about a lot of these programs before. Feel free to comment if you have any thoughts or advice.
Installation Order – from unboxing to System Image:
Windows 10 Pro (preinstalled)
Sign in with a new, temporary, local user admin
Do Windows Update Fix (see below)
Setup E: drive (secondary large HDD, change drive mapping)
Login with Microsoft (personal Id)
Place OneDrive onto E: drive
Change PC name
Move Windows Downloads folder to E: drive
Samsung Magician install – test speed of SSD. Very nice.
Install Office 365 64-bit (work Id)
Login with both Ids
Change OneNote backup storage location to E: drive
Delete previous Windows installations using Disk Cleanup
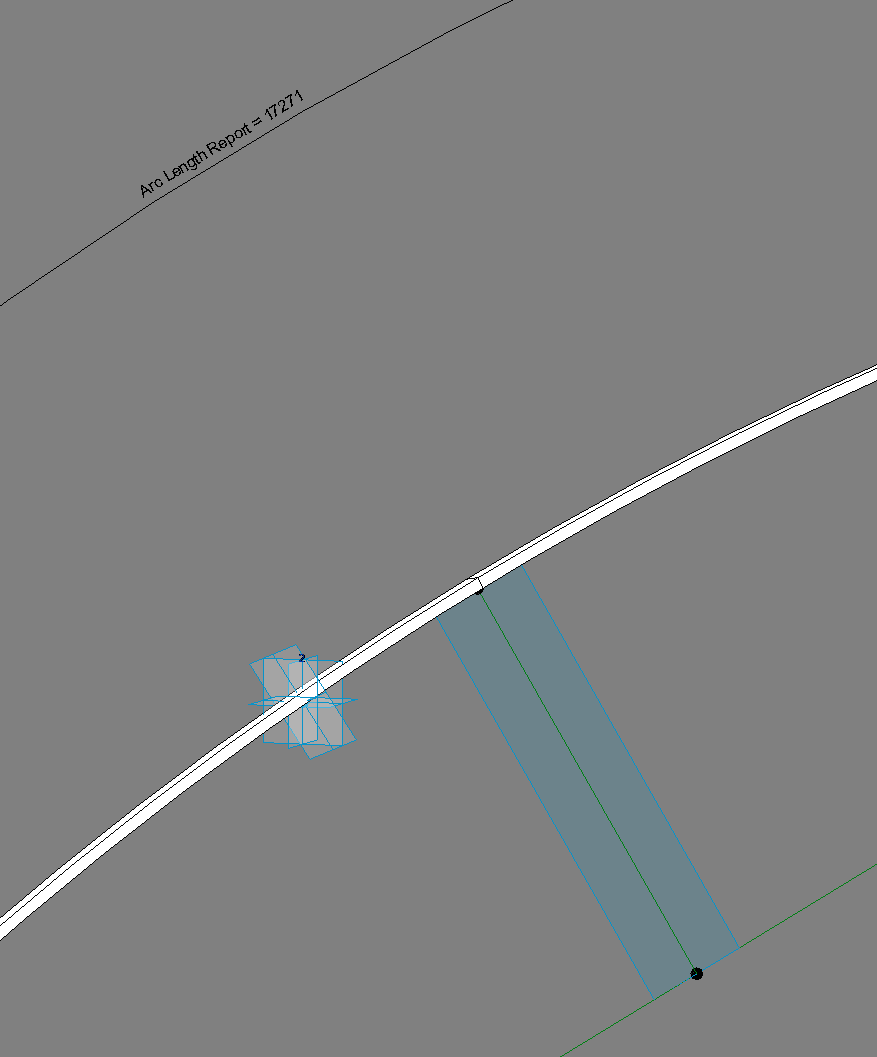
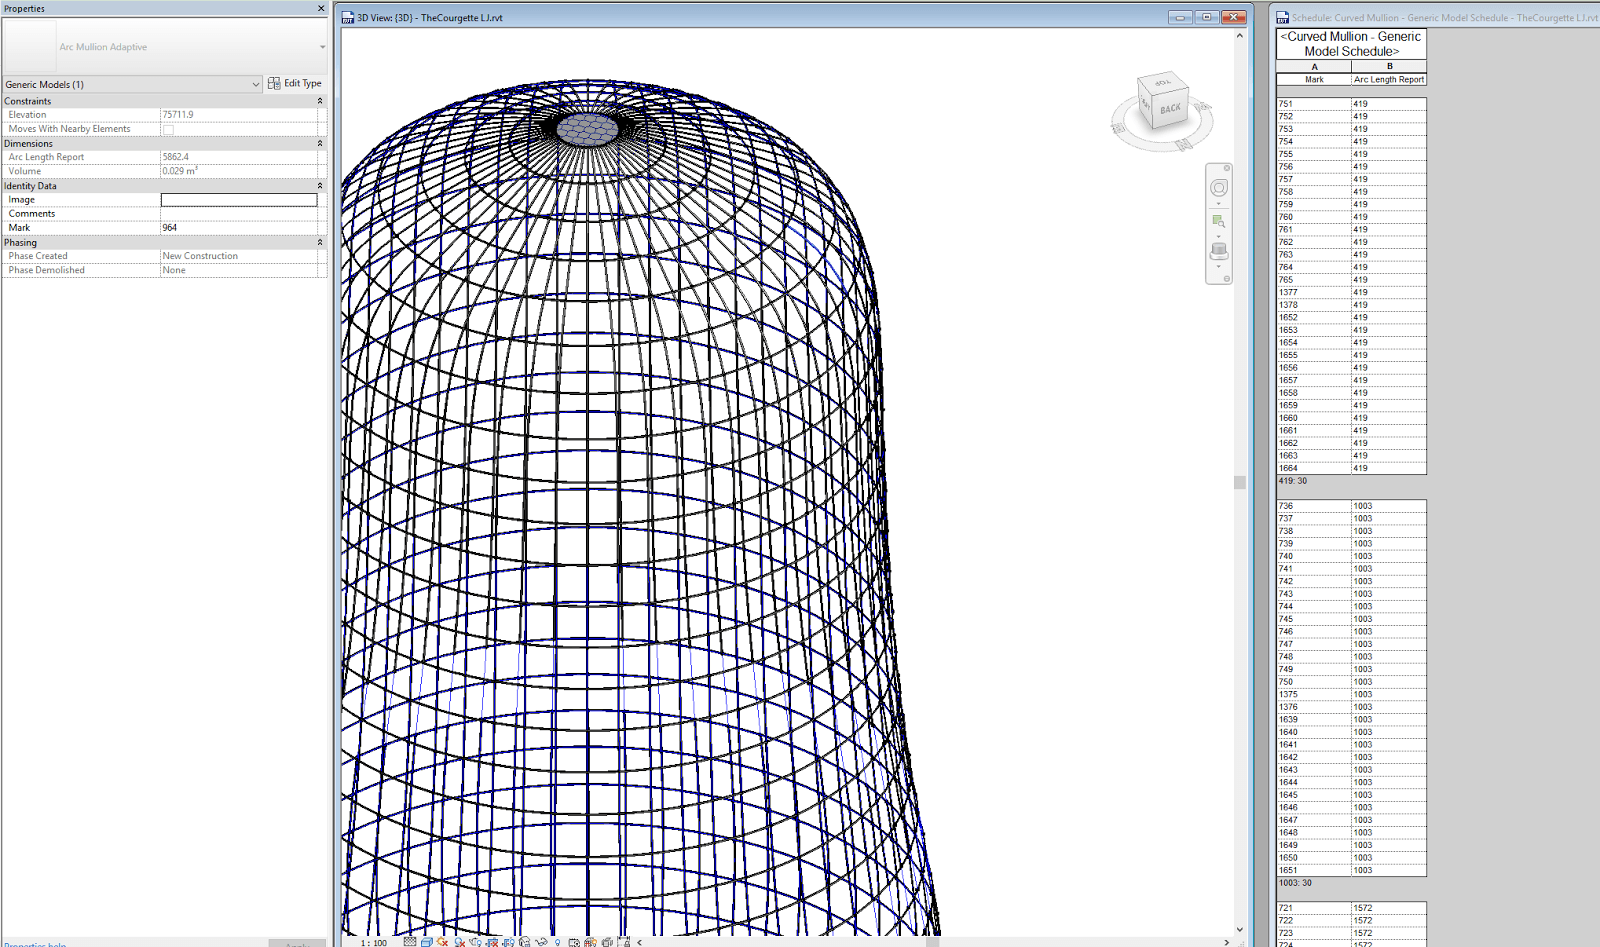
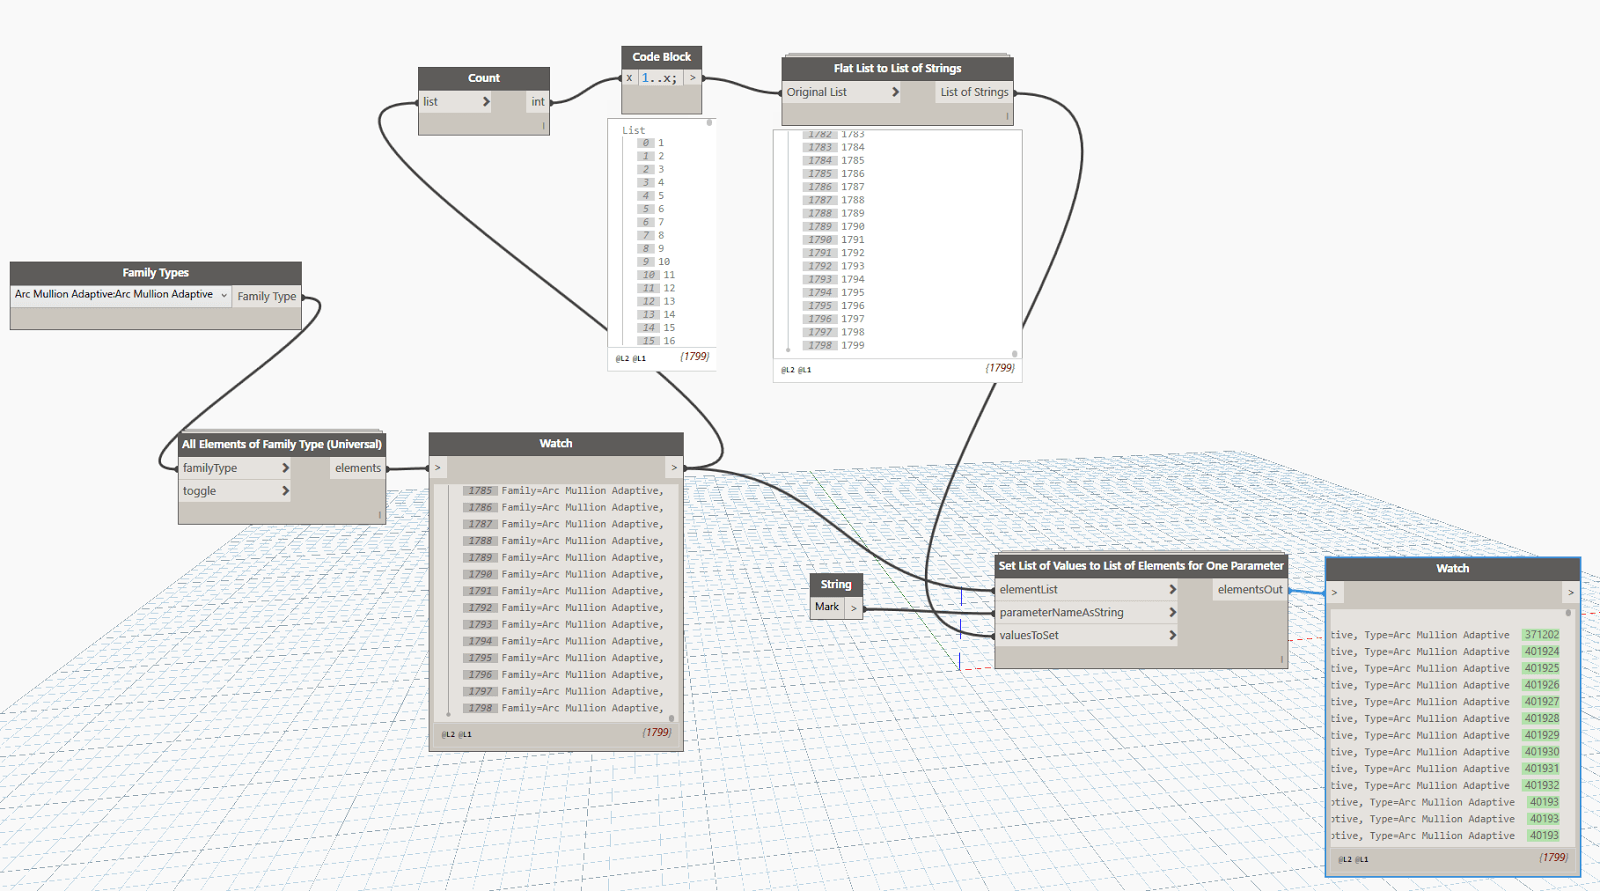
Interesting question raised by Rene Pellicer Garcia on LinkedIn recently: I found that I just couldn’t make real Revit curved mullions (of the right category, schedulable, measurable, etc). Best I could do was a geometry that looks very mullion-like, but can’t schedule it, measure it or quantify it…
It is one of those situations where there are many ways to accomplish the same task, and those methods could include:
Nested that into a 3 point Arc Mullion Adaptive family, and hosted it on the arc reference line
In the Arc Mullion Adaptive, made the main mullion form from the profile and the arc
Created a rig of Reference Lines to host the Arc Length Dimension
Used some hosted points on the Arc as intersected references for the Arc Length Dimension
Made a shared, instance, reporting parameter on the Arc Length Dimension
Loaded that family into the Mass form family
Placed it with 3 point click placement
Selected the Instance and used Repeat command to make it into a Repeater
Did similar for horizontal mullions
Noticed some places where it ‘broke’ – mostly where the Arc Length Dimension flips inside out or goes straight — considered making a ‘straight’ version of the family for these locations?
Made a schedule, filtered by Type Mark, showing these Arc Lengths
For the purpose of Identification, made a quick Dynamo Script to auto-populate the Mark parameter:
I’m sure my solution is not perfect, but it is one way of attacking the problem. It could be finetuned to be more robust and provide a nice modelling output.
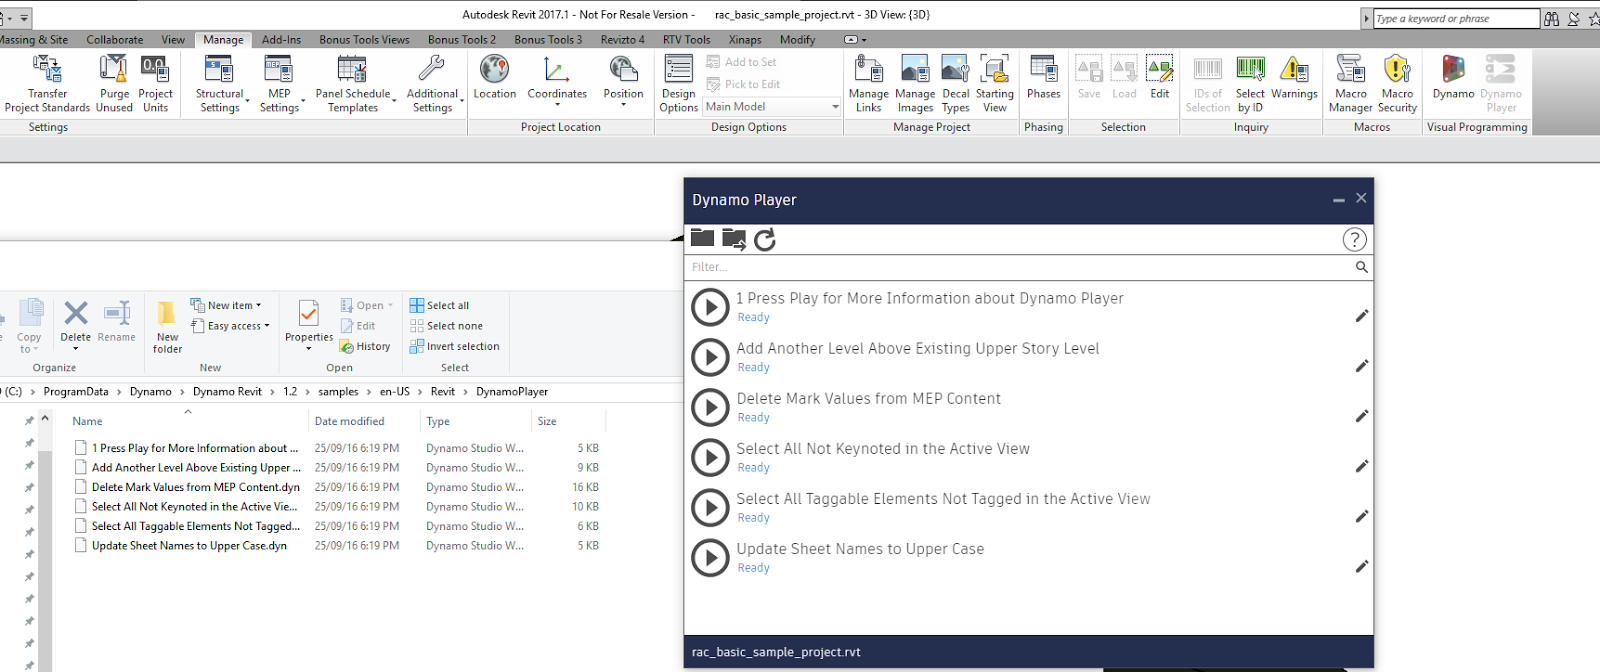
Big day yesterday in Revitupdates, particularly with Revit2017Update1 bringing some really cool enhancements, andthe Dynamo Player! Here are some linksand other information:
Dynamo Player
People have been asking for a way to run their scripts more easily and transparently, and now you can. Simply install Revit2017Update1, ensure you have Dynamo installed, and you will have a new option on your Ribbon…
It comes preconfigured to point at a samples folder:
You can point this at your own “Player” folder containing DYNs.
Press Play button to Run, and Edit button to open the DYN in Dynamo.
It remains to be seen how inputs will be handled?
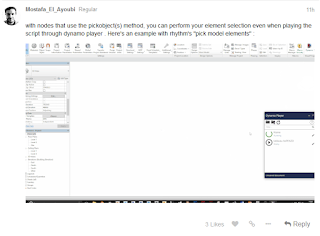
Pick Objects and Dynamo Player
Interesting thoughts over on theforum, about how if you use a DYN with a Select Node, it will still ‘work’ — this opens up some great possibilities!
So, you are in the market for a new BIM workstation? Recently I was too, and I wanted to share my experience and the ‘process’ of specifying, buying, and setting up a BIM workstation.
Over the years, I have been involved in setting the recommended specs for quite a number of CAD and BIM machines, and have used various suppliers – from big name brands, to the smaller PC builders. I personally feel that the big name brands rarely make sense in terms of what you get for what you spend. Many large firms will go with HP or Dell because they have some kind of long term agreement with them. But for small to medium businesses, you can definitely shop around to get maximum performance for your budget.
Target Applications
Firstly, you really need to clearly define the purpose of this machine… and this often boils down to “Which software am I going to use most of the time?” It can be good to put an estimated percentage on this.
For me, it would be something like:
Revit 30%
Navisworks 30%
Revizto 20%
Other 20%
Portability
Secondly, you need to determine if you need portability. I move around quite a lot, typically spending a few days in a site office, a day in our head office, and a day or two doing training or implementation work each week. So I need a powerful machine that can jump from desk to desk. I’m not overly concerned with battery life or even weight, as it won’t ever really be a ‘lap’ top, but rather a portable desktop workstation.
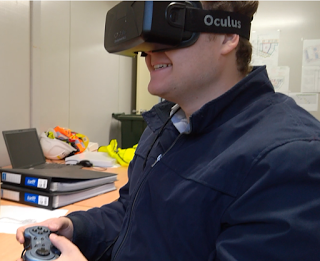
VM? VR?
I thought it would be worth mentioning that some people at this point would immediately jump to running a thin client of some sort, connected to a web host virtual machine with heaps of grunt. And that makes sense for some people. But I need to be able to run things like the Oculus Rift and HTC Vive, and the internet connection is simply not good enough in parts of Australia to completely rely on a virtual workstation
Form Factor
With that in mind, I wanted to build the fastest portable Revit, Navisworks and Revizto machine without going too crazy on the budget. The Director here at Virtual Built understands the importance of good hardware, which is great. I have been in the situation at previous jobs where you are wrestling to get an outdated piece of hardware updated or refreshed… it can be a drawn out battle!
Moving on, what does the above actually mean in terms of platform and specs? I looked at mobile and compact tower PCs, but it didn’t seem practical. Some of these have a monitor engaged on the side of the tower, but again, this wasn’t really well suited to running meetings.
So, I ended up looking at laptops. I started to focus on gaming laptops. Because a big part of how we work involves Revizto, and Revizto is built on Unity, and Unity is a game engine… it makes sense that good game hardware will run nicely. I have already come to the realisation that high end (Quadro) graphics in terms of ROI doesn’t make a lot of sense on Revit, and even with Navisworks I don’t see it as a huge advantage. If you were doing a lot of 3dsMax work, maybe the high end graphics would be more important.
Memory (RAM)
It is actually quite difficult to find a laptop that can take 64GB of RAM. I feel that 64GB RAM is the new baseline if you are working on any kind of complicated BIM projects, such as large hospitals. This helped prune down the list to just those gaming laptops that could handle big memory.
CPU
My comments about Quadro graphics cards kind of come into play here as well. Most people in a normal working environment will simply get better value from the high end consumer Intel CPU range (such as i7), rather than going with Xeon/s. And I was more interested in clock speed than cores, because while Revit is getting better at using multiple cores, it still isn’t really there yet.
Graphics
So, what graphics card should we go for? Many laptops come with the M (Mobility) range of nVIDIA graphics, like 980M and so on. I guess I’m an nVIDIA guy? I was pretty interested to learn that some high end gaming laptops actually take a full desktop graphics card architecture and cram it into the portable form factor. This means I could have a portable machine, without sacrificing any graphics prowess.
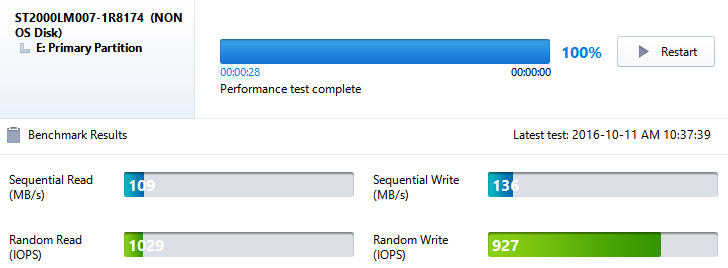
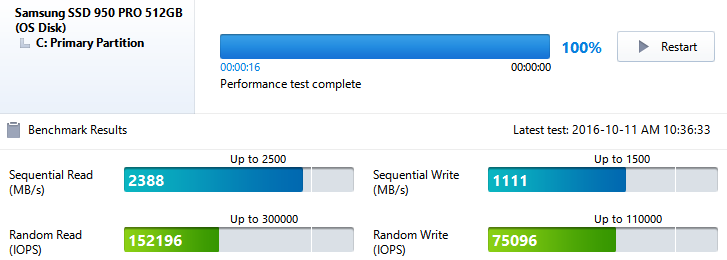
Storage
Obviously, the main drive needs to be an SSD, minimum 512GB. But did you know about PCIe M.2 SSD drives? These things are ridiculously fast. We will also probably need a big secondary drive to store large datasets, including a sync location for our company Box storage. This doesn’t need to be an SSD, but it could be if the budget allows.
Non SSD drive performance
PCIe M.2 SSD performance
Other
Some peripheral choices are not hugely important, but I think that getting the fastest and best network interfaces (Wifi and LAN) actually do make a productivity difference. Minimum of 3 or 4 USB3.0 ports if you can, and a few different graphics outputs – HDMI and mini DVI at a minimum. Would also be nice to have integrated Miracast (Wireless Display adapter) as well.
Summary
What does all of this mean? Well, let’s try and sum up the spec in one sentence:
A laptop with 64GB RAM,
the fastest i7 processor that can fit into the budget,
desktop nVIDIA gaming graphics (minimum 970),
a PCIe M.2 SSD primary drive, 2TB secondary,
and fast network interfaces.
In Part 1 of this post, we discussed the briefing and specification of a high end portable BIM workstation. But which one did I get? And how did it perform? You will find out in the future Parts of this series…
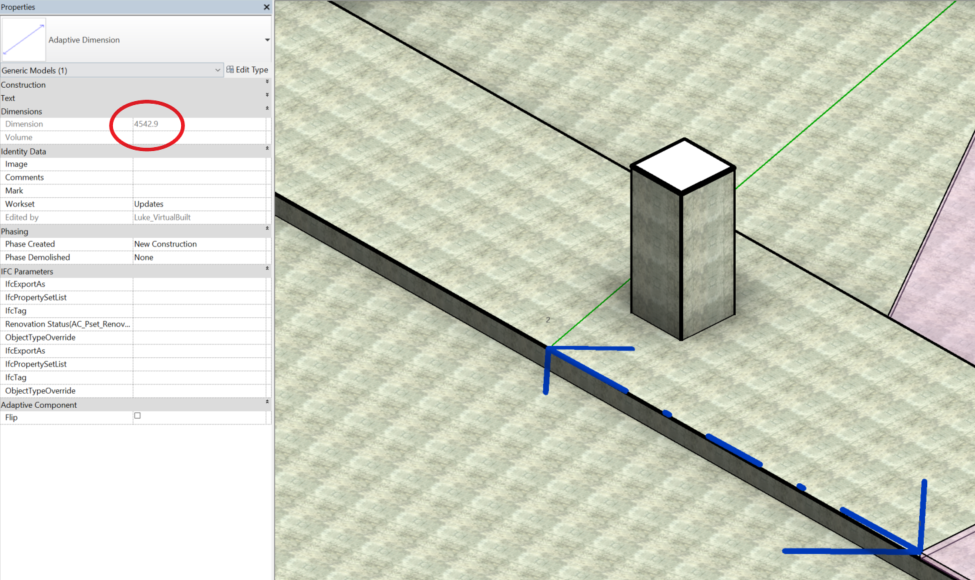
When working in 3D in Revit, you *can* use the normal dimension tool *if* you first set the Workplane. However, this can get annoying. Why not make a 2 point adaptive family, with a reporting parameter, so that you can just place the family (two clicks) and then check the instance parameter as shown below?
Update: V2 with arrowhead and tag in projectDownload here
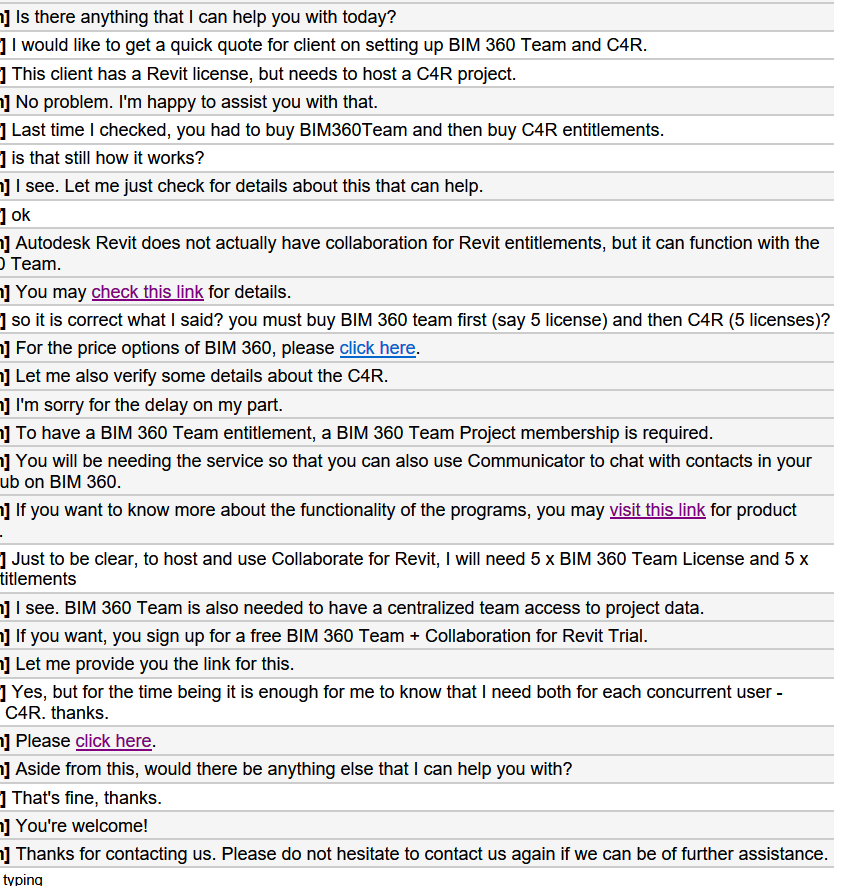
The fact that I’m posting about it means that it probably isn’t really that easy, right? There are a few challenging pieces of the puzzle that all need to come together to get C4R or Collaboration for Revit working on a real project. I just went through this process with a mechanical firm so it is all pretty fresh in my mind.
Firstly, note that A360 Team has been rebranded as BIM 360 Team and will be migrated, more details at this post.
Secondly, Autodesk really wants your whole team (like everyone, every consultant, every Revit link) on Collaboration for Revit. However, out in the real world it is just happening bit-by-bit, and in the meantime some hacks and workarounds can make the process a little bit easier.
A Quick Overview
Ok, so Collaboration for Revit runs on top of BIM 360 Team. What this means is that you need to have an active BIM 360 Team license if you wish to run projects. Then, you need a Collaboration for Revit license for each Revit user who will be connecting to that BIM 360 Team site. You still with me? This also means that persons outside of your firm may connect to your projects, provided they have their own Collaboration for Revit entitlement applied to their Autodesk account.
Once you have the BIM 360 Team license, and the Collaboration for Revit licenses, you then need to “Assign” the Collaboration for Revit licenses out to the users (using their Autodesk login details).
Finally, you need to actually do some stuff, like:
make a BIM 360 Team project,
invite the users,
initiate Revit models, and
get the links working.
Its a lot to take in, so you can see that the blog title is actually a half-joke 🙂 However, we were able to get all this up and running in about 4 hours for one firm, so you can too. Hopefully. Something that will help
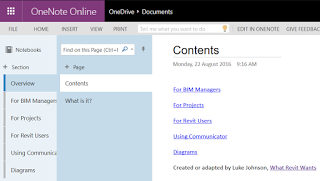
Given that there are a lot of moving pieces, I turned to my favourite research and documentation tool, OneNote. I have created a public notebook that you can view at this link: Revit Collaboration Public Help
Basically all of the steps involved in getting the licensing setup, inviting users, installing the addin, and initiating models onto Collaboration for Revit are in the notebook linked above. I will continue to update and add to this over time.
Any Questions?
Just comment to this post and I will endeavour to answer your question in the notebook, or point you toward the answer.
Now, here are a few other bits and pieces that may be useful, if the notebook doesn’t answer your questions…