The fact that I’m posting about it means that it probably isn’t really that easy, right? There are a few challenging pieces of the puzzle that all need to come together to get C4R or Collaboration for Revit working on a real project. I just went through this process with a mechanical firm so it is all pretty fresh in my mind.
Firstly, note that A360 Team has been rebranded as BIM 360 Team and will be migrated, more details at this post.
Secondly, Autodesk really wants your whole team (like everyone, every consultant, every Revit link) on Collaboration for Revit. However, out in the real world it is just happening bit-by-bit, and in the meantime some hacks and workarounds can make the process a little bit easier.
A Quick Overview
Ok, so Collaboration for Revit runs on top of BIM 360 Team. What this means is that you need to have an active BIM 360 Team license if you wish to run projects. Then, you need a Collaboration for Revit license for each Revit user who will be connecting to that BIM 360 Team site. You still with me? This also means that persons outside of your firm may connect to your projects, provided they have their own Collaboration for Revit entitlement applied to their Autodesk account.
Once you have the BIM 360 Team license, and the Collaboration for Revit licenses, you then need to “Assign” the Collaboration for Revit licenses out to the users (using their Autodesk login details).
Finally, you need to actually do some stuff, like:
- make a BIM 360 Team project,
- invite the users,
- initiate Revit models, and
- get the links working.
Its a lot to take in, so you can see that the blog title is actually a half-joke 🙂 However, we were able to get all this up and running in about 4 hours for one firm, so you can too. Hopefully.
Something that will help
Given that there are a lot of moving pieces, I turned to my favourite research and documentation tool, OneNote. I have created a public notebook that you can view at this link:
Revit Collaboration Public Help
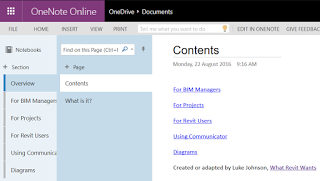
Basically all of the steps involved in getting the licensing setup, inviting users, installing the addin, and initiating models onto Collaboration for Revit are in the notebook linked above. I will continue to update and add to this over time.
Any Questions?
Just comment to this post and I will endeavour to answer your question in the notebook, or point you toward the answer.
Now, here are a few other bits and pieces that may be useful, if the notebook doesn’t answer your questions…
new help documentation:
https://knowledge.autodesk.com/support/revit-products/learn-explore/caas/CloudHelp/cloudhelp/2016/ENU/Revit-CAR/files/GUID-5A7EA270-AE79-447B-B12C-4C6B59D2F894-htm.html
moving models to folders:
https://knowledge.autodesk.com/support/revit-products/troubleshooting/caas/sfdcarticles/sfdcarticles/Collaboration-for-Revit-How-to-use-and-access-subfolders-on-A360-Team.html
You can move projects from A360 Free to a paid BIM360 Team hub by using the Transfer function:
Taking models offline and replacing later:
https://knowledge.autodesk.com/support/a360-collaboration-for-revit/learn-explore/caas/simplecontent/content/how-to-work-c4r-when-others-are-not-using-it.html
using local linked files
http://www.revitforum.org/worksharing-revit-server-c4r/28351-c4r-updating-links-6.html
Download links:
Collaboration for Revit 2017
Collaboration for Revit 2016




Great info, really useful so thanks a lot. Just a questions about setting up the person who will be administrating the project: Since the only person who can setup the hub is the Contract Manager or Software Coordinator, which, in most of our clients cases here is not the “hands-on” Revit Project admin person, can you, once the Hub is setup, then invite the admin person to be the one who creates the Project? Hence they then become the project administrator? Just trying to minimize the involvement of the Contract Manager….Or do you need to setup the project first. Sorry… Read more »