Problem:

I was recently trying to link Revit models to a federated file on Revit 2021. The models were failing to link, but no error message or warning was provided. The federated host model and the links were all initiated and ‘live’ collaborated models on the Autodesk Construction Cloud.


Resolution:

I had previously used this method ( Moving the Revit BIM360 CollaborationCache Folder to a Secondary Hard Drive ) to move the cache for BIM 360 / ACC Docs to a secondary hard drive. Windows Explorer showed this hard drive was essentially running out of space. So Revit was failing to link the model, but wasn’t providing a ‘insufficient hard drive space’ warning.

But why was the hard drive filling up?

I reviewed the files and folders and discovered that one particular program was generating massive log files:

The final resolution was quite simple – delete the massive log files, and then the files linked to Revit fine. I used 7-zip with the “Fastest” and “Delete files after compression” option to archive and delete those logs.

To future-proof this scenario, I’m considering writing a Powershell script to detect and possibly archive and delete the existence of massive log files.

In the old pre-BIM360 days, if you really had a problem where a Revit user didn’t relinquish elements in a workshared model, you could either

  1. Pretend to be that user and sync (yes just by changing your user name in Revit Options), or
  2. Detach that Central model and Save As.

Modern day BIM360 Revit Collaboration doesn’t allow either of those to happen easily…

So how do you relinquish elements in a BIM360 cloud Revit model?

Here’s how:

  • Open Revit and a model
  • Then go to Collaborate and Manage Cloud Models.
  • Browse to your BIM 360 Project and then the actual Model
  • Use the icon to view the model Actions menu and choose “Relinquish”
Screenshot from Revit 2018

When prompted, choose “Force Relinquish”

Choose the User and then click Relinquish

and Continue

Confirm by pressing Continue

Then, wait for the process to complete.

Finally, it is probably a good idea to Sync with Central 🙂


Revit Help Links (note, the process is basically the same for all current versions):

If you Close All Worksets when opening a model on BIM 360 Design, you may get this error (related to Project Info):

Can’t edit the element. It was deleted in the Central Model.


As you can see, it is related to the Project Info : Project Information element:


The error looks like this. You must click Cancel to proceed:

It appears to be some synchronisation bug or similar, possibly related to BIM 360 cloud worksharing. You can force the error to reappear by clicking on the Location option in the Ribbon

To fix it, try doing a full Sync with Central. It seems that this rectifies the bug for that session and future sessions with that particular cloud workshared model.

If you are already a C4R user, for a while you can keep working as you are. But the entire platform is shifting from C4R to B3D (BIM 360 Docs), and you will eventually have to make the leap. In the long run, it will allow for more control, like folder-level permissions, so for big projects it is going to make a lot of sense. For now, there is some confusion out there (like in this Twitter thread), so here are some basic steps to activate a new BIM 360 Docs account, setup a Project, and then invite some collaborators into the project.

First, you can go to your account and use the special link to create a new BIM 360 Docs workspace. That is, if you are starting fresh in the new platform.

Here is the activation form notes (read carefully). Note: the links are different depending on how you activate it. For example, if you have an existing C4R account and you want to ‘transition’, you would use the relevant activation link for existing C4R customers :

New BIM 360 workspace


Transitioning from C4R


Once done, you should have a new BIM 360 account:

And you just have to click the activate link in your email:

After that, you should be able to login to your BIM 360 workspace and start setting up some company settings, like adding a Logo and Business Units:

Setup a Business Unit:

https://help.autodesk.com/view/BIM360D/ENU/?guid=GUID-6A8990E7-A640-4267-83AF-64003B015F98


Finally, you can go ahead and Setup a Project:

https://help.autodesk.com/view/BIM360D/ENU/?guid=GUID-9C991F4C-7012-4770-B8F7-A1D45F5D9197


Then,

  • add Companies to your Workspace
  • Add Users to Companies.
  • And invite these Users to specific Projects.

In Revit 2018.3, after clicking Collaborate, you should be able to choose from 3 options:

You should see this in your Open dialog (if you have both a Team and a Docs entitlement):

Finally, you should be able to access Document Management, add folders, apply Permissions, and generally start work:


BIM 360 has just changed in a fundamental way. The trust environment is now more controlled, and it is sharing base technology with BIM 360 Docs. So instead of talking about C4R bolted onto A360 or BIM360, we will now be talking about ‘Revit files in this Docs module in this Team Project on BIM 360 Design’ (I think).

Revit 2018.3 is required and direct download link can be found here.

I’ll follow up with some more detailed information in the coming weeks.

Here is the post from Kyle:

All,
I wanted to welcome you, on behalf of the team here at Autodesk, to the Design Collaboration forum.  This forum exists for conversations about the design collaboration workflows possible in the BIM 360 Design product, which released today.  We look forward to the conversation.  First though, I’ll try to answer some likely questions you all have.


What’s BIM 360 Design?

BIM 360 Design is the next generation of Collaboration for Revit (C4R).  It enables the cloud worksharing you’ve come to love in C4R, but connected to the next generation BIM 360 platform.  You can learn more about it here on our new product center, and below is an image that captures what comes with it.BIM 360 Design.png


You can see that within BIM 360 Design there are 2 next gen modules that are included, Design Collaboration and Document Management.  Together with cloud worksharing, they represent the most seamless way to collaborate on Revit data across the globe.  We’ll talk more about the new workflow in subsequent targeted posts.


What Happened to C4R?

C4R just became BIM 360 Design as of today.  If you’re an existing subscriber, you’ll see the branding update in manage.autodesk.com shortly.  If you have existing projects in-progress, working against BIM 360 Team (aka Classic), nothing really changes aside from the branding you see in the account portal.  You can continue to work on those projects, and new subscriptions to BIM 360 Design can be allocated to new team members, who can then start to work on those existing projects.  More detail can be found in this FAQ.


What Can I Do With BIM 360 Design?

With BIM 360 Design, BIM authoring teams can say goodbye to “high trust” as the only way to work, and hello to flexible dynamics between multi-discipline BIM authoring teams. Along with those improved access controls comes a whole new web and mobile experience delivered by Next Gen BIM 360.  Across Document Management and the new Design Collaboration module, teams can:

  • Quickly and easily set up teams and define the data spaces they will work in.
  • Easily understand the current state of the project, with an aggregated view of the project data that can be navigated the way they think about it, not how our beloved authoring tools structure it.
  • Exchange data between teams in a controlled way, on the back of our new currency for data exchanges: Packages. These are like transmittals on steroids, allowing teams to curate the versions of Models, 2D Sheets, and 3D Views needed to communicate process.
  • Understand how data has changed over time. Change visualization can be enabled with the touch of a button on any BIM artifact contained in a Package. No more hunting for revision clouds or exporting the 3rd party tools.
  • Provide feedback on those BIM artifacts, with Markups and closed loop Issues created in Document Management (Issues are on their way to Design Collaboration).
  • Use the Preview version of Desktop Connector to collaborate on non-Revit project data, centralizing the data platform used for all Work in Progress (WIP) project data.
  • Use those BIM artifacts downstream for construction workflows across the Field Management, Project Management, and Model Coordination modules.

How Do I Get Started with BIM 360 Design?

If you’d like to start a new Project in this new way to work, you need to:

  1. Get a BIM 360 Account
    1. If you have an existing next gen BIM 360 account, you should automatically get the Design Collaboration module enabled tonight (April 9th US time zone)
    2. If you don’t have an existing account, your Contract Manager should receive an email shortly with instructions on how to get one created.
  2. Install the Revit 2018.3 Update
    This update released today, and should be available in the Autodesk Desktop app.  A direct download link can be found here.  This is required for Revit 2018 to know how to communicate with next gen BIM 360.
  3. Start a New Project and Enable Document Management + Design Collaboration
    With these two modules enabled, along with the latest update of Revit, you have what you need to get started.  We’ll have a separate thread that walks through the process to get up in running in more detail.

Hopefully, you all are as excited about this as we are.  We’re biased though; we’ve worked hard based on lots of feedback and customer engagement to deliver this new way to work, and your continued feedback and engagement will make sure that we deliver on the needs you all have.  Look out for subsequent discussions on specific parts of the overall product experience, and we look forward to hearing from there.  Post here in this thread with general questions.


Cheers,

Kyle & the Team

Kyle Bernhardt
Product Line Manager
BIM Project Delivery
Autodesk, Inc.

I have been chatting with one or two industry insiders over at Autodesk recently, and there are some pretty big changes coming to the BIM360 fraternity of products. For the most part, it seems like these will be very welcome improvements. However, it may have an impact on how you run projects through BIM360, and so it might be advisable to check out the upcoming BIM360 webinar (link). Details below:

Stay up to date with everything new in BIM 360. Each month, join us and the BIM 360 Product Team to find out how you can take advantage of the most recent and upcoming product updates.
• Learn how BIM 360 can help you improve project delivery
• Stay up to date with the newest features
• Get early insights into what’s coming in the next updates
• Participate in Q&A with the BIM 360 Product Team
• Get the resources you need to be successful

If you are new to BIM 360, check out our product overview before the webinar and bring your questions.
Copy & Paste the following url into your web browser:
https://www.youtube.com/watch?v=j4bDXLJzga8&feature=youtu.be

Image result for bim360 autodesk

A while back I posted about how to setup and deploy Collaboration for Revit. Things are moving quickly in this space, as more projects now need concurrent access to centralized models from a distributed team (say that quickly 5 times!)

Here is an updated list of a few best-practices for initial C4R project setup:

  • generally its a good idea to do a Reload Latest before Sync with Central
  • its best to be on the most current versions of Revit and their C4R extensions
  • baseline all workstations to the latest ISV certified drivers, reinstall the C4R v6 components using the .exe installer and flush all 4 caches being – CollaborationCache, PacCache, Communicator, User Temp Dir. This will ensure all workstations are at exactly the same Revit environment.
  • confirm that traffic to/from pubnub.com is successfully moving across your firewalls to/from the C4R workstations? That’s an important requirement for the Communicator panel; a key reliability and performance enhancement depends on this connectivity and without it the Communicator will fall back on an earlier implementation behavior which is known to be less reliable.
  • ADSK recommends that all users should use the personal accelerator.
  • To the best of each user’s ability, ADSK recommends self-scheduling SWC activity by using the Communicator timeline to avoid syncing when another user is syncing. See images below to help the team understand why this is important.
  • The success of this project likely hinges on the team’s ability to develop a way to coordinate SWC activity, as poor SWC scheduling is responsible for the major pain point for project teams. It should also be noted that the most egregious cases of poor SWC performance are due to users failing to self-schedule their SWC activity. When multiple SWC operations are in-flight simultaneously, Revit must go through multiple RL phases to maintain model and data integrity. this has the effect of greatly expanding SWC time, which is why we recommend that users check in the Communicator panel to see if a SWC is already in progress before attempting one. See the attached pptx for an explanation of why this is important.
  • Please review this Link here to understand the Proxy Server settings to unblock Autodesk A360 services
  • Please use this Link here for Proxy Server and domain exceptions for A360
  • The table below provide further information on minimum system requirements.
  • Note the connectivity speeds:

Sync with Central diagrams

As you can see below, when SWCs ‘overlap’ there is a performance hit. Good C4R management will require:

  • attempting to sync on a schedule… because modelling projects are easy to schedule, right?
  • using the Communicator (or some other IM tool) to keep team informed that you are syncing / about to sync. You could use a Slack channel per RVT for this?

I have added the above information to the Best Practices section of the Revit Collaboration Public Help notebook I created:

https://1drv.ms/u/s!AmvJg0j4a7kRo61EJKCpdkr3lhTecg

RTV Xporter Pro is one of those addins that I can safely recommend to every Revit user. If you ever need to print more than one sheet, or export a model multiple times, or to multiple formats, this tool is going to save you time. In fact, I think a large percentage of Revit users probably already have it! So, what’s the latest?

As you probably realise, Collaboration for Revit (C4R), Autodesk’s ‘Revit Server in the Cloud’ solution, is gaining popularity globally. It is genuinely a good way to get a team of people in different places to work together in real-time on a Revit project… provided you have good internet that is! So, it is great to see that RTV have now supported batch exporting from C4R projects using the local desktop application. Nice work!

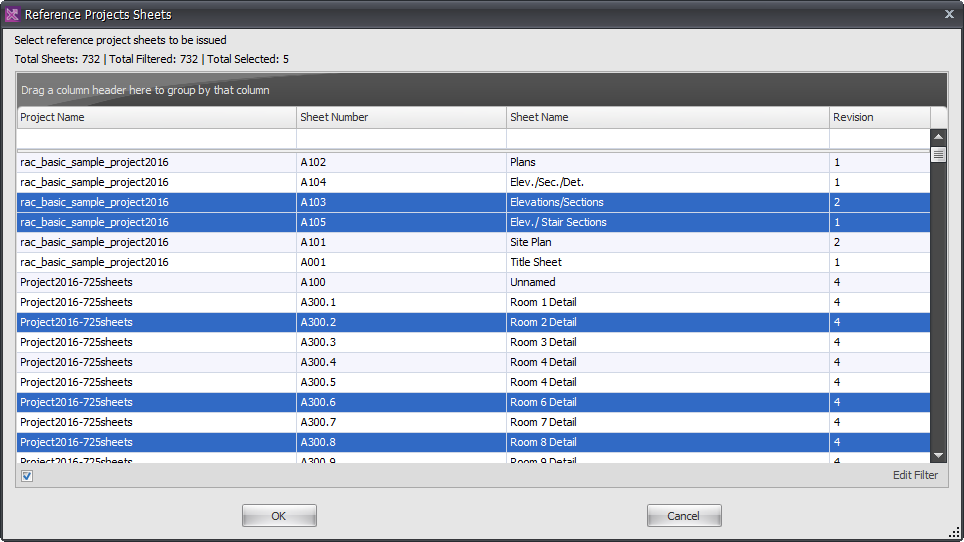
Another interesting feature is that you can now reference additional Revit projects to the current Document Issue / Transmittal record, which is pretty cool.

The latest build for Revit 2017 is 1.0.740.

Oh, and one final thought… if you haven’t tried RTV Xporter in a while (perhaps you recall the days of working with SQL Server and so on), I recommend you give the latest version a try. On almost every project I do, we do not need to use a SQL server because the addin just integrates so well with the information you already have in you Revit model.


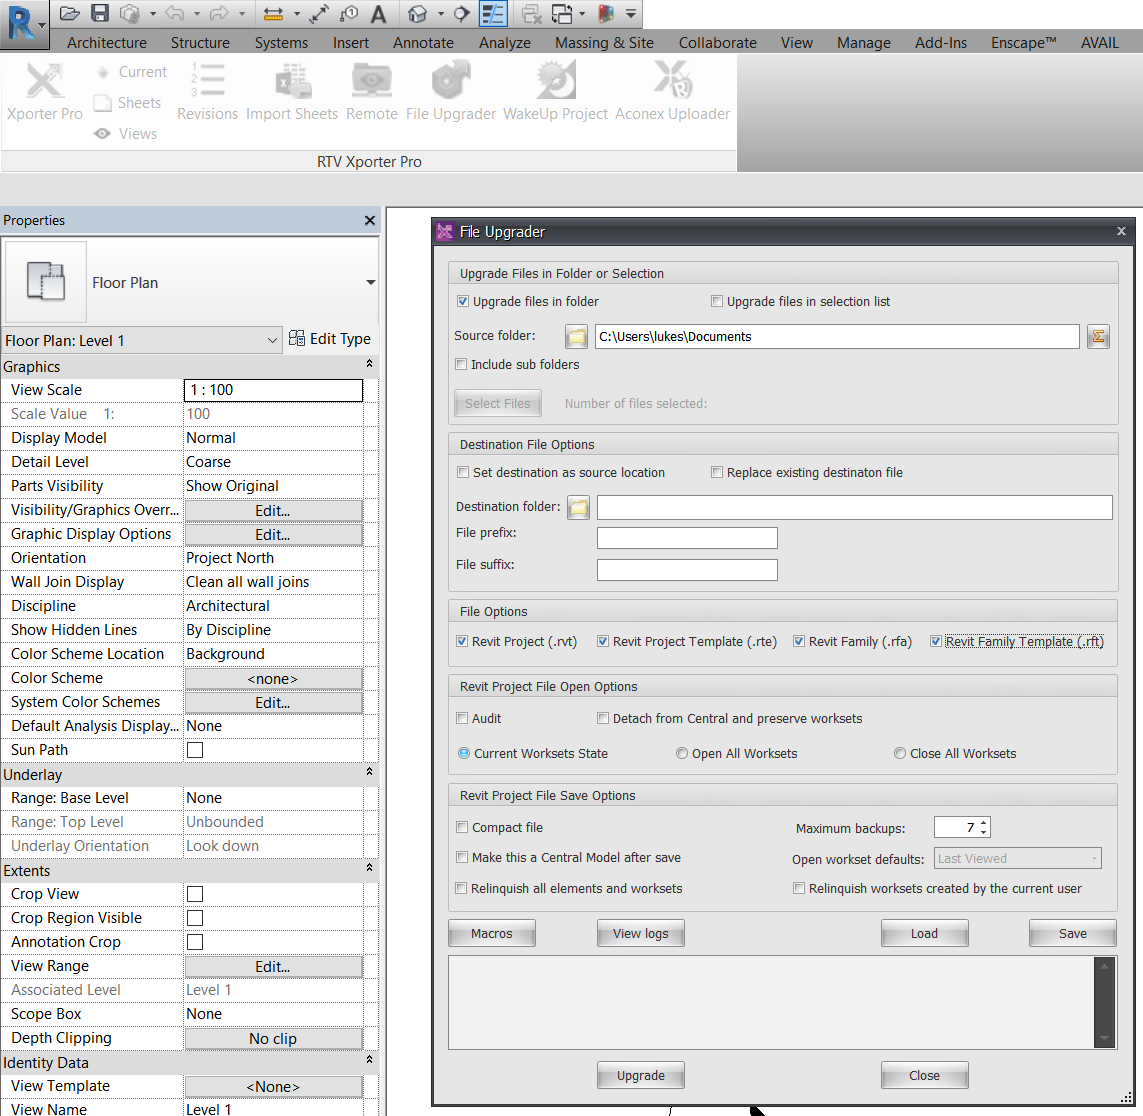
How to Batch Upgrade Any Revit File Type
A while back, I posted about an admittedly circuitous method to upgrade Revit files for free using eTransmit.

However, this is a much quicker and easier way, and its pretty affordable too… using RTV Xporter Pro. It supports batch upgrading of every Revit file type: rvt, rte, rfa, rft

To use it, just click the File Upgrader button and fill out the dialog. Easy!

Screenshot:

Other related post:
What Revit Wants: Various methods to upgrade your office RFT files to 2013

Heads-up:
RevitworX: Upgrading Files to 2016


Here is the full list of the latest updates, from the newsletter:

We have been busy working hard to integrate Collaborate for Revit (C4R) with our RTV Xporter PRO App for Revit. It is our pleasure that we are now able to provide C4R access via the desktop application (only). At this time our Remote Processing (Server) doesn’t support C4R but we are working hard to get this functionality added as soon as possible.

The updates are now available for download from our website and can be found here:
RTV Xporter Pro 2016 (Build 709)
http://www.rtvtools.com/downloads/2016_RTVXporterPro_64B.zip ;and
RTV Xporter Pro 2017 (Build 740)
http://www.rtvtools.com/downloads/2017_RTVXporterPro_64B.zip

The following is a list of new features, updates and fixes included in the above software updates.

Updates:

1. Scanning for PDF printers will only be performed on Export start up, if no registry printer or xml printer list is empty;
2. Multi-line parameter used for the export filename, New Line replaced with a Space;
3. Separate group for Title block Revision schedules in Views list;

Resolved:
1. Fixed DWG layer mapping file selection dialog displaying twice and multiple mapping files added to drop-down list;
2. Fixed Remote GUI when the root shared folder is defined as the watch folder;


New Features:

Export
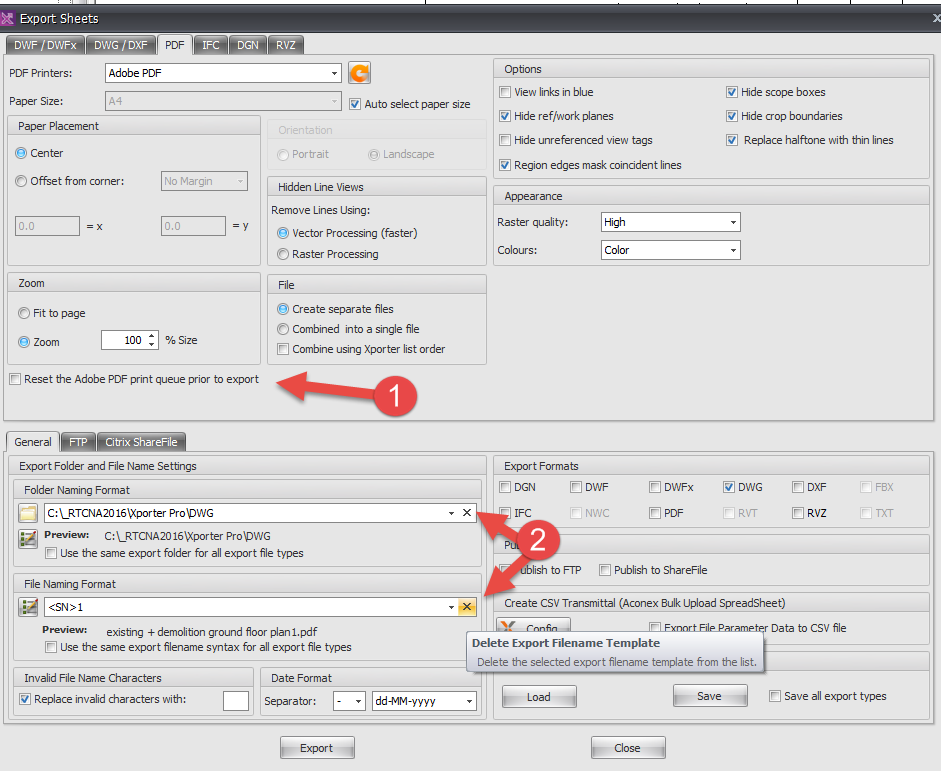
1. Checkbox option to Reset Adobe PDF print queue prior to export;
2. Delete button added to Export Folder and Export Filename template drop-down lists;

Issue
3. Issue, Reference Projects option now added. Users now have the option to reference additional Revit projects to the current Document Issue/Transmittal record. User can browse to select the project or used an existing (loaded) linked Revit project;

Note: Issue Reference Projects support linked models including C4R and Revit Server.
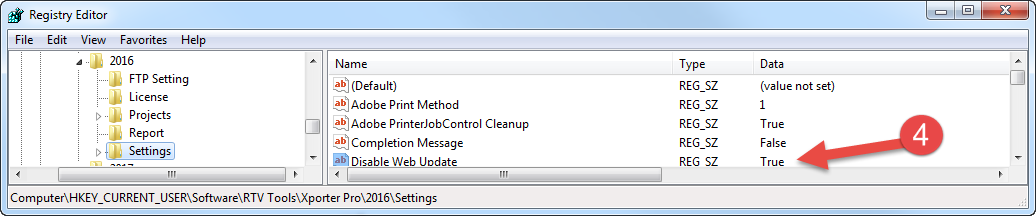
 

Web Update
4. New registry key added to disable check for updates by the users (restricted to system administrators);

C4R
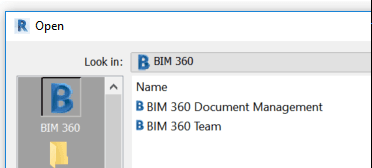
5. C4R Support added – limited to current model, not available with the Remote (Server) function;

The internet is bleeding hard today due to the well-publicized Amazon S3 outages. Autodesk services are also severely affected.

Collaboration for Revit (C4R) users may be wondering how to get access to their files when the service is down. Your best bet is to find the most recent local copy and possibly use that for the day.

You can find it by going to Windows Explorer and copying this address:
%localappdata%\Autodesk\Revit\Autodesk Revit 2016\CollaborationCache

or for Revit 2017:
%localappdata%\Autodesk\Revit\Autodesk Revit 2017\CollaborationCache

Then, go looking for your RVT files. They will have a long name with letters and numbers.

I recommend you open this file ‘detached’, and be fully aware that your project will not sync to C4R after you do that. You could isolate your work to part of the project only, and then possibly copy / paste back to the C4R project when it comes back.

Alternatively, save it as a new Central to your local file server, and then overwrite the C4R project later when it comes back online.

None of this is ideal of course, but if you want to get any work done today, you may have to try the above workarounds.

Related forum link:
Where are A360 Collaboration for Revit local files stored?

The fact that I’m posting about it means that it probably isn’t really that easy, right? There are a few challenging pieces of the puzzle that all need to come together to get C4R or Collaboration for Revit working on a real project. I just went through this process with a mechanical firm so it is all pretty fresh in my mind.

Firstly, note that A360 Team has been rebranded as BIM 360 Team and will be migrated, more details at this post.

Secondly, Autodesk really wants your whole team (like everyone, every consultant, every Revit link) on Collaboration for Revit. However, out in the real world it is just happening bit-by-bit, and in the meantime some hacks and workarounds can make the process a little bit easier.

A Quick Overview
Ok, so Collaboration for Revit runs on top of BIM 360 Team. What this means is that you need to have an active BIM 360 Team license if you wish to run projects. Then, you need a Collaboration for Revit license for each Revit user who will be connecting to that BIM 360 Team site. You still with me? This also means that persons outside of your firm may connect to your projects, provided they have their own Collaboration for Revit entitlement applied to their Autodesk account.

Once you have the BIM 360 Team license, and the Collaboration for Revit licenses, you then need to “Assign” the Collaboration for Revit licenses out to the users (using their Autodesk login details).

Finally, you need to actually do some stuff, like:

  • make a BIM 360 Team project,
  • invite the users,
  • initiate Revit models, and
  • get the links working.

Its a lot to take in, so you can see that the blog title is actually a half-joke 🙂 However, we were able to get all this up and running in about 4 hours for one firm, so you can too. Hopefully.

Something that will help
Given that there are a lot of moving pieces, I turned to my favourite research and documentation tool, OneNote. I have created a public notebook that you can view at this link:
Revit Collaboration Public Help

helpdoc.png

Basically all of the steps involved in getting the licensing setup, inviting users, installing the addin, and initiating models onto Collaboration for Revit are in the notebook linked above. I will continue to update and add to this over time.

Any Questions?
Just comment to this post and I will endeavour to answer your question in the notebook, or point you toward the answer.

Now, here are a few other bits and pieces that may be useful, if the notebook doesn’t answer your questions…

new help documentation:
https://knowledge.autodesk.com/support/revit-products/learn-explore/caas/CloudHelp/cloudhelp/2016/ENU/Revit-CAR/files/GUID-5A7EA270-AE79-447B-B12C-4C6B59D2F894-htm.html

moving models to folders:
https://knowledge.autodesk.com/support/revit-products/troubleshooting/caas/sfdcarticles/sfdcarticles/Collaboration-for-Revit-How-to-use-and-access-subfolders-on-A360-Team.html

You can move projects from A360 Free to a paid BIM360 Team hub by using the Transfer function:

transfer.png

Taking models offline and replacing later:
https://knowledge.autodesk.com/support/a360-collaboration-for-revit/learn-explore/caas/simplecontent/content/how-to-work-c4r-when-others-are-not-using-it.html

using local linked files
http://www.revitforum.org/worksharing-revit-server-c4r/28351-c4r-updating-links-6.html

Download links:
Collaboration for Revit 2017
Collaboration for Revit 2016

Collaboration for Revit 2015

Recent chat with Autodesk