Experienced Navisworks Coordinators typically have a very solid workflow in place for grouping clashes into clash groups. Some prefer to do that part manually (with selection and filters), so they can observe and determine which items should be grouped together. Others will use an auto-grouping tool, like bim42 Group Clashes, or iConstruct.

If you are using iConstruct and you wish to use the Navisworks clash group data downstream, you may wish to preserve existing clash groups at each subsequent clash run, and only group the ‘new ungrouped’ clashes. The bim42 Group Clashes tool has a tickbox for this, and iConstruct 2019 provides a filter. If you are using iConstruct 2018 or older, you may be wondering how to preserve existing clash groups and only “push” the grouping rules for clashes that are currently not grouped.


Here’s how:

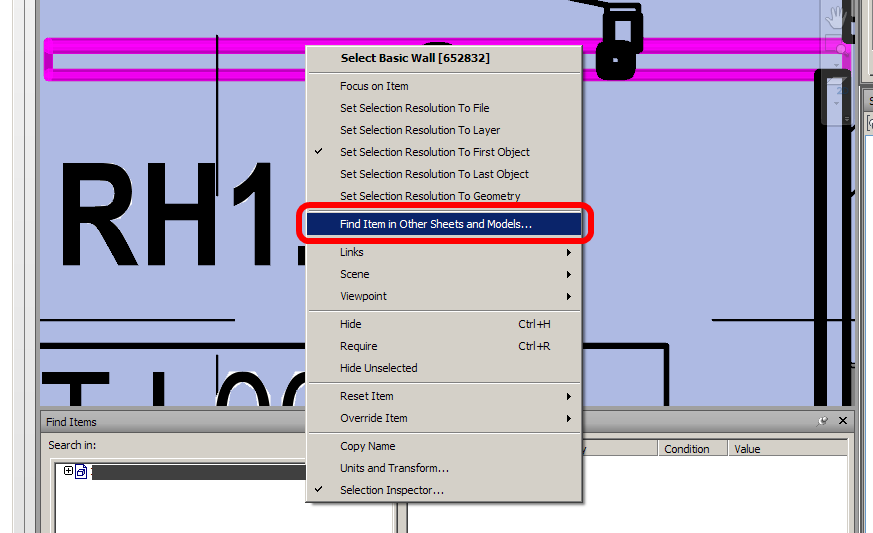
  1. Run the Clash Manager from iConstruct
  2. Find the list entry without a name
  3. Versions:
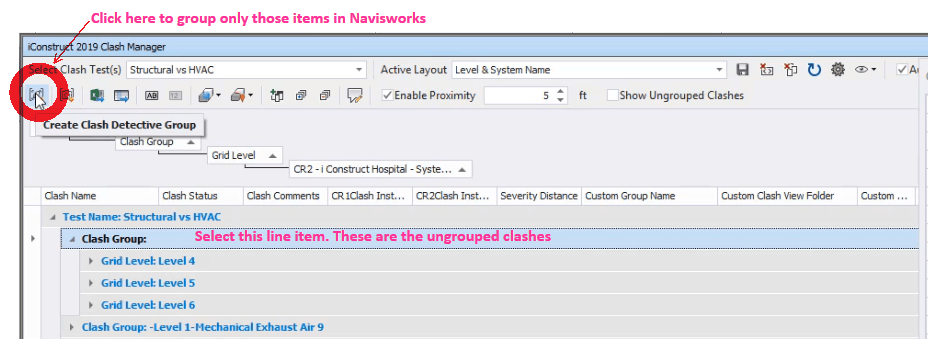
    • iConstruct 2019 has a filter for “Show Ungrouped Clashes”
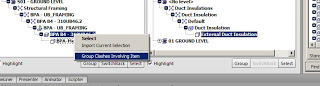
    • iConstruct 2018 – select only the ‘unnamed’ Clash Group: ,
  4. Then click “Create Clash Detective Group”
  5. iConstruct will immediately create the relevant groups from only the ungrouped clashes
  6. You can then go ahead and Sync to Revizto, or use the data downstream in some other workflow


Here’s a video from Robert Gadbaw that clearly demonstrates this workflow:

This workflow will allow you to use iConstruct to group your clashes, and preserve those groups when Syncing with Revizto. Revizto has a very solid and customisable connection to Navisworks that includes the ability to sync the clash results with Revizto Issues in both directions.

Have you ever wondered how to increase the image resolution exported by Navisworks during a Clash Report?

You can set this in the Registry, look in bottom left corner of image for the location of this key:

nwclimg

Also note, Navisworks 2016 is 13.0 in the Registry.

More Navis tips:
What Revit Wants: Thirteen Navisworks Tips to Boost your Productivity for 2014

Simon Moreau has shared a nice addin for Navisworks that allows the automatic grouping of clashes. From his blog:
“This plug-in enables a lot of possibilities for sorting clash detection results in a meaningful report, and will become a full-time member of my coordination toolbox.

To install this plug-in, you can copy-paste the ClashDetective.ADSK.dll file available here in a new ClashDetective.ADSK folder in C:Program FilesAutodeskNavisworks Manage 2016Plugins. You can also see my edited version of the example code here.”

Original post: Grouping clash results | BIM 42
Heads-up from Michael Clothier

Here is what the installation folder looks like:

And the addin ribbon in Navisworks Manage 2016:

You can also download the Navisworks SDK from here:

  Navisworks 2016 SDK (Updated April 7th) (exe – 207 Mb)
  Navisworks 2015 SDK (Updated July 1st) (exe – 193 Mb)
  Navisworks 2014 SDK (exe – 217 Mb)

To simulate a temporary search set in Glue, select an object and view its properties. Then, right-click on the desired “search” property and click Select Similar:

To merge Clash Groups in Navisworks:

  1. Select the Groups you want to Merge with Ctrl key
  2. Right-click, Explode (the child clashes will remain selected)
  3. Right-click, Group

Screencast of above:

Have you ever had a large facility, divided up into Levels and Sectors, and you wanted to find out in which zone a particular item or group of items exist?

In Navisworks, this can be a real pain because guess what – Navisworks doesn’t know about “stuff”, only about surfaces. In other words, if an item is fully contained within the volume of another item, this doesn’t show up as a clash. Theoretically, you could have a facility full of pipes that are clashing with ducts, and as long as the pipes run perfectly inside the shell of the duct, the clash won’t show in Navisworks. Scared?

Interestingly, Revit Interference Check does know about stuff. It can find clashes of one item inside another, such as:

So, if you have access to the Revit models of items that you want to clash to see if any are “inside” others, Revit Interference Check can do that for you.

Now, before I move on… I did investigate some options for forcing Navisworks to do this type of detection for me. My first idea was setting the clash detection tolerance to a negative. In essence, these moves things around to see if they will hit each other. Set it to 500mm and it will find items that are 499mm apart. But it was too heavy handed to find what I wanted. So my next idea was to slice up the model in Revit before exporting to Navisworks and detect that way (basically giving me more surfaces to work with). Here are the steps I took:

  1. Modelled the sector level zones as Floor elements in Revit
  2. Made the Floor have a new layer at every 100mm (ie. 45 layers for 4500mm floor to floor)
  3. Divided all these Floors into Parts – meaning I had slices at every 100mm
  4. Exported the 3D view from Revit to DWF with Parts Visibility set to show both– in this way, you get both the original Floor and the resulting Parts. Using the Convert Parts option in Navisworks Exporter gives you one or the other, but not both… I imported this 3D DWF to Navisworks and used it for clash detection.
  5. Using some search sets, I was able to use the Part “slices” to discover where items existed, but I couldn’t easily relate that back to the original Floor element (which had a manually input property for the Sector in the Comments field in Revit). An addin that drives parameters from original Floors into their child Parts would help here…

So, back to treasure hunting in Revit… If you have access to the Revit models (or IFC) of the items you want to check, it is quite easy:

  1. Link the models together
  2. Use Interference Check to determine which items are affected (see image above). Only certain categories are candidates for Interference Check, check the last column here.
  3. Export the HTML report from Interference Check dialog
  4. Open in Excel
  5. Use a LEFT formula and Remove Duplicates to grab list of Element Ids
  6. Use CONCATENATE to put commas in
  7. Use Select by Id in Revit, and the string from 5) to select the affected elements in Revit
  8. Modify some property to allow for filtering. In my case, I made a “Tags” property so that I can search for “contains” in a Schedule and selectively show items. 

Here are some screenshots of those steps.

Another way to shortcut some of the above would be to drive different Type Names into each floor based on the two sector-level parameters (using an addin). In the Interference results, you can immediately see:
Workset
Category
Type
Element ID

At least then you wouldn’t have to go through the above Excel steps just to get the results into a Revit selection set!

To combine some workflows, if you don’t have access to the Revit model and you want to do this type of “container clashing”:

  1. Use the FBX to DWG workflow to get your items from Navisworks
  2. New Family – Generic Model
  3. Import DWG – Origin to Origin 
  4. Also place something at 0,0,0 (could use DWG origin locator for this)
  5. Save / Load family into Project
  6. Place the family at 0,0,0 (could use DWG origin locator for this)
  7. Use this Generic Model family as one of the parties in your Interference Check
  8. If you go this route (FBX-DWG-family), it will take super long to do the Check – go grab a drink or do something else for a bit
    (note: one nice thing about this is that the family is clashed as one single item – meaning the Interference Check results are quite clean)

Remember you can use “Show Last Report” on the Ribbon to get the last interference check results back.

Ok, lets say you have a large team working on a single Revit project, and questions fly back and forth. Some firms use a Clash box, which is then listed in a Generic Model Schedule. Unfortunately, these can’t be placed in drafting views or on sheets.

This is where an annotation family comes in. When associated with a Note Block schedule, it provides a decent “inside Revit” method for creating and tracking questions and answers. It can be used on sheets, in 2D views, plan views etc. It works in Legend views but will not schedule from them. It can’t be placed directly in a 3D view. You can work around both of these by placing them on top of Legend and 3D views that are placed on Sheets.

One big advantage of these is that you can select a Schedule Row, and then click Highlight in Model to take you directly to that issue, clash, or question item.

This particular version uses a saved selection based filter to override the leader colour and thickness by template. You just select all instances and save the selection, overwriting MQ as the saved selection set.

It also has adjustable attachment width using “right attach” instance parameter. Another tip – you can add as many Instance text Parameters as you like to the Note Block Schedule, and they will be instantly visible upon selection of the annotation family, ready for you to add data.

Revit Wants you to associate as much useful data to the model as possible – and intelligent, team-capable issue tracking certainly fits into that category.

For Revit 2014:
Download here

Some images:

By now, most of us are using Navisworks for some sort of aggregation, model checking or clashing.  So why would anyone want to use Revit Inteference Check (on the Collaborate tab, Coordinate panel)?  Basically, because its “in-canvas” and doesn’t require workflow-disconnect (export NWC, find Clash, Switchback, modify, refresh NWC).

Instead, we can run a clash report within Revit, close the dialog, fix the problem, then refresh the report.  Much easier.

For one recent Basement Carpark Design, we already had Parking families set out, and the Structural model linked in.  All I had to do was edit the Parking family, add a Shared Nested family of suitable Category (in my case, Electrical Equipment), run the Interference Check, fix or mark up the problems, and then switch “off” the shared nested component (using a visibility switch on the shared nested component).  Quick and easy.

Obviously, there is a lot it can’t do (especially compared to Navis), but some things it can do nicely.  Read on for some Q and A:

Is there a limit to the Categories you can use in an Interference Check?
Yes, see image below

Can you clash against a Shared Nested form of one of the above Categories?
Yes!

Can you clash against a Linked file in Revit?
Yes, of course – the above Category limitation still applies

Can you clash against selected objects?
If you select objects before starting the command, only items matching above Category limitations and present in the selection will be available as a tick box.

Will collinear 3D faces trigger a Interference in Revit?
Unfortunately yes.  You can work around this by offsetting one of the forms by 1 or 2mm to “ignore” those clashes.

Will an invisible (unchecked) Extrusion or Family be included in the Interference Check?
No

Will an item that is completely transparent (either based on a View setting or Material setting) be included in the Interference Check?
Yes

Can you clash against a Void form?
Yes

While you can’t “Save” a Search Set, you can Refresh your previous Interference Check in Revit.  Just do this:
Interference Check – Show Last Report – Click Refresh
Note: pressing “Refresh” does not re-run the Check, it just re-checks the things already in the list to see if any have been fixed.

To make “finding” the clashes quicker after the report is run – open a few key views first.  As these are in memory, when you click “Show” on an item in the report, Revit will look in these open views first.

Helping google:
Revit interference checking shared nested

What is Navisworks Manage good for?

  • Model aggregation – either from pure Revit or from a mixture of 3D software
  • Clash Detection
  • Programme Visualization (timelining)
Some great things about Navisworks:

  • it is very fast to navigate around the model in 3D, and files are generally lightweight
  • you can easily switch between Orthographic and Perspective (its funny the things that impress you as a Revit user…)
  • SpacePilot Pro integration works very smoothly, even better than Revit (probably because the models are lightweight, so the SPP isn’t fighting your system specs to redraw things, as in Revit)

Note: this article based on using Navisworks Manage 2013, Service Pack 2 (10.2.0.91043) on Windows XP 64-bit.

Key things to keep in mind when exporting or opening Revit files for use in Navisworks:

  • Firstly, it seems most people recommend using the Revit add-in to export a Navisworks NWC from a dedicated Revit 3D view (rather than opening the RVT direct from Navisworks).  This way, you can have some certainty about the export result (the correct Design Option is exported etc)
  • If you have Shared Coordinates set up and working between your various Revit models, things will be a lot simpler.  There is an option in the exporter where you can specify that it uses Shared Coordinates.  If you are working with a set of RVTs where shared coordinates were never properly set up, you may need to pick a particular RVT and publish coordinates to all related RVTs in the set.  This may become tricky if there is no site / main host file and you have to play around by cascading coordinates into all related RVTs… you get the idea.
Some things that will help you:
  • Press F2 anywhere to rename
  • Navisworks has a Project Browser (View – Windows – Project Browser).  You can append a 2D DWF containing drawing sheets, and view these sheets in Navisworks from the Browser.  You can also select objects from these imported Sheets and find them in the 3D model! (more info on this below)
  • When clashing, you can group clashes related to a particular item by right-clicking on it and selecting “Group Clashes Involving Item”:

  • There are a few tweaks that I find useful on the Clash Detective – Display Settings panel.  I only set Item 2 to be highlighted (leaving Item 1 controlled by a previously applied Appearance Profile), and set the Viewpoint to Save changes.  Now, as I go through the clash list, I use my SpacePilot Pro in Fly mode to get the view looking nice, and when I switch away and back to that clash, my previous camera movement is preserved

  • If you do a search using the Find Comments tool, but don’t enter any search critera, you will be presented with a detailed history of your interaction with the project – very helpful
  • How to re-path NWC file links (basically just close NWF, slightly rename, open NWF, dialog will walk you through it):
    Revit .NWC files not updating

Here’s an idea I came up with for document aggregation:

  • As you know, Design Review can open almost anything and save it as DWFx.  And Navisworks can append / import DWFx data (append = 3D, import =2D).  So you can use this to create a combined project document that has a combination of different data – images, project submissions, markup sets, meeting minutes etc.

    Download Design Review install package from here (700mb).

    You can also download the 2D DWF writer (printer driver) from here.

  • The really cool part is if you create a DWF set from the same originating application (ie. if you export DWFx from Revit) as your geometry, you may be able to select an element on the Sheet View, and find that same element in 3D (see below)
  • I even went so far as to make a PDF of my Clash Report, then print to 2D DWF, then import the pages back into my Navisworks set – interesting way to store Clash report snapshots huh?

Importing 2D DWF data:
When trying to import a 2D DWF, don’t use the Append command (it won’t work, and will tell you it doesn’t contain 3D data).  Instead, use the Import Sheets button on the Project Browser:

Now, you can navigate to an item on the Sheet view, right-click and Find Item in Other Sheets and Models.  To make this all work properly, you should also click the Prepare All button at the bottom of this dialog…

Once you have found the item in your main NWC, click View.  You can then use Focus or Zoom commands to correctly visualize the item from that particular sheet.

You can’t easily put items in folders in the Project Browser, but when you import a new DWF, it puts all of those Sheets together (adding them to the bottom of the list)

You can save multiple viewpoints for each Sheet View.  If you draw redlines on one of these saved sheet viewpoints, be sure to finish the command or switch to modify to input the redline / text into the saved viewpoint.

Double-click on the toplevel NWC in the Project Browser to return to your model.

A note on Phasing:

  • I mistakenly assumed that Navisworks would understand if one object was demolished in a clash set, and thus ignore the clash (because at the time of New Construction, the clash would no longer exist, right?).  Apparently not, so…
  • I created a Rule based on two Search Sets, one of Demolished items, one where the Demolished Phase was undefined.  The rule type to use is “Specified Selection Sets” (pick the two sets).  This effectively excluded the problematic phasing condition from the clash results – and reduced clashes from 177 to 118 in one case…

When exporting a report:

  • I like the Tabular HTML option.  It also exports a folder with a set of larger images.  You can use a PDF printer like CutePDF or Distiller to print the report from IE into a PDF, thus making it easier to transmit
  • You can change the size of the images exported in a Clash Report – use the hold Shift+click on Options method:
    ‘Secret’ Settings: Changing Image Sizes in Navisworks Clash Detection Reports | microsolresources
  • After exporting a report for transmission, it might be a good idea to save the clash views into your Navisworks project, like this:
  • Now, using these viewpoints, you can arrange them into folders in Navisworks.  When you export to DWFx, the views will be available to someone using Design Review (or Navisworks Freedom).
  • Keep in mind than an NWF file retains links to NWC files and updates them accordingly, while an NWD is a single container of all data in a Navisworks file at a given time (a snapshot).

Sadface – There is no Tab key for selection cycling of objects under the cursor.

Download link for the free viewer (does anyone else find it funny that Navisworks – inherently a viewing program and not a content creation tool – also has its own viewing program?):
Navisworks Freedom | Free 3D Viewer Download

Further reading / resources:

Autodesk Navisworks Tutorial – Clash Detective

Navisworks Clash Course

Great class for new Navisworks users – download the video from AU:
Autodesk University – BIM for Contractors: An Introduction to Autodesk® Navisworks® Manage 2012, Part 1
Autodesk University – BIM for Contractors: An Introduction to Autodesk® Navisworks® Manage 2012, Part 2

A kind-of workaround for the selection cycling annoyance:

Other Navisworks classes from AU you may want to check out:
Autodesk® Navisworks®: Practical Tips and Tricks from Seven Years in the Construction Industry

Autodesk® Navisworks® Isn’t Just for Contractors: How an Architecture Firm Is Using Navisworks to Improve Its Process

Autodesk® Navisworks® in the A/E Design Firm