When Revit exports to IFC, it typically uses the current Location (Survey Point) Shared Coordinates as Origin. You can observe this in the IFC file:

2%2Bifc.png

But what if you want to Export to IFC with Project coordinates (Revit origin), not Shared?

We want to do this because we have set up the import process from Tekla using this same Revit origin, here and particularly this:

tekla.png

1) Firstly, make a container RVT file with one Site Location, no shared coordinates. In other words, Project Base Point, Survey Point, and Revit Origin are all in one place.

1%2Bproject.png

2) Then, open the project you want to export, and link this ‘container’ file Origin-to-Origin

3) Transfer Project Standards:

3.png

4) Choose the Link you made, and Project Info (only):

4.png

5) Choose New Only (this will just bring in the uniquely named project location from the link):

5.png

6) Open Location dialog in Revit, under Site you will notice a new “Site“. Set it current with the Make Current button:

6.png

7) Now that the Project Origin (neutral coordinates) are set, you can export to IFC:

7.png

8) After Exporting, reset the coordinates back to what it was before with Make Current:

8.png

9) Optional: delete the IFC Export site definition if you don’t need it anymore…

I previously posted about a similar method, but it was a bit ‘destructive’, whereas the above process can be implemented into a live project more easily:
What Revit Wants: When and how to neutralize Survey coordinates for IFC export from Revit

Further reading:

Let’s face it, sometimes Shared Coordinates can be a pain. Issues may arise when trying to make small adjustments to very large numbers, and that comes up in other places in Revit too. In some cases, using “Specify Coordinates at a Point” has almost no effect, and you need to resort to workarounds like these.

In Revit, if we follow certain steps in a certain way we can solve these issues. It may seem a fiddly, but if you want to fix coordinates on an existing model, perhaps one of these methods will work for you.

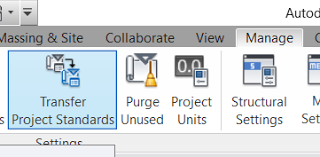
Method 1 – Transfer Project Standards, Project Info
This transfers the ‘location’ data of a Shared Site…

On a real project, you will probably have a control model you can use in the workflow below. The control model needs to have some lines showing at the desired Project Base Point position, probably in a Linked View, as well as a SITE fixed named site that has the ‘correct’ shared coordinates.

  1. Open one of your models to fix
  2. Go to a Plan view
  3. Link in the COORDINATES file Origin-To-Origin
  4. Set Linked view – COORDINATES
  5. Turn on Site – Project Base Point
  6. Select it and ‘unclip’
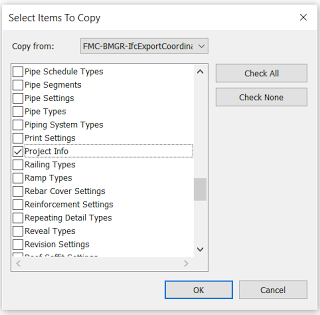
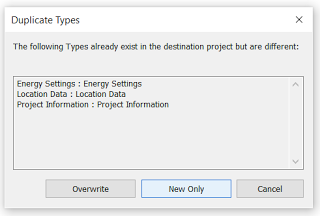
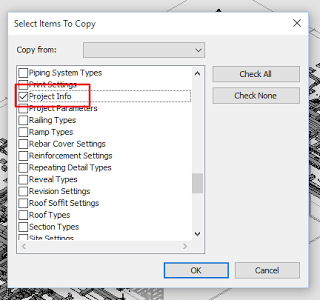
  7. Transfer Project Standards (from the link) – Project Info
  8. Choose ‘New Only’
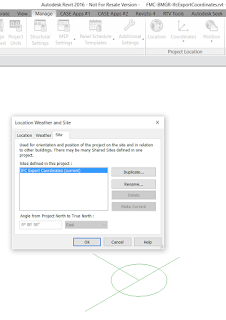
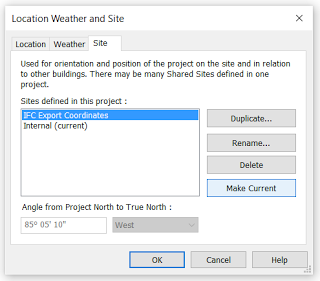
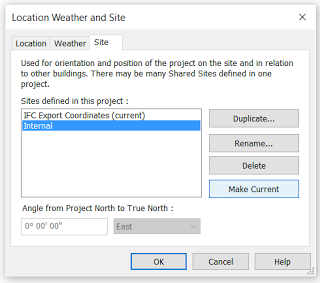
  9. Go to the Location – Site dialog box
  10. Set the SITE fixed to ‘Make Current’
  11. Delete your old SITE, and rename SITE fixed to SITE (we have now replaced the shared site coordinate info with that from the control model). Now, to get a moved PBP in the right spot for the project
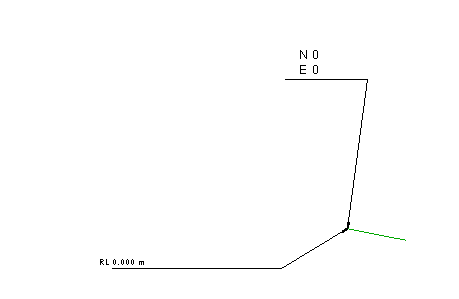
  12. Back in Floor Plan view, slightly drag the unclipped PBP away from the two green lines (the pbp position in the control file), then move it back to exactly that point
  13. PBP should now be fixed

tps.png

If this doesn’t work, you may try
Method 2 – neutralizing coordinates and re-Acquiring

  1. Select your PBP, unclip it, rightclick and “Move to Startup Location”
  2. Link in a new, blank RVT such as a NEUTRAL_COORDINATES.rvt and Acquire Coordinates from it (this resets coordinates)
  3. Save your file (your PBP should report 0,0 coordinates)
  4. Link in the control model PBP RVT
  5. Acquire coordinates from it
  6. Delete it (yes)
  7. Re-link it again (this is to get around a Revit bug, that sometimes ‘shifts’ the linked model after acquiring coordinates)
  8. Save your host file (shared coordinates are now set correctly, and the PBP can be moved into place as below)
  9. Select your PBP, unclip it, and move it to the location from the control model. You may need to set up a plan view that has PBP switched on, and view range all the way down to AHD 0.00.

Both of these methods are somewhat involved, but they may be useful to you in those situations where “nothing else works”.

When exporting to IFC, you may find that Revit feeds the Survey Coordinates (or shared coordinates) to the resulting IFC file, when in fact you want it to be based on Project Coordinates.

If your project team is using origin-to-origin linking, it will be almost vital that you neutralize the Revit survey coordinates immediately prior to exporting to IFC.

This is quite easy:

  1. Make a new file based on a blank template
  2. Insert a origin locator dwg and draw a couple of model lines over the top (this is purely to give you something to “pick”)
  3. Save and close this blank RVT file (and keep it for future use)
  4. Link it into your live Revit project
  5. Use Acquire Coordinates and select the new, fresh, blank RVT file
  6. Save As this temporary RVT with neutralized survey coordinates to somewhere
  7. Now Export your IFC

Your resulting IFC file won’t be confused about which coordinate system to use – it should now Append to Navisworks and other software using the same origin-to-origin coordinate system as that in the originating Revit project.