Changing and updating Shared Coordinates in Revit can be quite a challenge. At Virtual Built Technology we often create a Revit Control File to manage and transfer project datums, shared coordinates and other compliance items for the project team.
This video describes the techniques and challenges involved in updating and instituting shared coordinates on a Revit project. It also includes the steps involved in adopting other Revit modelling standards and requirements into your file.
Here are some of the tips included in the video:
how to un-share coordinates for linked models
how to acquire new coordinates
checking that coordinates are correct for linked models
using Transfer Project Standards – Project Info as a method of fixing coordinates
other model compliance steps including: updating base point settings, transferring Phase Settings, loading a Start View for the project
copying locator elements
copying scope boxes
using Dynamo to automatically generate the required worksets for compliance
I’m sure you are aware that intellectually Revit shared coordinates take minutes to explain, but emotionally they take years to master 🙂
I’ve been looking for a way to check and validate coordinates using the Revit API. One method I implemented in VirtualBuiltApp is to gather Grid Intersection coordinates and compare those, but obviously you need a federated model with links to achieve that comparison.
One interesting fact to note is this:
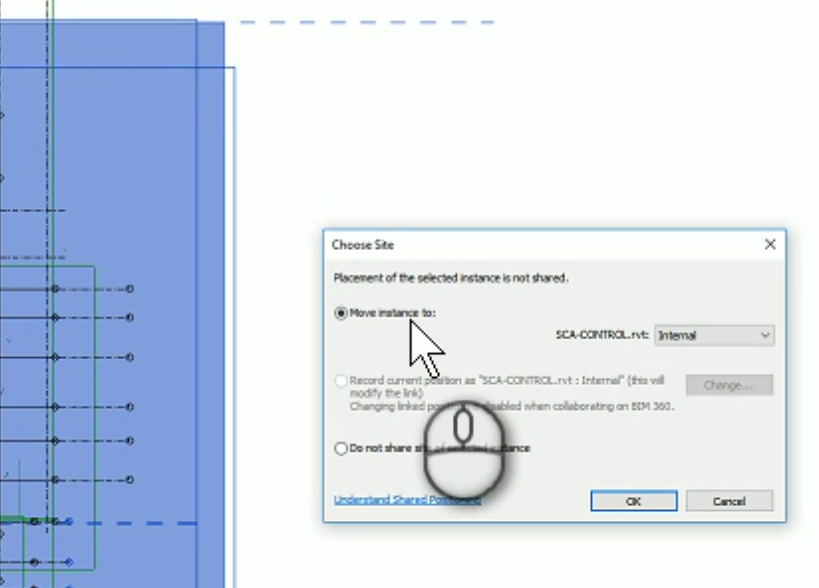
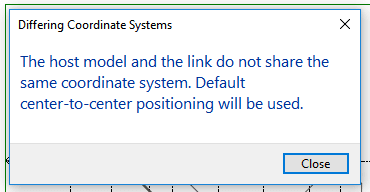
two Revit models can Report functionally identical shared coordinates (same translation and true north rotation), and you can still receive “The host model and the link do not share the same coordinate system. Default center-to-center positioning will be used”.hashtag sadface, hashtag why-revit-why
If we put this another way:
if two models don’t have some related history (created from the same file), or
if Acquire or Publish Coordinates has not occurred between those models, then
the Shared Coordinate error will appear — even if they report identical Spot Coordinates and True North Rotation
If you are wondering what the Revit API actually does support in terms of Shared Coordinate setup and validation, here is the best bit of Revit API Shared Coordinates information I can share:
A GUID-based relationship is set up between the files. Setting up the same relationship has been possible via the API via Document.AcquireCoordinates() for a few releases.
With 2018’s SiteLocation.IsCompatibleWith() it is also possible to identify if two coordinate systems are the same.
Also, keep in mind that BIM 360 Design (Revit Cloud Worksharing) does not support Publish Coordinates. Only Acquire Coordinates can be used in that environment.
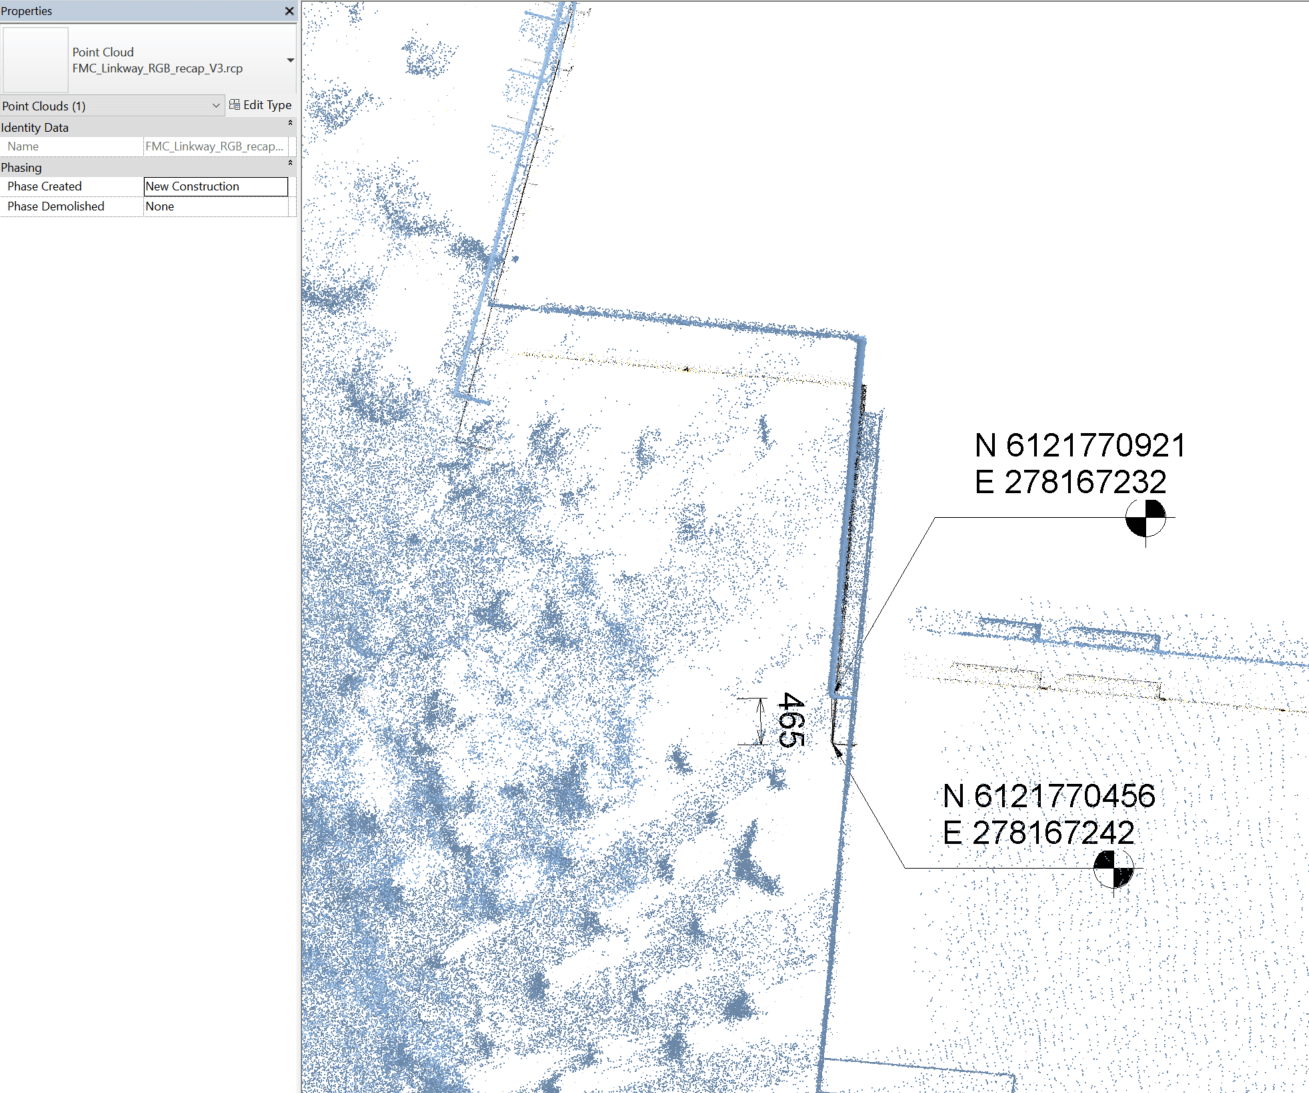
So when dealing with ‘world’ coordinates in a point cloud, sometimes things just don’t work too well. I thought I had this all solved recently by using the DXF, Center-to-Center, Acquire Coordinates workflow. However, I discovered that somewhere along the line, Revit still does break down with the large coordinates. I think this is happening in between Recap and the Revit point cloud rendering engine. I was getting something that looked like this:
As you can see, the shared coordinate system is very large. In this situation, you can’t even move the point cloud into the correct location in Revit, it jumps in large increments when moving. Interestingly, Navisworks and AutoCAD both handle these large coordinates ok – appending the same data does not have the error shown above. So…
How do we fix this and make Revit happy?
Basically, we do a temporary truncation of the source data, get it into Revit, and then reinstate the appropriate coordinate system.
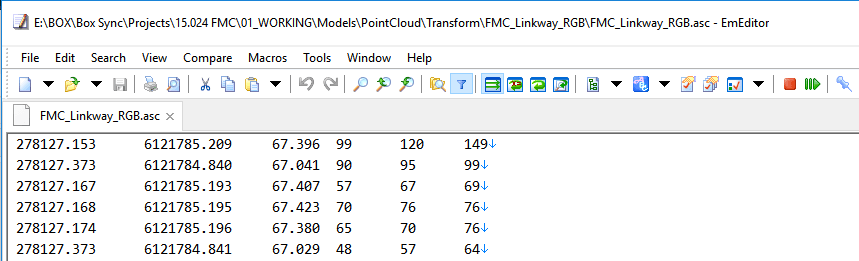
To truncate the data, have a look at your source point cloud information. In my case, I could identify 4 leading digits for the X and Y coordinates that were not significant:
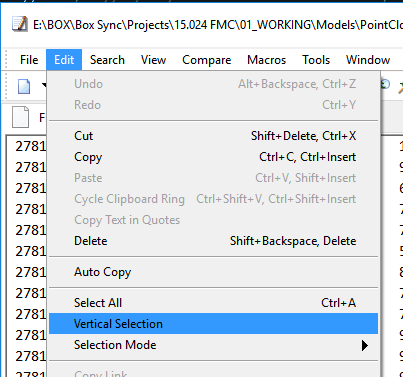
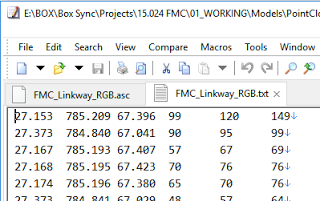
Using EmEditor (which handles large text files very well), and its Vertical Selection feature, I was able to delete the 2781 and 6181 digits from my source data.
In effect, this transformed everything by 278100m and 6121000m. Keep these numbers in mind for future reference…
Ok, with the simplified source data in hand, I followed these steps:
Index a new RCP in Recap using the simplified data
Open surveyor DXF file in AutoCAD and manually Move all the geometry. Move the objects by the values above (278100, 6121000) towards the origin. Save As – a new DWG file with modified coordinates.
Link this modified DWG into Revit, Center-to-Center
Acquire Coordinates from it
Link the Point Cloud RCP By Shared Coordinates
Everything lines up now that the large coordinate shift error has been avoided!
Link in the original DXF and align it with the modified temporary DWG we were using
You may need to temporarily neutralize coordinates (here or here), and…
Now you can Acquire Coordinates from the original DXF and you will have reinstated the ‘world coordinates’, but the Revit point cloud rendering engine is now much happier.
Hope this helps you if you face a similar problem 🙂
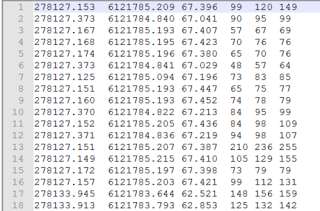
I thought that most of this was ‘easy’ and solved now, but it was more of a challenge than I expected. I received aASC file from a survey in XYZRGB format, which looks like this:
Those XYZ values are Metres (or Meters if you are in US) in the MGA 94 coordinate system. I also received aDXF file with the same World coordinates, and project related gridlines so I could relate the pointcloudto our Revit models.
I tried getting the MGA Shared Coordinates right inRevit, and then linking an RCP or RCS from Recap ‘by Shared Coordinates‘, but I didn’t have much joy.
Here is the workflow that worked for me…
Getting the right Shared CoordinatesinRevit
Start a new, blank Revit model
Link the DXF Centre-to-Centre (this is best way to deal with huge coordinates)
Acquire Coordinates from it
Save your Revit file. You now have the right World coordinates, and a project grid relationship.
Importing the PointCloud by Shared Coordinates
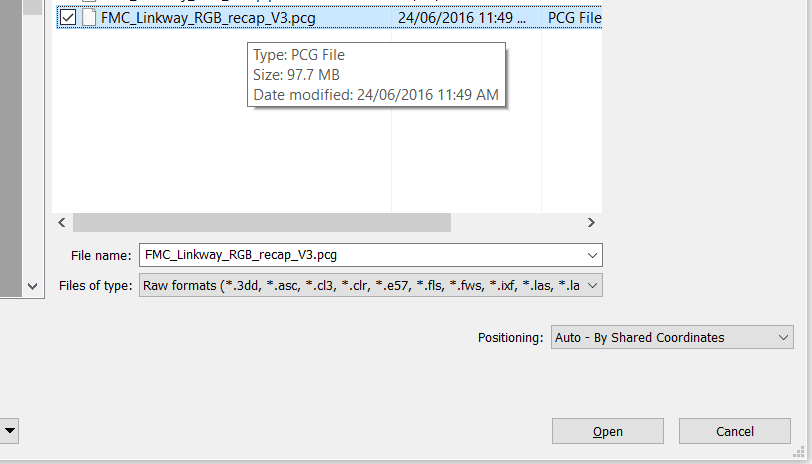
Open Recap and import the data. For the ASC dataabove, on the import settings I used ‘Advanced’, and chose the text columns XYZRGB. I also set the coordinate system.
Export to PCG. Sounds weird, I know. But PCG is a nice reliable container that supports colours.
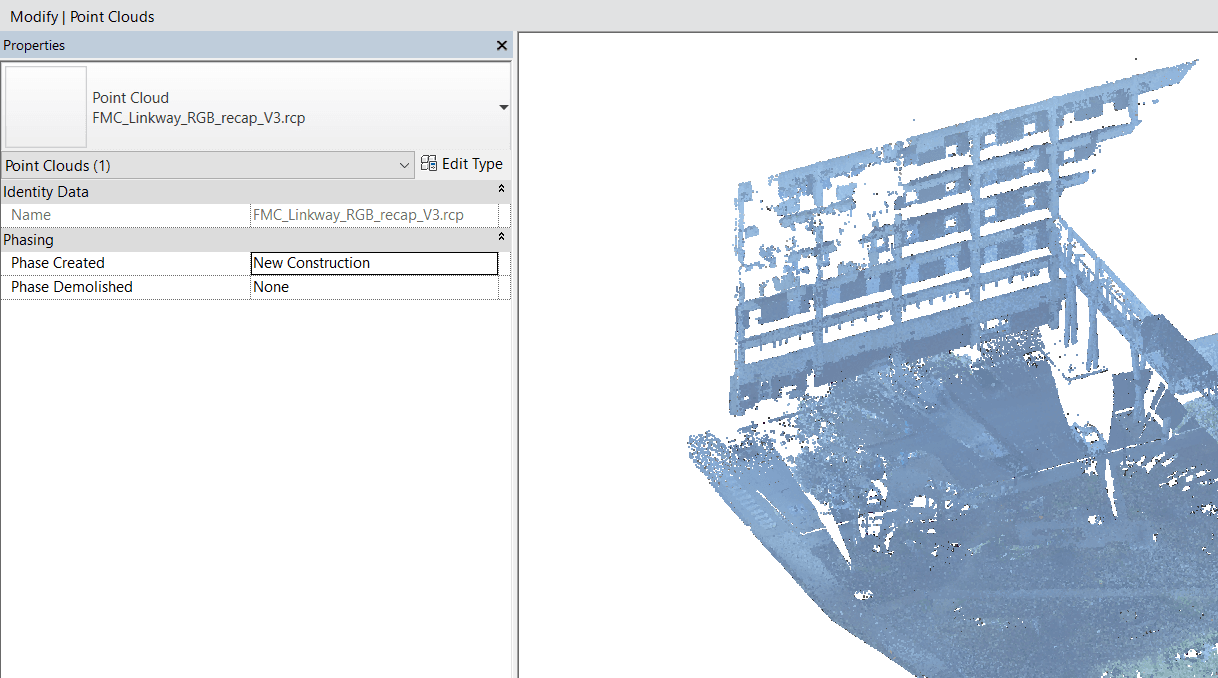
InRevit, Link PointCloud, by Shared Coordinates, and choose the unIndexed raw PCG:
Revit will now open another dialog, and you can index the PCG file (again) toan RCP+RCS
Link this RCP file by Shared Coordinates
It should be in the right location and related to the DXF coordinate system.
Let’s face it, sometimes SharedCoordinates can be a pain. Issues may arise when trying to make small adjustments to very large numbers, and that comes up in other places in Revittoo. In some cases, using “Specify Coordinates at a Point” has almost no effect, and you need to resort to workarounds like these.
In Revit, if we follow certain steps in a certain way we can solve these issues. It may seem a fiddly, but if you want tofixcoordinates on an existing model, perhaps one of these methods will work for you.
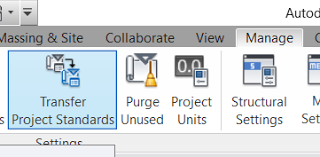
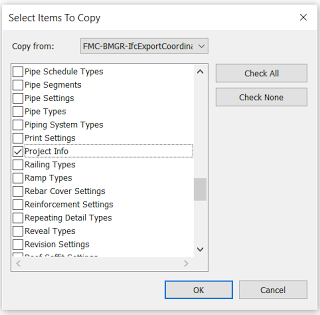
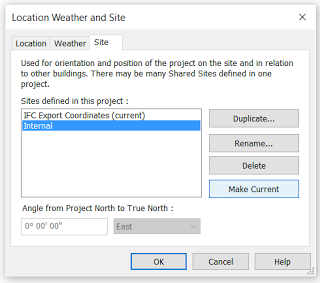
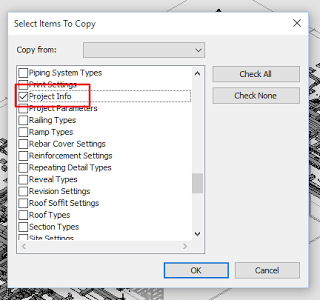
Method 1 – Transfer Project Standards, Project Info
This transfers the ‘location’ data of a Shared Site…
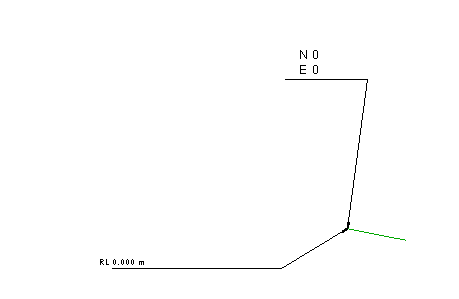
On a real project, you will probably have a control model you can use in the workflow below. The control model needs to have some lines showing at the desired ProjectBasePoint position, probably in a Linked View, as well as a SITE fixed named site that has the ‘correct’ sharedcoordinates.
Open one of your models tofix
Go to a Plan view
Link in the COORDINATES file Origin-To-Origin
Set Linked view – COORDINATES
Turn on Site – ProjectBasePoint
Select it and ‘unclip’
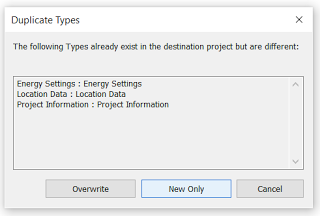
Transfer Project Standards (from the link) – Project Info
Choose ‘New Only’
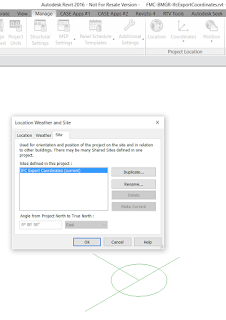
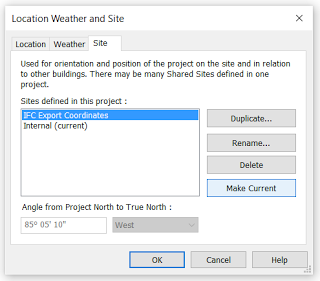
Go to the Location – Site dialog box
Set the SITE fixedto ‘Make Current’
Delete your old SITE, and rename SITE fixed to SITE (we have now replaced the shared site coordinate info with that from the control model). Now, to get a moved PBP in the right spot for the project…
Back in Floor Plan view, slightly drag the unclipped PBP away from the two green lines (the pbp position in the control file), then move it back to exactly that point
PBP should now be fixed
If this doesn’t work, you may try Method 2 – neutralizing coordinatesand re-Acquiring
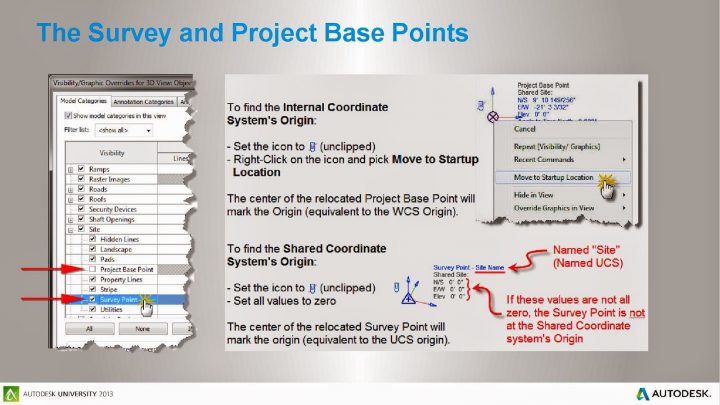
Select your PBP, unclip it, rightclick and “Move to Startup Location”
Link in a new, blank RVT such as a NEUTRAL_COORDINATES.rvt and Acquire Coordinates from it (this resets coordinates)
Save your file (your PBP should report 0,0 coordinates)
Link in the control model PBP RVT
Acquire coordinates from it
Delete it (yes)
Re-link it again (this is to get around a Revit bug, that sometimes ‘shifts’ the linked model after acquiring coordinates)
Save your host file (sharedcoordinates are now set correctly, and the PBP can be moved into place as below)
Select your PBP, unclip it, and move it to the location from the control model. You may need to set up a plan view that has PBP switched on, and view range all the way down to AHD 0.00.
Both of these methods are somewhat involved, but they may be useful to you in those situations where “nothing else works”.
Video: Matthew Miller recently gave high praise to this class, when he posted that David Baldacchino’s class AB412 Navigating Through the Storm Using Coordinate Systems in Revit “has been the best explanation of shared coordinates, that has helped me understand them.”
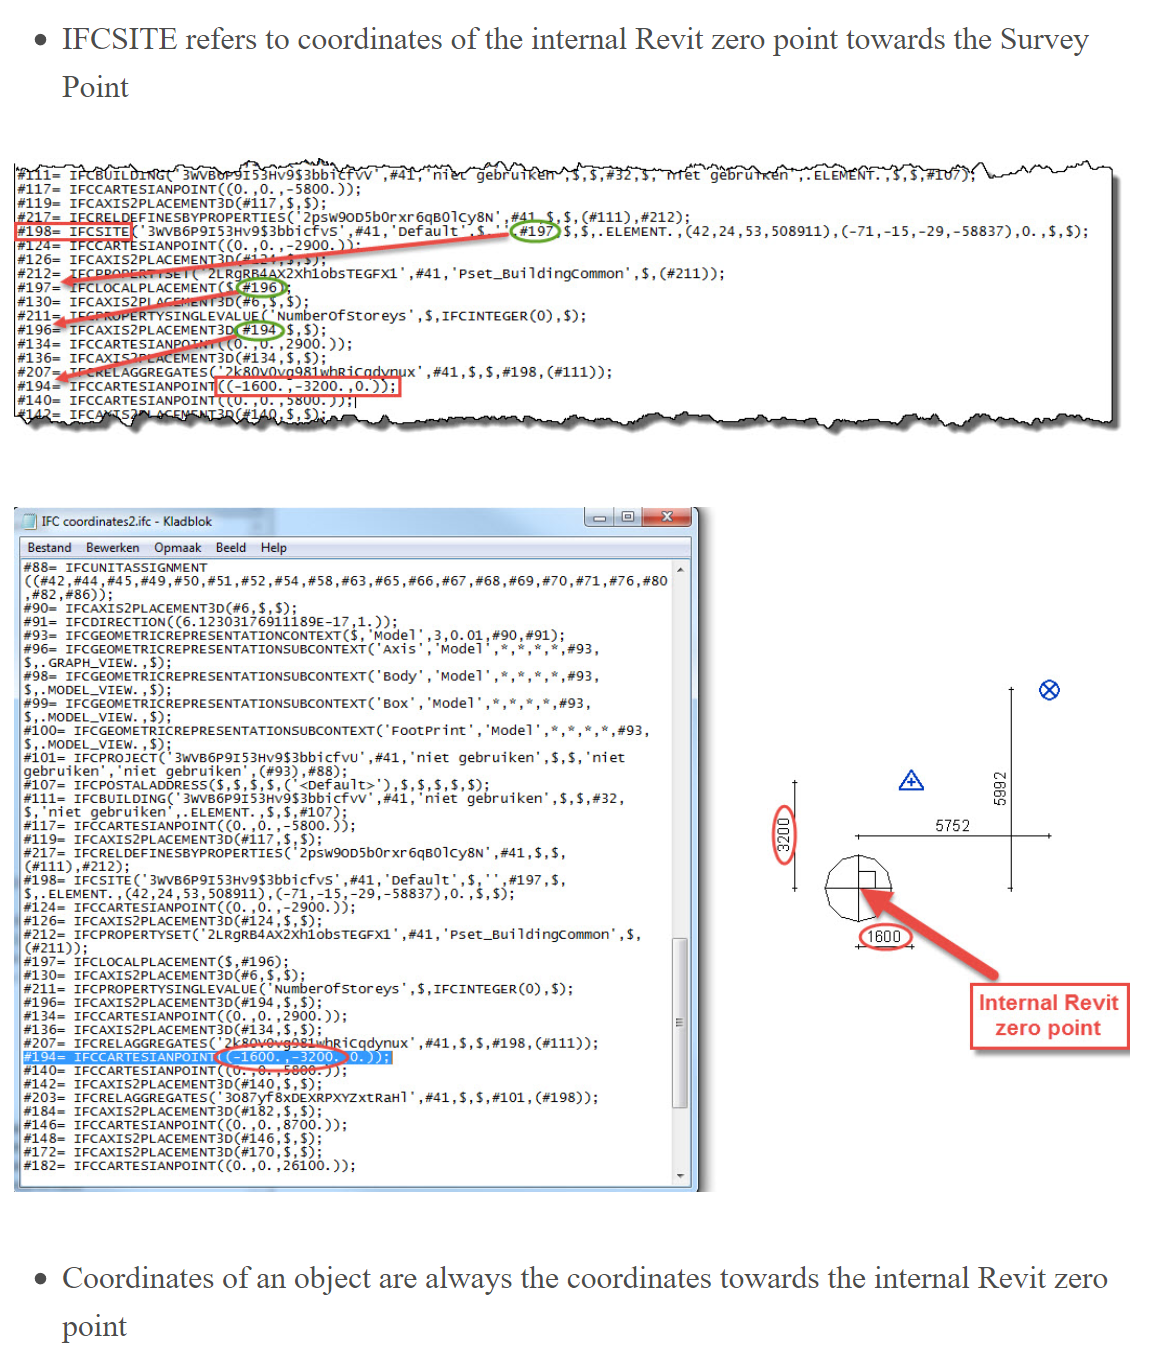
When exporting to IFC, you may find that Revit feeds the Survey Coordinates (or shared coordinates) to the resulting IFC file, when in fact you want it to be based on Project Coordinates.
If your project team is using origin-to-origin linking, it will be almost vital that you neutralize the Revit survey coordinates immediately prior to exporting to IFC.
This is quite easy:
Make a new file based on a blank template
Insert a origin locator dwg and draw a couple of model lines over the top (this is purely to give you something to “pick”)
Save and close this blank RVT file (and keep it for future use)
Link it into your live Revit project
Use Acquire Coordinates and select the new, fresh, blank RVT file
Save As this temporary RVT with neutralized survey coordinates to somewhere
Now Export your IFC
Your resulting IFC file won’t be confused about which coordinate system to use – it should now Append to Navisworks and other software using the same origin-to-origin coordinate system as that in the originating Revit project.