I am loving Navisworks more with every passing day.  A job doesn’t have to be a fully collaborative / coordinated project in order to get benefit from Navis.  Here is a collection of recent information and resources relating to Navisworks.  Hope you find something interesting!

Firstly, a link to the Navisworks updates page.

On Revit – Navisworks implementation generally:
“… contractor will import the Revit model into Navisworks and use Navisworks to ‘virtually construct the building’, creating construction sequences to ensure every element slots into place, almost like a jigsaw. Linking the model to packages like Microsoft project will allow digital construction monitoring against the project schedule. This is happening all over the world…”
via
http://revitst.blogspot.in/2013/08/revit-collaboration.html

Using Catalogues in Navisworks Quantification:
http://beyonddesign.typepad.com/posts/2013/08/using-catalogues-in-navisworks-quantification.html

Coordinating Models stored in Vault using Navisworks:

http://beyonddesign.typepad.com/posts/2013/08/managing-your-discipline-and-coordination-models-with-autodesk-vault.html

Up and Running with Autodesk Navisworks 2014
by Deepak Maini

I have been reviewing this book and I really enjoy its content.  It is detailed, comprehensive and easy-to-follow.  Highly recommended for those who are learning Navisworks or those who want to increase their proficiency and efficiency when using Navisworks… More on this book in a future post.

Downloads (via this):
Table of Contents
Tutorial files

Australia / NZ purchase page:
here

Amazon page for the Up and Running book:
http://www.amazon.com/Up-Running-Autodesk-Navisworks-2014/product-reviews/1482605279

Training course by Deepak:
http://www.cadgroup.com.au/community/blog/cadblog/index.php?showentry=330

4D IFC Importer for Navisworks Manage 2014
At this point in time, you can’t create products in Navisworks from the API, but if you import the IFC using the native importer (IFC2x3 only), then you can run my IFC enhancer (plugin can be downloaded from http://www.geometrygym.com/downloads ) which can generate the timeliner tasks and identify the ifc products by their unique identifiers.
Download:
ggNavisIFC2014x64 v0.0.02.msi (18th October 2013) Navisworks 2014
New plugin to extract 4d information from IFC files and convert into Navisworks timeliner.

Read more:
http://geometrygym.blogspot.com.au/2013/10/navisworks-4d-ifc.html

Hear more about Autodesk® Navisworks® and the Glue Connection, including answers to these important questions:

How do Navisworks and Autodesk® BIM 360™ Glue® work together?
How can BIM 360 Glue bring value to my project?
How does BIM 360 Glue integrate with other applications?
Where does mobile app access fit into the workflow?

To watch this on-demand webcast,
fill out form at link below:
Autodesk – On Demand Webcast: Navisworks and the Glue Connection

or

Use this link

Let’s say you installed a standalone trial using BDSU media, and you are trying to switch to Networked license of Navisworks.  Can it be done?

One possible method:
If you did it by making a Deployment you can modify the deployment and then running the setup again will modify your installation
If you have a manual trial install. it might that placing a LICPATH.LIC file in C:Program FilesAutodeskNavisworks Manage 2013 might do the trick
This file is nothing but an ASCII file that points to your license server

SERVER yourserver.domain 27000
USE_SERVER
via
How to convert Standalone to Network – Autodesk Discussion Groups

Do you have a better suggestion?  Feel free to comment…

Other ideas for switching standalone to network licenses for AutoCAD products can be derived from:
http://blog.microsolresources.com/2014/04/29/how-to-change-license-type-in-autocad-2015

Some reading:
Solution for Inventor
Prior to the 2012 release we did not provide license switching at runtime. You had to uninstall the product and reinstall it with the appropriate license.
For the 2012 release products, the solution described here has only an effect on the licensing method for the individual Inventor product. If Inventor is installed as part of a suite (Factory Design Suite or Product Design suite), the other products in the suite, except AutoCAD, do not have a mechanism for runtime license switching and will continue using the license method used at install time. Below are three example scenarios.

For the 2013 release products and beyond, this solution is both valid for the individual Inventor and Inventor LT product and for Inventor and Inventor LT installed as part of a suite.
[HKEY_LOCAL_MACHINESOFTWAREAutodeskNavisworks Manage x6410.0AdLM]
“Type”=dword:00000002

Other info:

Navisworks may have issues importing PCG point cloud files.  For example, if you try to append a PCG directly to Navisworks Manage 2013, it will say “No plugin exists that will open pointfile.pcg”.

If you try to export a view from Revit 2013 to Navisworks and it contains a linked point cloud file, the point file will not be converted even if the “Convert linked files” option is ticked in Navisworks settings.

Here are some workarounds:

Some have recommended importing the PCG into AutoCAD, and export an NWC from there:
Revit OpEd: Point Cloud Data into Navisworks
Point cloud import – Autodesk Discussion Groups

You can also:

  • Import PCG to AutoCAD, then append the DWG to Navisworks
  • get PTS from Cyclone, or even TXT, and then append it directly to Navisworks
As per:

Point Cloud files imported into Navisworks & Revit from Cyclone, .pts vs .ptx. | LinkedIn

Depending on the size of the original point cloud file, it will take some time for Navis to make the necessary indexed NWC file (like half a day maybe).

Obviously, if you are living in 2014-Suite-Land, you can also just use Recap to import the PCG and export as a supported file format for Navisworks.

A 2008 PDF that describes the point cloud types Navis supported:
http://www.sparpointgroup.com/uploadedFiles/News/PDF/peterquinn.pdf

Of the 4 free 3D PDF creation methods I have previously posted, this is the easiest and probably the best:

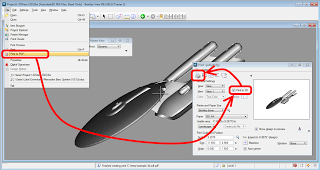
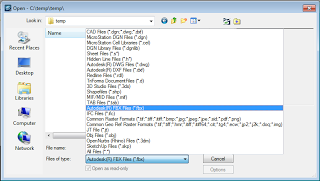
  1. Export an FBX file from Revit, Navisworks, or any other Autodesk application (File – Export – FBX)
  2. Open it in Bentley View and Print to PDF (tick the Print to 3D checkbox).

Done.  It is literally that easy.  For a slightly different step by step method specifically for Revit, go to this page.

Note: for direct, simple and customizable 3D PDF creation capability from Revit, check out the Revit to 3D PDF link in the sidebar.

The key difference between this and my previous post about using Bentley View to make 3D PDFs is the fact that it supports opening FBX natively (you don’t need special exporters) – and FBX is a format that Autodesk also supports extensively.  Bentley View can open lots of other formats too…check it out:

The good thing about this process is that you capture any colour overrides that you applied in an exported Navisworks view.  Keep in mind that you can also easily adjust the brightness of the 3D scene in Bentley View.
Also, did you know that Bentley View can open a Sketchup SKP file directly and print it to 3D PDF with ease?

Now, to those who cry “Nay, but a DWF is better…”

  • Yes, it is
  • It isn’t as widespread as PDF
  • Most people already have Adobe Reader installed
  • Some people won’t have the PC permissions necessary to install Design Review due to strict IT policies
  • For those Clients who want a quick, navigable 3D impression of their building – 3D PDF is going to be much more accessible and user friendly

Personally, I think the most limiting factor in the use of 3D PDF for visualization is that it doesn’t support textures (as per the limitations of U3D format in the notes at the end of this post).

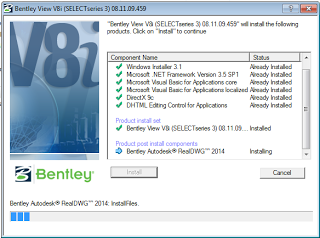
Bentley View V8i (SELECTseries 3) update 2 has some key changes:

  • Autodesk® RealDWG™ 2014 support 
  • Support for the IFC and JT file formats 

Key updates are described at this link.

To easily deploy Bentley View easily, you will need two packages:

  •  Prerequisites for Bentley Desktop Applications Software v08.11.09.03
    Filename: pbda08110903en.exe
  • Bentley View V8i (SELECTseries 3) v08.11.09.459
    Filename: vw081109459en.exe

Ok, what if you are using an earlier version of Bentley View that can’t open FBX directly?

  1. Export FBX of desired view from Navisworks [160mb]
  2. Open FBX in FBX Review or FBX Converter and save as OBJ [169mb]
  3. Open the OBJ in Bentley View V8i and print to 3D PDF (you can use this method) [13mb]
Step 3 (opening the OBJ) took a long time, but it did work.  I performed this process with superseded Bentley View version 08.11.07.440 (downloaded in 2011).
Download it at:

Some notes:
Limitations of U3D:
Texture mapping is currently limited to only a diffuse map per material…Okino’s Universal-3D (.u3d) 3D File Export Converter

Photoshop 3D capability:
Note:
In Photoshop CS5 and CS6, 3D functionality was part of Photoshop Extended. All features in Photoshop Extended are part of Photoshop CC. Photoshop CC does not have a separate Extended offering.

You need photoshop cs3 or later for 3d model importing. It will definitely import a .obj. As mentioned you need acrobat pro or acrobat X to import u3d files to use in a pdf. If you do not have access to cs3 or later there are other alternatives for viewing models. Do you specifically need to have a 3d pdf? If not you can download the .fbx plugin for quicktime, you can then export you scene or model as an fbx and open in quicktime and it will server a a 3d viewer. Thee are also numerous other obj viewers available on the net just look around. Wings 3d is a full modeling app that is free and very lite in size and should be able to open several types of 3d files.
CGTalk – How to covert the 3d model to .u3d and put in to PDF

Wings 3D can import FBX and export VRML / WRL:
Wings 3D – Wikipedia, the free encyclopedia

Download at http://www.wings3d.com/?page_id=84 (2011 software)

What is Navisworks Manage good for?

  • Model aggregation – either from pure Revit or from a mixture of 3D software
  • Clash Detection
  • Programme Visualization (timelining)
Some great things about Navisworks:

  • it is very fast to navigate around the model in 3D, and files are generally lightweight
  • you can easily switch between Orthographic and Perspective (its funny the things that impress you as a Revit user…)
  • SpacePilot Pro integration works very smoothly, even better than Revit (probably because the models are lightweight, so the SPP isn’t fighting your system specs to redraw things, as in Revit)

Note: this article based on using Navisworks Manage 2013, Service Pack 2 (10.2.0.91043) on Windows XP 64-bit.

Key things to keep in mind when exporting or opening Revit files for use in Navisworks:

  • Firstly, it seems most people recommend using the Revit add-in to export a Navisworks NWC from a dedicated Revit 3D view (rather than opening the RVT direct from Navisworks).  This way, you can have some certainty about the export result (the correct Design Option is exported etc)
  • If you have Shared Coordinates set up and working between your various Revit models, things will be a lot simpler.  There is an option in the exporter where you can specify that it uses Shared Coordinates.  If you are working with a set of RVTs where shared coordinates were never properly set up, you may need to pick a particular RVT and publish coordinates to all related RVTs in the set.  This may become tricky if there is no site / main host file and you have to play around by cascading coordinates into all related RVTs… you get the idea.
Some things that will help you:
  • Press F2 anywhere to rename
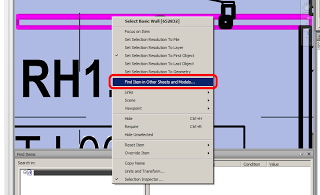
  • Navisworks has a Project Browser (View – Windows – Project Browser).  You can append a 2D DWF containing drawing sheets, and view these sheets in Navisworks from the Browser.  You can also select objects from these imported Sheets and find them in the 3D model! (more info on this below)
  • When clashing, you can group clashes related to a particular item by right-clicking on it and selecting “Group Clashes Involving Item”:

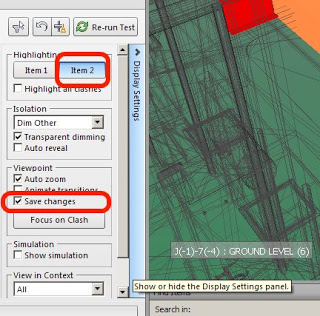
  • There are a few tweaks that I find useful on the Clash Detective – Display Settings panel.  I only set Item 2 to be highlighted (leaving Item 1 controlled by a previously applied Appearance Profile), and set the Viewpoint to Save changes.  Now, as I go through the clash list, I use my SpacePilot Pro in Fly mode to get the view looking nice, and when I switch away and back to that clash, my previous camera movement is preserved

  • If you do a search using the Find Comments tool, but don’t enter any search critera, you will be presented with a detailed history of your interaction with the project – very helpful
  • How to re-path NWC file links (basically just close NWF, slightly rename, open NWF, dialog will walk you through it):
    Revit .NWC files not updating

Here’s an idea I came up with for document aggregation:

  • As you know, Design Review can open almost anything and save it as DWFx.  And Navisworks can append / import DWFx data (append = 3D, import =2D).  So you can use this to create a combined project document that has a combination of different data – images, project submissions, markup sets, meeting minutes etc.

    Download Design Review install package from here (700mb).

    You can also download the 2D DWF writer (printer driver) from here.

  • The really cool part is if you create a DWF set from the same originating application (ie. if you export DWFx from Revit) as your geometry, you may be able to select an element on the Sheet View, and find that same element in 3D (see below)
  • I even went so far as to make a PDF of my Clash Report, then print to 2D DWF, then import the pages back into my Navisworks set – interesting way to store Clash report snapshots huh?

Importing 2D DWF data:
When trying to import a 2D DWF, don’t use the Append command (it won’t work, and will tell you it doesn’t contain 3D data).  Instead, use the Import Sheets button on the Project Browser:

Now, you can navigate to an item on the Sheet view, right-click and Find Item in Other Sheets and Models.  To make this all work properly, you should also click the Prepare All button at the bottom of this dialog…

Once you have found the item in your main NWC, click View.  You can then use Focus or Zoom commands to correctly visualize the item from that particular sheet.

You can’t easily put items in folders in the Project Browser, but when you import a new DWF, it puts all of those Sheets together (adding them to the bottom of the list)

You can save multiple viewpoints for each Sheet View.  If you draw redlines on one of these saved sheet viewpoints, be sure to finish the command or switch to modify to input the redline / text into the saved viewpoint.

Double-click on the toplevel NWC in the Project Browser to return to your model.

A note on Phasing:

  • I mistakenly assumed that Navisworks would understand if one object was demolished in a clash set, and thus ignore the clash (because at the time of New Construction, the clash would no longer exist, right?).  Apparently not, so…
  • I created a Rule based on two Search Sets, one of Demolished items, one where the Demolished Phase was undefined.  The rule type to use is “Specified Selection Sets” (pick the two sets).  This effectively excluded the problematic phasing condition from the clash results – and reduced clashes from 177 to 118 in one case…

When exporting a report:

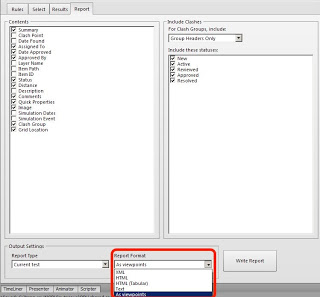
  • I like the Tabular HTML option.  It also exports a folder with a set of larger images.  You can use a PDF printer like CutePDF or Distiller to print the report from IE into a PDF, thus making it easier to transmit
  • You can change the size of the images exported in a Clash Report – use the hold Shift+click on Options method:
    ‘Secret’ Settings: Changing Image Sizes in Navisworks Clash Detection Reports | microsolresources
  • After exporting a report for transmission, it might be a good idea to save the clash views into your Navisworks project, like this:
  • Now, using these viewpoints, you can arrange them into folders in Navisworks.  When you export to DWFx, the views will be available to someone using Design Review (or Navisworks Freedom).
  • Keep in mind than an NWF file retains links to NWC files and updates them accordingly, while an NWD is a single container of all data in a Navisworks file at a given time (a snapshot).

Sadface – There is no Tab key for selection cycling of objects under the cursor.

Download link for the free viewer (does anyone else find it funny that Navisworks – inherently a viewing program and not a content creation tool – also has its own viewing program?):
Navisworks Freedom | Free 3D Viewer Download

Further reading / resources:

Autodesk Navisworks Tutorial – Clash Detective

Navisworks Clash Course

Great class for new Navisworks users – download the video from AU:
Autodesk University – BIM for Contractors: An Introduction to Autodesk® Navisworks® Manage 2012, Part 1
Autodesk University – BIM for Contractors: An Introduction to Autodesk® Navisworks® Manage 2012, Part 2

A kind-of workaround for the selection cycling annoyance:

Other Navisworks classes from AU you may want to check out:
Autodesk® Navisworks®: Practical Tips and Tricks from Seven Years in the Construction Industry

Autodesk® Navisworks® Isn’t Just for Contractors: How an Architecture Firm Is Using Navisworks to Improve Its Process

Autodesk® Navisworks® in the A/E Design Firm

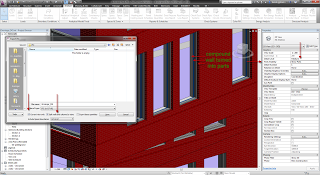
Some tips on using IFC with Parts from http://danielgijsbers.blogspot.com/2012/08/revit-parts-and-ifc.html

It’s important when you export a Revit model to IFC that the following conditions are met:
  • Export with “Current View Only” option
  • Parts must be visible in the view
  • If the “Split Walls and Columns By Level” option is chosen, then wall parts will be assigned to the appropriate level as determined by their spatial position


Be aware:
Parts import / export done for all categories except Roofs
Parts import from IFC : only geometry is imported not the parts information

via
Revit parts and IFC

Have you tried Showcase yet?

Like Shades of Grey, I’m relatively excited about Showcase:
One of my brightest hopes for Revit 2013 is Showcase, which is a totally separate application.  Could this finally be the viewer that works ?  I’ve tried Design Review & Navis Works Freedom,  Quicktime FBX plugin, Tekla Bimsight … People are doing clever things with Game Engines, but I need a quick and easy way of bringing a lightweight export from the model into meetings.  
via
Shades of Grey: BROAD BRUSH & FINE DETAIL

Evidently, you need a pretty decent system to make everything smooth, as Neil Thompson says
@jrostar it eats ram more than revit on full render.

A few links:
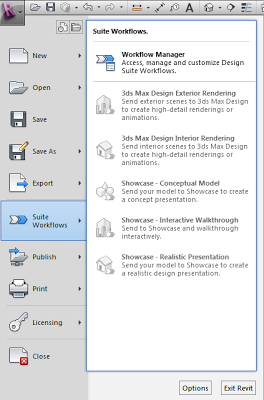
Suites Workflow Manager – WikiHelp

Revit Workflows in the Autodesk Building Design Suite – WikiHelp

Installation notes:

I really tried to get Showcase working without installing the whole Building Design Suite, but I haven’t figured it out yet! Here are some of the steps I tried:

  1. Install Revit, Showcase and Max (separate downloads, not from BDS media)
  2. Activate all products using a Suite license
  3. Extract the folder WorkflowInstaller from your extracted Suite archive – Content subfolder.
  4. Close all Autodesk programs
  5. Run the file AutodeskBuildingDesignSuiteWorkflows.msi from the appropriate subfolder (x64 or x86)
  6. Open Revit – Suite Workflows still not visible 🙁

Direct download Showcase 2013 (use this method):
http://trial.autodesk.com/SWDLDDLM/2013/SHOWCASE/ESD/Autodesk_Showcase_2013_Multilingual_Win_64bit.exe

Direct download 3dsMaxDesign 2013 (use this method):
http://trial.autodesk.com/SWDLDDLM/2013/MAXDES/ESD/Autodesk_3ds_Max_Design_2013_EFGKJS_Win_64bit.exe
http://trial.autodesk.com/SWDLDDLM/2013/MAXDES/ESD/Autodesk_3ds_Max_Design_2013_EFGKJS_Win_32bit.exe

AutoCAD Design Suite Standard 2013
http://trial.autodesk.com/SWDLDDLM/2013/DSSTD/ESD/AutoCAD_Design_Suite_Standard_2013_English_Win_32bit.part1.exe
http://trial.autodesk.com/SWDLDDLM/2013/DSSTD/ESD/AutoCAD_Design_Suite_Standard_2013_English_Win_32bit.part2.rar

Some notes about Workflows:

Need to install 3dsMax to make it work:
Revit Workflows in the Autodesk Building Design Suite – WikiHelp

Install Workflows – WikiHelp
BDSP 2013extContentWorkflowInstallerx64
“C:ProgramDataAutodeskWorkflowsProducts.xml”

What is Autodesk DirectConnect? – WikiHelp

For all you Ipad users out there:

Field BIM-Interactive™ enables BIM viewing and interactivity on the iPad. Key features include:

  • A simple interface that will allow a user to put themselves “inside” the model while in the field
  • Online or offline access to interact with model files
  • Support for both Navisworks® and Revit® files (with other model types to follow)
  • Viewpoints are transferred from your model file into Field BIM-Interactive so you can quickly navigate to a specific location

via
Field BIM-Interactive: Construction BIM viewing on the iPad| Vela Systems