One of the most consistently “in-demand” job positions here in Australia at the moment is for Revit MEP Drafters.  Personally, as part of my coordination role on the new Royal Adelaide Hospital, I’m spending lots of time in and around Revit models that have originated with a huge range of MEP subcontractors – mechanical designers and consultants, plumbing, drainage, fire sprinklers, syphonic roof drainage, medical gas, pneumatic tube – the list literally does go on from there. Invariably, these models end up as NWCs that I use to federate and clash against one another.

Accordingly, it made a lot of sense for me to investigate and fully understand the features of the originating “flavour” of Revit – RMEP, otherwise known as Revit MEP. Accordingly, I have spent the past week checking out The Aubin Academy: Revit MEP 2014publication, authored (somewhat obviously) by Paul F Aubin, along with Darryl McClelland, Martin Schmid and Gregg Stanley

Paul Aubin is one of those guys that really needs no introduction, especially when it comes to Revit. Chances are that you have read something he wrote, watched a video he recorded, or seen him at AU or RTC. As the author had such established credentials, the question for me was “does this book fit my particular needs?”

Like many of you, I have spent a lot of time around Revit over the years. I have even done some basic modelling with the MEP tools in the suite version of Revit. In any case, I’m glad to report that this book strikes a nice balance between theory, explanation and step-by-step workflows. It covers broad aspects related to BIM management and office processes, but it also steps deep enough into the workings of the program to show you how to actually get work done in Revit MEP.

One of the great things about the book is the way that the information is segregated. Do you want to learn specifically about Mechanical modelling tools? Turn over to Chapter 5 – Mechanical Systems. Or perhaps you are more interested in pipework tools? Then try Chapter 6 – Piping Systems.

The beginning of the book shows great sensitivity to the actual project procurement process – how does MEP Revit modelling fit in with the overally Revit model development? You will likely start by receiving a model from the Architect for context – the book describes “best practice” methods of linking and interacting with this data. It also provides some useful insight into data segregation (the kind of information you should definitely file away for future use), like:

“As a guideline, projects up to about 150,000 square feet may reside in a single common MEP model…”

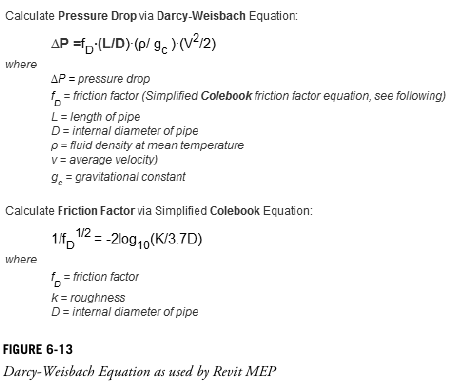
The book also considers the conceptual way that Revit considers and calculates various MEP related items. For example, it includes this illustration of the Darcy-Weisbach Equation as used by Revit:

This type of “conceptual background” is invaluable to me – it comes back to figuring out What Revit Wants. How is RMEP going to analyse and interpret the things that I am modelling? What project parameters are key to the systems analysis process? This book will help you get your head around all of those things, and it does so in readily understandable, easy-to-follow language and layout.

Along with specific workflows for MEP, it also includes great tips that apply to all users of Revit, like this:
“We are going to actually delete all the levels. As such, it is important that you select all levels at once as Revit will not otherwise allow you to delete a single remaining level.”

Notes relating specifically to BIM Managers are included in the context that makes them most useful, like:
“BIM Manager Note:
Revit MEP has added Plumbing as a separate discipline and in conjunction has created a new Plumbing Template. For more information on templates and how to create one for your company refer to Chapter 3. Existing projects will be upgraded on open to add the Plumbing Discipline to Project Browser.”

Analytical considerations beyond Revit are also described, such as:

“Avoid negative offsets of roofs as this might cause exporting errors through the gbXML tool.”

Finally, Paul and his team make sure that they include information that is useful on a day-to-day basis. Here are a couple of examples:

  • In lieu of deleting sizes it might be best to leave the sizes in the table and simply deselect the size in the “Used in Size Lists” and/or the “Used in Sizing” column.
  • Once you click Finish or Cancel in the Floating System Inspector panel the System Inspector Information tags will disappear. If you want a permanent tag to remain, you will have to build a custom tag Family for this purpose and attach it to the object.
  • NOTE: Currently, fittings and equipment cannot have a fill pattern applied to them
  • As you are placing your ductwork you can use the Justification Controls to keep your ductwork flat on top, flat on bottom, etc.

In this post, I have included just a small selection of the productivity- and knowledge-enhancing gems that you will find if you take the time to read The Aubin Academy: Revit MEP 2014.

To conclude, I would like to include this quote regarding the scope and intended audience of this book:
“If part of your job requires that you design building systems and produce construction documentation and engineering design drawings, then this book is intended for you. Specifically, this includes anyone in the Mechanical, Plumbing, Fire Protection, Electrical, and other building design engineering professionals.”

You can get it here:
http://paulaubin.com/books/the-aubin-academy-revit-mep-2014/

Dataset downloads:
Read Me

Dataset Download

Chapter 4 Dataset Update (Replace your copy of this file)

Content used in the book:
http://www.titus-hvac.com/main/software/index.aspx?prod=TerminalUnits

I am loving Navisworks more with every passing day.  A job doesn’t have to be a fully collaborative / coordinated project in order to get benefit from Navis.  Here is a collection of recent information and resources relating to Navisworks.  Hope you find something interesting!

Firstly, a link to the Navisworks updates page.

On Revit – Navisworks implementation generally:
“… contractor will import the Revit model into Navisworks and use Navisworks to ‘virtually construct the building’, creating construction sequences to ensure every element slots into place, almost like a jigsaw. Linking the model to packages like Microsoft project will allow digital construction monitoring against the project schedule. This is happening all over the world…”
via
http://revitst.blogspot.in/2013/08/revit-collaboration.html

Using Catalogues in Navisworks Quantification:
http://beyonddesign.typepad.com/posts/2013/08/using-catalogues-in-navisworks-quantification.html

Coordinating Models stored in Vault using Navisworks:

http://beyonddesign.typepad.com/posts/2013/08/managing-your-discipline-and-coordination-models-with-autodesk-vault.html

Up and Running with Autodesk Navisworks 2014
by Deepak Maini

I have been reviewing this book and I really enjoy its content.  It is detailed, comprehensive and easy-to-follow.  Highly recommended for those who are learning Navisworks or those who want to increase their proficiency and efficiency when using Navisworks… More on this book in a future post.

Downloads (via this):
Table of Contents
Tutorial files

Australia / NZ purchase page:
here

Amazon page for the Up and Running book:
http://www.amazon.com/Up-Running-Autodesk-Navisworks-2014/product-reviews/1482605279

Training course by Deepak:
http://www.cadgroup.com.au/community/blog/cadblog/index.php?showentry=330

4D IFC Importer for Navisworks Manage 2014
At this point in time, you can’t create products in Navisworks from the API, but if you import the IFC using the native importer (IFC2x3 only), then you can run my IFC enhancer (plugin can be downloaded from http://www.geometrygym.com/downloads ) which can generate the timeliner tasks and identify the ifc products by their unique identifiers.
Download:
ggNavisIFC2014x64 v0.0.02.msi (18th October 2013) Navisworks 2014
New plugin to extract 4d information from IFC files and convert into Navisworks timeliner.

Read more:
http://geometrygym.blogspot.com.au/2013/10/navisworks-4d-ifc.html

If 446 MB is a bit steep for your Ipad, maybe an 18 MB PDF is more appropriate?
Download this .pdf version of the first Autodesk design book to view on your computer or tablet device.

Imagine Design Create (pdf – 17793Kb)

via
Autodesk – Book – Imagine Design Create

This is not exactly the same as the interactive Ipad app, but it seems much of the printed content is similar.  Here is a link to the free Ipad app:
Autodesk® Imagine, Design, Create
By Autodesk Inc.
http://itunes.apple.com/us/app/autodesk-imagine-design-create/id479894743?mt=8

The overall premise of the book is to learn Revit Architecture while developing the interior of a two story law office. The reader is provided an architectural model with established columns, beams, exterior walls, minimal interior walls and roofs in which to work. This allows more emphasis to be placed on interior design rather than primary architectural elements. The chapters chronology generally follows the typical design process.

Download sample chapter (the sample chapter is chapter 4 – Revit Materials):
978-1-58503-664-6-4.pdf (application/pdf Object)

Link to main book webpage

Heads-up via http://bim.sandvik.bz/2011/11/12/ny-revitartikkel-new-book-for-revit-and-interior-design/

After selecting an Import instance, you can choose to Full Explode or Partial Explode.  Most users realise that exploding is a bad idea, and it can get very messy.  In fact, a number of experienced Revit users feel that you should NEVER import a CAD instance, always use Link.
In any case, the main difference between a full explode and a partial is this:
  • Full Explode will explode all blocks and XREFs into their most basic elements, such as lines and arcs.
  • Partial Explode will explode the instance into its nested blocks and XREFs.  You can use Partial Explode again to explode these blocks into their nested blocks, and so on, until you get down to the lines and arcs etc.
You can explode (disassemble) the import symbol into its next highest level elements: nested import symbols. This is a partial explode. A partial explode of an import symbol yields more import symbols, which, in turn, can be exploded into either elements or other import symbols. This is analogous to exploding in AutoCAD with nested xrefs and blocks. For example, you explode an xref into other xrefs and blocks. Those xrefs and blocks can, in turn, be exploded into more blocks and xrefs.
You can also explode the import symbol immediately into Revit text, curves, lines, and filled regions. This is a full explode.