Some people view Glue as a lightweight, cloud version of Navisworks.  So, in what scenario would you use desktop Navisworks and cloud Glue together?

These questions:

  • How do Navisworks and Autodesk® BIM 360™ Glue® work together? 
  • How can BIM 360 Glue bring value to my project? 
  • How does BIM 360 Glue integrate with other applications? 
  • Where does mobile app access fit into the workflow?

Are answered in the webcast Navisworks and the Glue Connection:
Link to on demand webcast here

via
https://twitter.com/Navisworks/status/425692536439861248

As you may have seen on LinkedIn:

http://www.linkedin.com/nhome/updates?topic=5835983554198130688

I am pleased to say that I have accepted a position with cutting edge BIM consultancy Virtual Built. I sincerely enjoyed my time at Woodhead, and I truly benefited from the depth of architectural experience as well as the broad project range I experienced there (in my relatively short tenure). Yet, it still felt like the right time (for me) to move closer to BIM technology, and take a small step away from pure architecture.

There are a number of reasons that this current position at Virtual Built feels like a good fit for my particular mix of knowledge and experience, and some of these reasons will be progressively revealed in future posts here.

Initially, I’d like to mention the 4 primary services that Virtual Built offers:

  1. BIM Coordination – assisting Builders and General Contractors with project coordination of models in Navisworks – solving problems before they become an issue on site.
  2. BIM Advice and Consulting – offering our expertise to a range of disciplines and professionals who are looking to maximise the financial benefits of BIM at the business-level, including Architects, Engineers, Consultants and Contractors.
  3. BIM Training – with years of project experience using Revit and Navisworks, alongside proven ability to deliver quality training, Virtual Built owner Michael Clothier and I are in a unique position to offer practical and pragmatic training that is suited to your needs.
  4. BIM Content Creation – including Revit modelling and documentation, family creation, project startup work, 3D rendering and visualization (such as for marketing purposes), and the provision of tailored BIM Execution Plans that are effective and current.

BIM really is here to stay. It will, of course, change and adapt over time. The question is – will you?

We would love to help you get on board with BIM and keep pace with this technology. Not simply “because everyone else is doing it”, but because we believe it can actually improve the profitability and quality of your work.

Please Contact us if you would like to learn more

http://virtualbuilt.com.au/contact-us/?utm_source=What%20Revit%20Wants&utm_medium=blog&utm_campaign=Virtual%20Built%201


This hotfix resolves three issues:
– Problems resulting from operations that involve clicking in the first column of the Clash results grid, such as collapsing/expanding groups, dragging clashes and resizing columns.
– Issues with material and transparency inconsistency when importing FBX files.
– Issues with the automatic selection of the correct Rendering engine (Presenter or Autodesk)

Downloads at:

this link

via

Navisworks/BIM 360 InfoCenter: Navisworks 2014 Hotfix 3

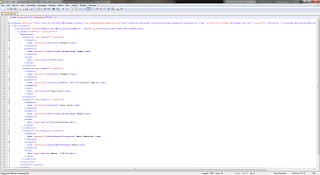
Daniel Gijsbers uses Notepad++ to do some quick editing and creation of similar Navisworks search sets:


“Let’s create a couple of searchsets that will find the same parts but on different levels.

He notes that you should import-export-import to make sure GUIDs are not duplicated.

Read the whole post:

Interesting post by Ben a while back on the impact of Revit view settings when exporting to Navisworks.  In most cases, this is “logical” – if you can see it, it will get exported, but if you can’t see it, then it won’t.

However, this doesn’t quite hold true for model lines.  Have you ever wanted to export model lines (3d) from Revit and import these into Navis?  Ben suggests this workaround:
Model lines will not be shown in your 3D Navisworks file when brought through from your Revit project. One way to combat this would be to export your Revit file as an .IFC and then bring that file into Navisworks. .IFC brings through model lines but not detail lines through the { IfcAnnotation } Parameter.

 via
http://bimopedia.com/2013/11/25/view-settings-from-revit-into-navisworks/

By now, most of us are using Navisworks for some sort of aggregation, model checking or clashing.  So why would anyone want to use Revit Inteference Check (on the Collaborate tab, Coordinate panel)?  Basically, because its “in-canvas” and doesn’t require workflow-disconnect (export NWC, find Clash, Switchback, modify, refresh NWC).

Instead, we can run a clash report within Revit, close the dialog, fix the problem, then refresh the report.  Much easier.

For one recent Basement Carpark Design, we already had Parking families set out, and the Structural model linked in.  All I had to do was edit the Parking family, add a Shared Nested family of suitable Category (in my case, Electrical Equipment), run the Interference Check, fix or mark up the problems, and then switch “off” the shared nested component (using a visibility switch on the shared nested component).  Quick and easy.

Obviously, there is a lot it can’t do (especially compared to Navis), but some things it can do nicely.  Read on for some Q and A:

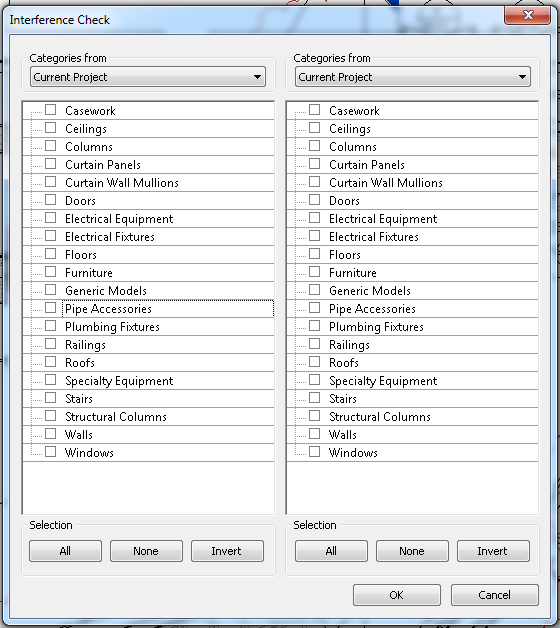
Is there a limit to the Categories you can use in an Interference Check?
Yes, see image below

Can you clash against a Shared Nested form of one of the above Categories?
Yes!

Can you clash against a Linked file in Revit?
Yes, of course – the above Category limitation still applies

Can you clash against selected objects?
If you select objects before starting the command, only items matching above Category limitations and present in the selection will be available as a tick box.

Will collinear 3D faces trigger a Interference in Revit?
Unfortunately yes.  You can work around this by offsetting one of the forms by 1 or 2mm to “ignore” those clashes.

Will an invisible (unchecked) Extrusion or Family be included in the Interference Check?
No

Will an item that is completely transparent (either based on a View setting or Material setting) be included in the Interference Check?
Yes

Can you clash against a Void form?
Yes

While you can’t “Save” a Search Set, you can Refresh your previous Interference Check in Revit.  Just do this:
Interference Check – Show Last Report – Click Refresh
Note: pressing “Refresh” does not re-run the Check, it just re-checks the things already in the list to see if any have been fixed.

To make “finding” the clashes quicker after the report is run – open a few key views first.  As these are in memory, when you click “Show” on an item in the report, Revit will look in these open views first.

Helping google:
Revit interference checking shared nested

I previously posted about Up and Running with Autodesk Navisworks 2014 by Deepak Maini a while back, but I think it definitely deserves another mention.  Here is a selection of usability and productivity tips I thought you might find useful in the coming year:

1) Merge – in the scenario where a Navisworks coordinator issues an NWD to three different teams, who all do markups in their respective NWD files, they need to save as NWF before returning the file (for merging) to the initial coordinator. This avoids having duplicate geometry.

2) Home – Project – Scene Statistics will show you if any Object Enablers are missing

3) To preview a model in isolation, without having to close the current project, and before fully Appending it to the main scene, you can use the Import Sheets and Models tool

4) To change the pivot point while orbiting in 3D, move the cursor over the desired vertex and then scroll the wheel button of the mouse once.

While using the Walk tool, scrolling the mouse wheel up or down is equivalent to tilting your head up or down (similar to “Look” on the Steering Wheel

5) Holding the SHIFT key down and selecting any object will select everything in the Autodesk Navisworks scene. Repeating this process will cycle through various selection resolutions.

6) The Move and Rotate tools show on a “toggle” basis – to turn these gizmos off, select any object and then from the Item Tool ribbon tab, clear the Move or Rotate tool.

7) You can add new parameters to objects directly in Navisworks – right-click in the blank area of the Properties window and select Add New User Data Tab; a new custom tab is added with the default name of User Data. This is sensitive to the selection resolution (ie. Can be added to a entire layer etc). Along similar lines: Navisworks does not allow you to view properties of objects in different layers or categories at one time. For example, if you select the curtain panels on all the layers, the Properties window will be grayed out. So you will have to create the custom properties one layer at a time.

8) Quick Properties settings are stored in the software, not in the Navis project file

9) Section boxes – if you have used a custom alignment, using the same alignment again will rotate the plane 180 degrees (like mirroring it). Also, the Fit Selection tool will (unsurprisingly) resize the sectioned view to fit selected objects.

10) To permanently turn “on” the options to save the object visibility and material overrides using the Options Editor. From the left pane, expand Interface and click on Viewpoint Defaults. From the right pane, select the Save Hide/Required Attributes and Override Material tick boxes. Henceforth, whenever you create a viewpoint in any file, these two options will be turned on.

11) Use Ctrl+G to turn Gravity on and off

12) To use Measure tool to move objects or models into position: First, measure the distance between any two points that are supposed to match in the scene. Then, select one of the files from the Selection Tree and use the Transform Objects tool (in the Ribbon) to move the selected file

13) Markups, Commenting and Tags – Redline markups can only be added in a saved viewpoint

To add a line break to various text entry boxes in Navisworks, such as Redline Markups, you can use the P (backslash P) switch

Redlines, Comments or Tags? As I mentioned in my previous post about using Revit and Navisworks, using Comments is quite powerful (moreso than redlines) in a lot of ways, as it allows for easy searching. However, Tags are even better, as they relate directly to a model element and they can still be searched as with comments.

This is just a selection of awesome tips you will find in this great Navisworks resource.  Here is how you can get it:

Australia / NZ purchase page:
here

Amazon page for the Up and Running book:
http://www.amazon.com/Up-Running-Autodesk-Navisworks-2014/product-reviews/1482605279