When loading merged models from BIM 360 Glue, selection sets and clash tests that
were created with Navisworks 2018 or earlier now show and maintain the correct
individual model or file selections (NW-54655).
Changing a Timeliner appearance using the Configure tab no longer causes a crash
when .NET Framework 4.8 is installed (NW-54941).
Navisworks will no longer run out of memory and crash when saving an NWF file larger
than 2GB to an NWD format (NW-55133).
Patched a potential security vulnerability in the licensing code (NW-55168).
Having recently installed some more storage hardware, and previously posted about moving folders with symbolic links, I then decided to move my BIM 360 Glue cache folder and Navisworks Cache folder to a secondary hard drive. I did this using symbolic links.
You need to:
start a Command Prompt as Administrator
use the commands shown below
Moving BIM 360 Glue cache storage location:
if exist "%localappdata%\Autodesk\Bim360Glue 2016\LocalCache" rename "%localappdata%\Autodesk\Bim360Glue 2016\LocalCache" bim360glue2016.old
mklink /d "%localappdata%\Autodesk\Bim360Glue 2016\LocalCache" R:\BIM360Glue2016
if not exist R:\BIM360Glue2016 MD R:\BIM360Glue2016
robocopy /mir "%localappdata%\Autodesk\Bim360Glue 2016\bim360glue2016.old" R:\BIM360Glue2016\
Moving Navisworks cache storage location:
if exist "%localappdata%\Autodesk\Navisworks 2019\LocalCache" rename "%localappdata%\Autodesk\Navisworks 2019\LocalCache" Navisworks2019Cache.old
mklink /d "%localappdata%\Autodesk\Navisworks 2019\LocalCache" R:\Navisworks2019Cache
if not exist R:\Navisworks2019Cache MD R:\Navisworks2019Cache
robocopy /mir "%localappdata%\Autodesk\Navisworks 2019\Navisworks2019Cache.old" R:\Navisworks2019Cache\
After you have run the scripts above, you can delete the old folders with the .old suffix (Navisworks example shown below).
BIM 360 has just changed in a fundamental way. The trust environment is now more controlled, and it is sharing base technology with BIM 360 Docs. So instead of talking about C4R bolted onto A360 or BIM360, we will now be talking about ‘Revit files in this Docs module in this Team Project on BIM 360 Design’ (I think).
Revit 2018.3 is required and direct download link can be found here.
I’ll follow up with some more detailed information in the coming weeks.
All,
I wanted to welcome you, on behalf of the team here at Autodesk, to the Design Collaboration forum. This forum exists for conversations about the design collaboration workflows possible in the BIM 360 Design product, which released today. We look forward to the conversation. First though, I’ll try to answer some likely questions you all have.
What’s BIM 360 Design?
BIM 360 Design is the next generation of Collaboration for Revit (C4R). It enables the cloud worksharing you’ve come to love in C4R, but connected to the next generation BIM 360 platform. You can learn more about it here on our new product center, and below is an image that captures what comes with it.
You can see that within BIM 360 Design there are 2 next gen modules that are included, Design Collaboration and Document Management. Together with cloud worksharing, they represent the most seamless way to collaborate on Revit data across the globe. We’ll talk more about the new workflow in subsequent targeted posts.
What Happened to C4R?
C4R just became BIM 360 Design as of today. If you’re an existing subscriber, you’ll see the branding update in manage.autodesk.com shortly. If you have existing projects in-progress, working against BIM 360 Team (aka Classic), nothing really changes aside from the branding you see in the account portal. You can continue to work on those projects, and new subscriptions to BIM 360 Design can be allocated to new team members, who can then start to work on those existing projects. More detail can be found in this FAQ.
What Can I Do With BIM 360 Design?
With BIM 360 Design, BIM authoring teams can say goodbye to “high trust” as the only way to work, and hello to flexible dynamics between multi-discipline BIM authoring teams. Along with those improved access controls comes a whole new web and mobile experience delivered by Next Gen BIM 360. Across Document Management and the new Design Collaboration module, teams can:
Quickly and easily set up teams and define the data spaces they will work in.
Easily understand the current state of the project, with an aggregated view of the project data that can be navigated the way they think about it, not how our beloved authoring tools structure it.
Exchange data between teams in a controlled way, on the back of our new currency for data exchanges: Packages. These are like transmittals on steroids, allowing teams to curate the versions of Models, 2D Sheets, and 3D Views needed to communicate process.
Understand how data has changed over time. Change visualization can be enabled with the touch of a button on any BIM artifact contained in a Package. No more hunting for revision clouds or exporting the 3rd party tools.
Provide feedback on those BIM artifacts, with Markups and closed loop Issues created in Document Management (Issues are on their way to Design Collaboration).
Use the Preview version of Desktop Connector to collaborate on non-Revit project data, centralizing the data platform used for all Work in Progress (WIP) project data.
Use those BIM artifacts downstream for construction workflows across the Field Management, Project Management, and Model Coordination modules.
How Do I Get Started with BIM 360 Design?
If you’d like to start a new Project in this new way to work, you need to:
Get a BIM 360 Account
If you have an existing next gen BIM 360 account, you should automatically get the Design Collaboration module enabled tonight (April 9th US time zone)
If you don’t have an existing account, your Contract Manager should receive an email shortly with instructions on how to get one created.
Install the Revit 2018.3 Update
This update released today, and should be available in the Autodesk Desktop app. A direct download link can be found here. This is required for Revit 2018 to know how to communicate with next gen BIM 360.
Start a New Project and Enable Document Management + Design Collaboration
With these two modules enabled, along with the latest update of Revit, you have what you need to get started. We’ll have a separate thread that walks through the process to get up in running in more detail.
Hopefully, you all are as excited about this as we are. We’re biased though; we’ve worked hard based on lots of feedback and customer engagement to deliver this new way to work, and your continued feedback and engagement will make sure that we deliver on the needs you all have. Look out for subsequent discussions on specific parts of the overall product experience, and we look forward to hearing from there. Post here in this thread with general questions.
Cheers,
Kyle & the Team
Kyle Bernhardt
Product Line Manager
BIM Project Delivery
Autodesk, Inc.
I have been chatting with one or two industry insiders over at Autodesk recently, and there are some pretty big changes coming to the BIM360 fraternity of products. For the most part, it seems like these will be very welcome improvements. However, it may have an impact on how you run projects through BIM360, and so it might be advisable to check out the upcoming BIM360 webinar (link). Details below:
Stay up to date with everything new in BIM 360. Each month, join us and the BIM 360 Product Team to find out how you can take advantage of the most recent and upcoming product updates. • Learn how BIM 360 can help you improve project delivery • Stay up to date with the newest features • Get early insights into what’s coming in the next updates • Participate in Q&A with the BIM 360 Product Team • Get the resources you need to be successful
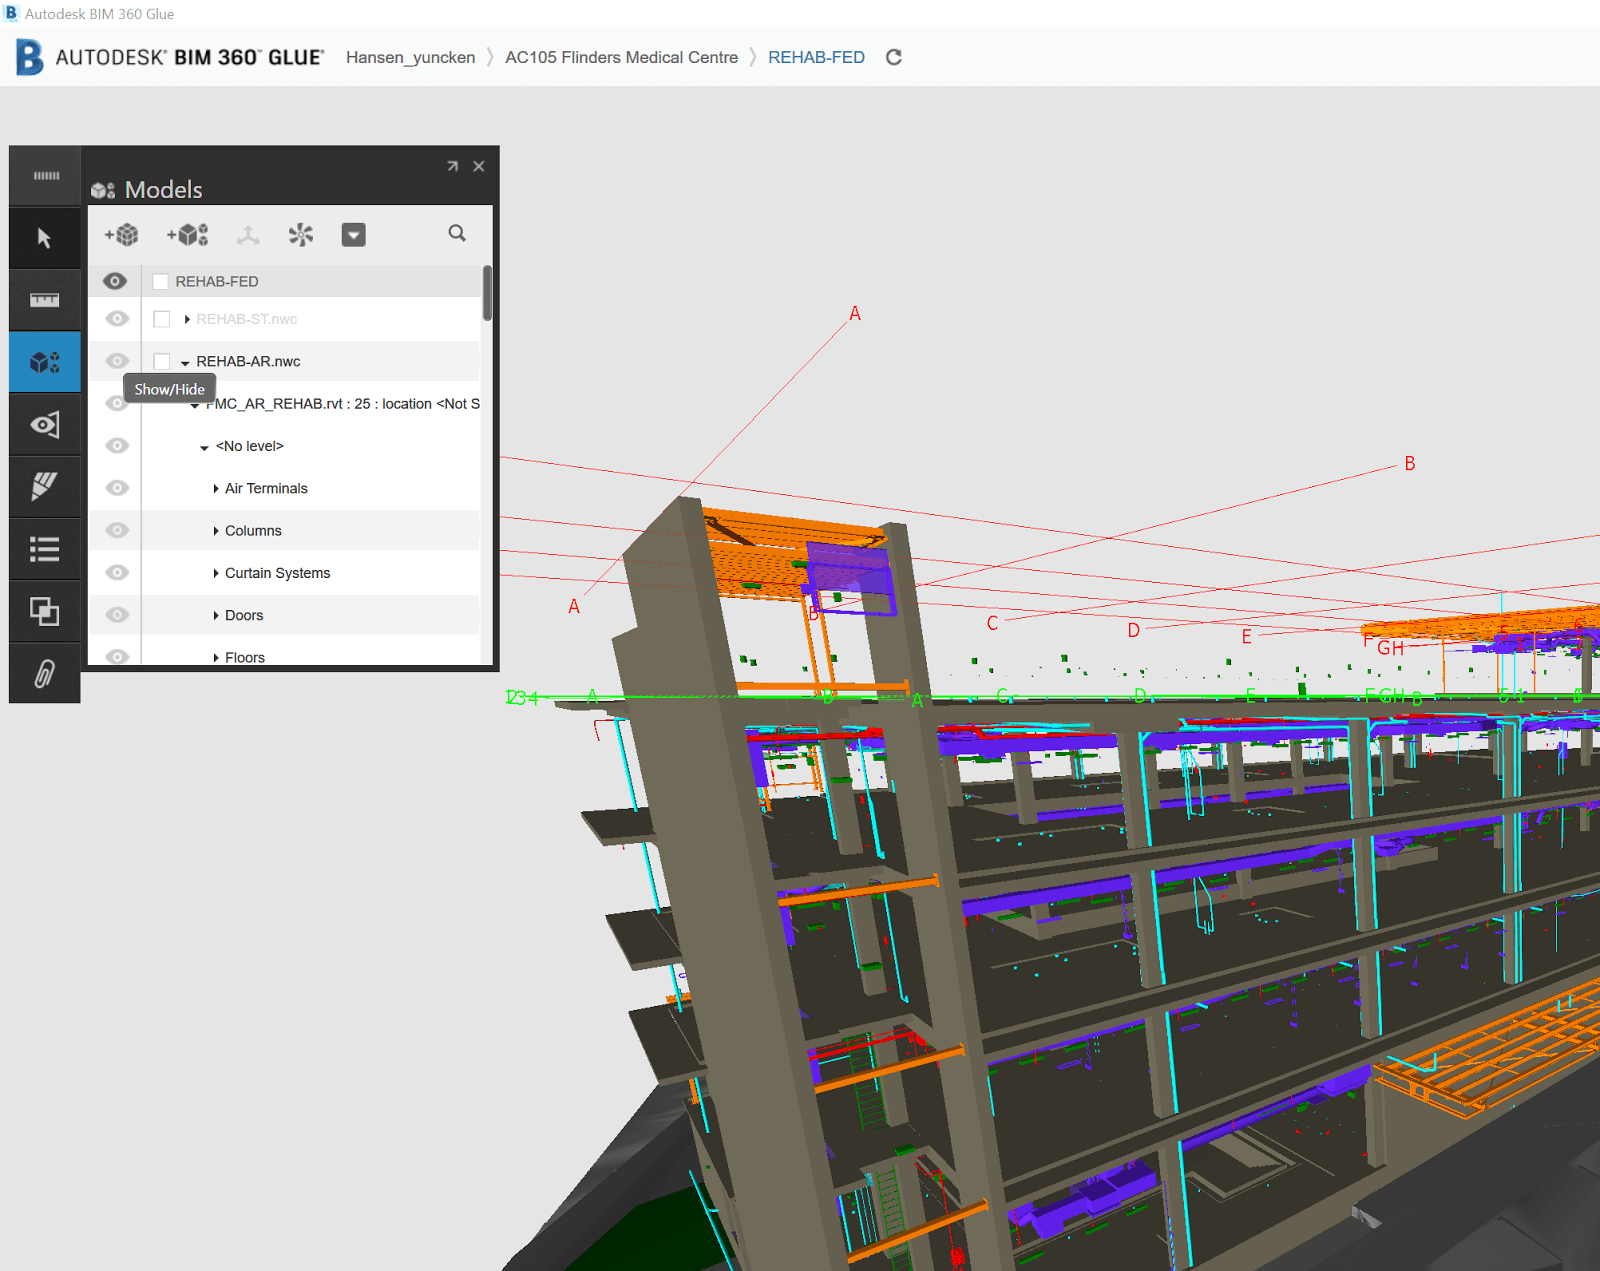
Recently I had an issue sharing colour overrides from Navisworks to BIM 360 Glue. This has been ok for a while, but something broke. After some investigation, it turns out that one of the sub-Models in the Glue merged model was causing the problem.
I typically convert IFCs using the Link method, which results in DirectShape objects. It seems that one of the Architectural files that I converted this way from ArchiCAD to Revit and then to BIM 360 Glue was stopping the colours from getting baked into the BIM 360 Shared View.
To workaround this issue:
Determine what problem model/s you have (possibly those converted from IFC)
Open your Merged Model in Navisworks for BIM360
Hide these problem models in Navisworks scene
Run Appearance Profiler or otherwise apply colour overrides
In the BIM 360 Shared Views pane, click New to make a new Shared View on BIM 360 Glue with the colours ‘baked in’
Go to Glue desktop app and confirm the colours are working
Then, Unhide the problem model here…
And then make a new view in the desktop app
This new view should have all models you want showing, and the colour overrides working ok.
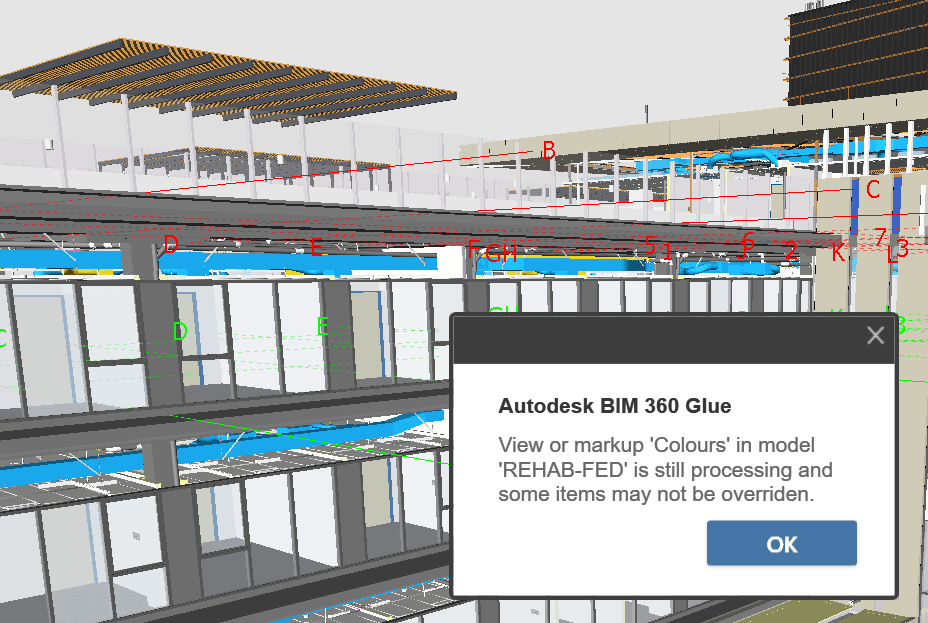
On a related note, you may have seen this warning:
View in model is still processing and some items may not be overridden
It seems that this might put your Glue merged model in a dirty state? Try deleting all views with this message before trying to create Shared Views from Navisworks with colour overrides.
Sometimes in Glue addin for Revit will fail with the message “Oneormoregluingerrorsoccurred“.
You may be able to workaround this problem by following these steps:
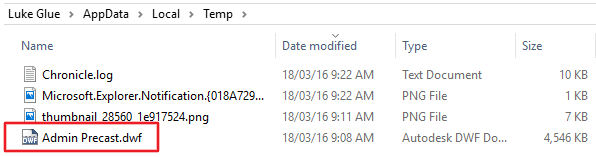
After receiving the error, immediately browse to your Temp directory. To do this, open Windows Explorer and type %TEMP% in the address bar.
Sort by Date Modified
Look for a DWF or NWC that matches the View Name that failed to Glue in Revit
Grab that file, and remove the suffix (usually a few digits) so that the DWF Filename = View Name = Glue Model name
Using the Glue desktop app, upload that model manually
Renamed model ready for upload
This process opens up an interesting possibility… usually when exporting a DWF using plain Revit, it will always use Project Internal coordinates. However, the Glue addin can actually export DWFs with Shared Coordinates (if you choose that in the Glue export More Options dialog).
Using the above steps 1-5, you can ‘find’ this DWF with Shared Coordinates and use it wherever you please… such as in Navisworks.
It is Autodesk’s mobile-centric implementation of an integrated FM system… It hasn’t been around for long, but it already allows you to export Equipment directly from BIM 360 Field. It also allows you to view the equipment in context, and attach photos and other information.
It would seem like the current cloud model and sharing workflow from Autodesk currently looks something like this:
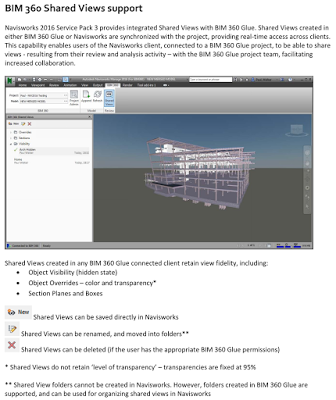
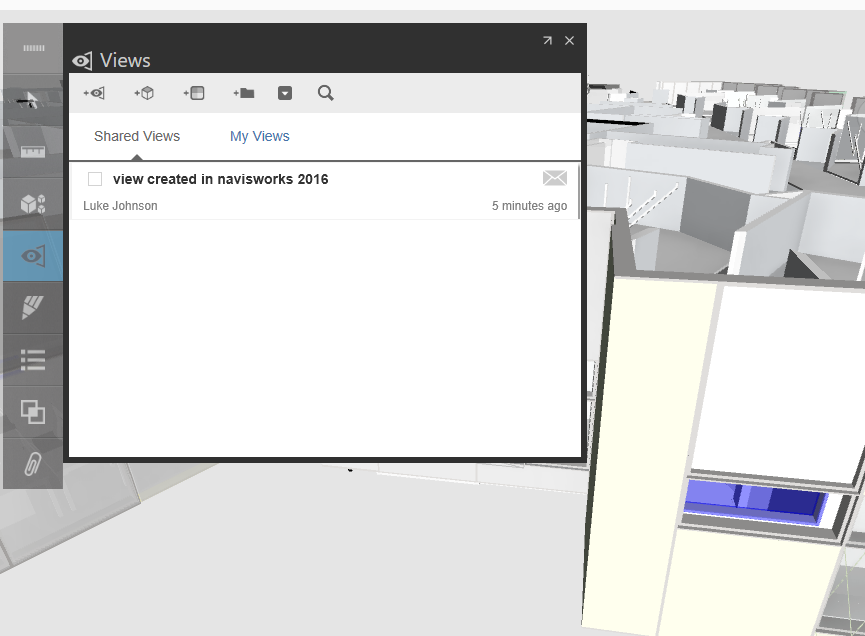
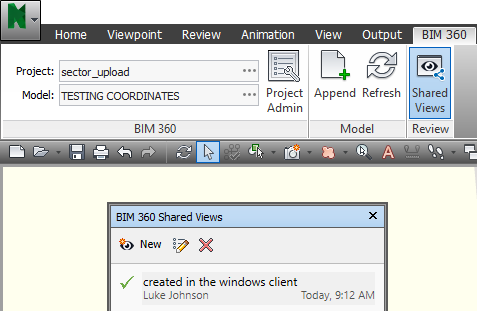
It is officially called “Shared Views”, as per the above details from the SP3 feature readme.
How does it work?
In Navisworks 2016, connect with a BIM360 Glue project and model
Navigate in Navisworks to a view you would like to save
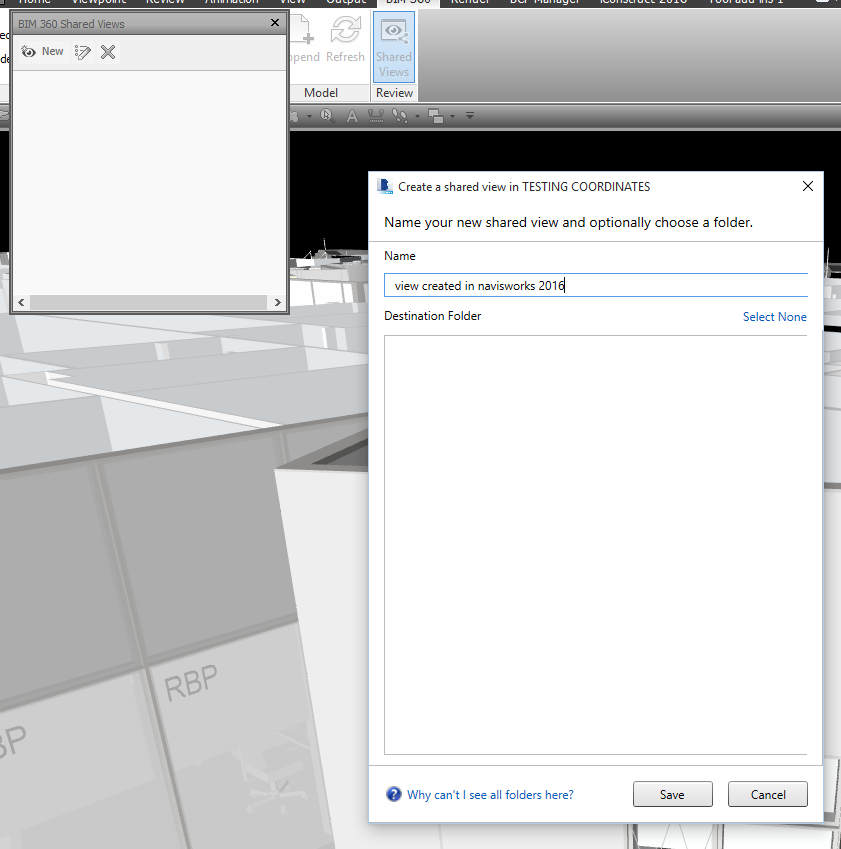
On the BIM 360 ribbon, open the Shared Views pane and then click New
Name the view
After creating this view in Navisworks, you can open the Glue Windows client and open that model, and the view will appear in the Shared Views list:
Similarly, in the Glue web client you can now access this view:
And, in the Windows client we can easily make and organize Shared Views. To see them in Navisworks, just click Refresh and they will show up in the Shared Views pane:
This update is a great advancement for Autodesk BIM interoperability, and combined with Switchback it now allows bidirectional viewpoint sharing between Navisworks, Glue and Revit. Very cool 🙂
Most of these are bug fixes, and some BIM360 Glue integration performance improvements. Details and direct links below: Autodesk Navisworks 2016 Service pack 2 delivers user experience and stability improvements to the Autodesk BIM 360 integration. Service pack 2 also addresses problems identified in other parts of Autodesk Navisworks 2016. Service Pack 2 also includes all of the updates from Service Pack 1. Service Pack 2 can be installed on either the original version or the Service Pack 1 version of Autodesk Navisworks 2016.