I had a weird issue wherein I could join our office VPN using XP and Vista with no problems, but Windows 7 would not connect to the VPN and would trigger an error. (Please note that I was trying to connect to a Small Business Server 2003 computer).

The following fix worked for me:

  1. In the Windows 7 client, open an elevated command prompt
  2. Type in the following: netsh int ip reset > resetIP.log

Reboot the computer, and see if you can now connect to the VPN.I found this fix at http://thenonapeptide.blogspot.com/2009/09/solving-pptp-vpn-error-720-on-windows-7.html

You can increase your productivity by opening Multiple Instances of Revit when working on the same Central file. This is particularly useful if you want to set one instance to render a view, and continue modelling or drafting in the other Revit instance.

This is how to do it:

  1. Open Revit, and open a local copy of the Central file. This instance will be using your normal user name (eg. Luke).
  2. Open another instance of Revit. Click the ‘R’ button, and go to ‘Options’.
  3. Under General, type a different Username into the applicable box (eg. Luke-SECOND)
  4. Click OK.
  5. In this second instance, open another local copy of the Central file. This is done by navigating to the Central, and then ensuring that the ‘Create New Local’ box is ticked before opening the Central.
  6. You now have two instances working on the same Central file. You can test this by ‘Synchronizing’ each instance.

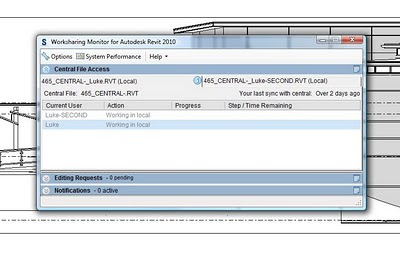
If you have Worksharing Monitor installed, open it up and have a look at the two instances. You should see something like that shown below:Please note that you will need a decent PC to take advantage of this ability. It will be particularly useful if you have 4 or even 8 processing cores available.
(whispers) There is a secret way to enable a advanced user feature in Windows 7 and Vista, and it is extremely simple.

Just make a new folder, and give the folder the following name:
GodMode.{ED7BA470-8E54-465E-825C-99712043E01C}

You will find that when you open this folder, it is like a Super Control Panel.

Apparently this does not work in Vista 64 bit, but it does work in 32 bit.

Thanks to PC User magazine and William Archibald for writing this tip in a letter to the magazine.

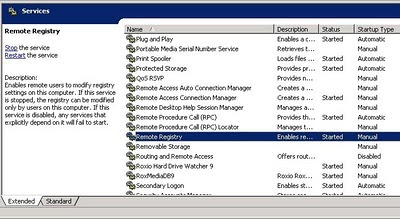
While using Autodesk Product Manager, or the Autodesk Asset Locator, you may come across an issue where certain remote computers are ‘unreachable’. Assuming you have the correct permissions, the problem here is that the Remote Registry Service is not running.

Simply go to the Client computer that is ‘unreachable’, open Services (Start – Run – Type services.msc), find the service called ‘Remote Registry’ and Start the service.

When you run a search again, this computer will now be reachable by the Autodesk Asset Locator, and you will see the Autodesk products on this PC in the search results.

Have you ever wanted to ‘re-issue’ or revise a large group of sheets such that they all receive the same, updated revision in the Revision Schedule?

Lets say you have 100 sheets and these form the ‘Approval’ set of documents – how do you go about amending and reissuing them?

For significant revisions, it is our company policy that all revised sheets have the same entry in the Revision Schedule. Therefore, we use the following method (it takes a little setting up the first time, but it is worth it):

  1. On the first sheet you would like to re-issue, create a small section of Revision Cloud that is associated with the appropriate revision in from the Sheet Issues/Revision dialog box.
  2. Select this small section of Revision Cloud and Group it into a detail group. Call this group whatever you like – something like ‘Approval Revision Set 1’
  3. Select the Detail Group and Ctrl-C (copy to Clipboard)
  4. (At this point we usually Hide the Revisions from the sheet by Tab-selecting the Revision Cloud and Hide Category in View, as we don’t really use Revision Clouds in the traditional sense)
  5. Go to the next sheet in the set and Paste-Aligned
  6. Repeat this for each sheet you would like in the ‘Revision Set’ (you will notice that as you do this, a new entry appears in the Revision Schedule – as you would expect)

Now, you can quickly re-issue that entire set. How?Just edit the ‘Approval Revision Set 1’ Detail Group that you created, and:

  • Add a new piece of Revision Cloud that is associated to the appropriate entry in the Revision Schedule. All your sheets have now been issued with the new entry, and the Revision Schedule on each sheet shows the new entry!

You can do some tricky things with ‘nesting’ these Detail Groups to give you more flexibility or add new sheets to sets.

One of our staff found a bug for Schedule editing in Revit 2010 64 bit. If modifying a Schedule (in our case a Door Schedule) and you change a ‘Type Property’ and then go straight to the ‘Close’ button in the Schedule (without changing cells or tabbing or anything), Revit will tell you “this will change all instances of this xxx type” and then if you click ‘OK’, Revit will crash.

Here are the steps to reproduce this issue (keep in mind that we are running Revit 64 bit on Vista 64 bit):

  1. Create a schedule that includes Type Properties that you can directly modify.
  2. Open the schedule.
  3. Modify the Type Property.
  4. Using your mouse, click the ‘x’ or Close button in the top right corner of the schedule window.
  5. Revit will provide you with a dialog box – Click ‘OK’.
  6. Revit crashes.

See if you can reproduce this.It would be wise to Save your project before trying!