A recent post over at Revit Scratchpad deals with the issues of ‘user expectations’ and the importance of setting up a Revit project correctly from the beginning.  Check it out:


Revit can be amazing at doing complex tasks and yet sometimes it can seem almost impossible to get it to do something that the user considers a simple task.

In a recent such case and after explaining an open-heart surgery procedure for a live Revit project a colleague of mine summed up the whole thing in a nutshell. He said that it reminded him of doing a slider puzzle…

I guess the lesson is to try and start with the end goal in mind. Please dont just jump in…

via
Revit Scratchpad: Do you find Revit puzzling?

I was trying to delete a view today, and I got this Error:
The Revision of this Revision Cloud has been issued.  Deletion of this Revision Cloud is prohibited.

So, obviously there are some Revision Clouds, marked as ‘Issued’, in this view.  But how do I find out which ones are on there?  There is no ‘Revisions on Sheet’ button because this view is no longer on a sheet…aha, got it!

  1. Make a new sheet
  2. Place the ‘orphaned’ view on the sheet
  3. Now you have access to the ‘Revision on Sheet’ button from the Sheet View
  4. The Revision Clouds that exist in that view will be ‘greyed’ out in the dialog box.

To delete the view:
  1. Un-issue the selected Revision/s
  2. Find the Revision Cloud
  3. Delete the Clouds
  4. Delete the View

PS – If your sheet family has a Revision Schedule on it, this should also show the Revision Clouds that are in the view…

I find the Error Report – Warning – Select by ID process to be a little unwieldy in Revit (at the moment).

Here is a little process that may speed things up for you when reviewing a Error Report in Revit.

  1. Save Error Report to HTML
  2. Open HTML Error Report
  3. Copy data to Excel spreadsheet.
  4. Use RIGHT formula to extract only the id number to a new column.
    eg =RIGHT(C3,7)
  5. Copy the cell containing the id number to the ‘Select Elements by ID’ dialog in Revit.

Remember the GetLevel add-in? I previously posted about it at What Level is that on? and Find Elements Associated with a Particular Level.

Well, the guy behind GetLevel, Steve Faust, has just released version 1.0 of a new add-in called Selection Master – and it is very cool.  I was esteemed enough to be part of the beta project, so I can speak from experience.  It’s the selection tool that you have been waiting for.

You basically get two main tools on the Ribbon – a Full Select button, which opens a well endowed selection dialog box, and a series of Quick Select tools.  To use these, you just pick an Element – Quick Select Level – and it will select all elements on the level that the selected object is associated with.  Cool, huh?

Selection Master supports 5 types of filters:

  • Level
    • Level filters recognize level parameter, work plane, reference level, and schedule level so all offset beams, etc. are included.
  • Family
  • Category
  • Phase Created
  • Phase Demolished

Selection Master - FiltersThe Selection Master full interface can be used to create filters based on any of these properties or combine as many filters as desired to refine the set. Find all first floor walls created in phase 2 or simply find every element related to the second floor level.

At just $25 for a seat, or $400 for an Enterprise license (both are Subscription based), don’t you think it’s worth a try?

It currently supports Revit 2011 and Revit 2012.

Read more at
Selection Master – Home

Martijn de Riet has pointed out something very useful when you are trying to use a Calculated Value to pull together a bunch of similar-but-different parameters.  If you come across an error, don’t forget about the ‘Add to all elements in the selected categories’ check box in the Parameter Properties dialog.

The Problem:
When you create the first (window) schedule you’ll notice a whole bunch of width parameters, all referencing the total width of different windows (fig 1)
After creating the schedule you figure: let’s create a “scheduled width” parameter which adds up all those separate width parameters. This way you can clean up your schedule (fig 2). Only to find that it won’t calculate. In this case, the family “ontwerpraam doesn’t have the parameter “breedte_vo” so in the schedule it returns no value. Therefor, the total cannot be calculated (fig 3).

The Solution:
Open the schedule properties, go to the Fields Tab, select the parameter causing problems and click Edit.
In the Parameter Properties, check the checkbox “Add to all elements in the selected category”, select the category “windows” and choose whether it should be an Instance or Type Parameter (fig 4).
The parameter is now accessible in the schedules, even with the families it’s not actually in. You can now fill in a value and the Scheduled Width parameter will calculate properly (fig 5). It will even show up in the family’s properties (fig 6).

The Original Forum Post:
Push parameters in the project environment

Thanks Martijn de Riet!!

The Revit Clinic has posted a nice little display order workaround for Filled Regions in Title Blocks.  I have a feeling that this workaround may also be useful in other situations…

1. Start a new Revit generic annotation family.
2. Cut & paste the filled region[s] into the generic annotation family.
3. Load the generic annotation family into the title block family.

While the display order may appear incorrect in the title block family, it should now appear print in the expected order once loaded back into the project.
via
Filled Region Blocking your Lines in a Project Title Block? – The Revit Clinic

Ever wanted to replace a font with a different one in a Revit project, including adjusting all text, dimensions, and labels?

I came across a very handy add-in through the RevitDE blog.  Its called BIMTools, and its from a company called Sofistik.  Here is some translated text from the original blog post:
have to change all text, dimension styles and lettering families…
This can be in a very simple way, the text of all type of label types to adapt quite easily.

via
RevitDE Blog Post

Here is some further explanation from the company site:
This tool allows all project elements such as text labels, dimensions, beams, columns and wall labels will be changed and adapted in a step within a Revit. Filter functions allow a targeted selection of the desired label text. The tool works across multiple projects such as converting, saving an enormous amount of time while drawing standards.
BIMTools download page (Translate)

Actual German download page http://www.sofistik.de/loesungen/soficad/bimtools/registration/

The above text hints at the fact that the replacement is ‘filter based’.

  • After registering, you will get a link to a ZIP file.  After unzipping that file, you will get access to two EXE files – one for Revit 2012, and on for Revit 2012 x64 (64-bit).

  • Run the installation for your version.

NOTE 1:  I was able to select ‘English’ during the installation, but it appears that the add-in is not in English after it is installed!  Anyone know German out there?

NOTE 2:  The installation process adds the BIMTools ribbon to RST 2012, but not to RAC.

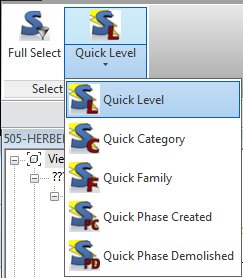
Here is a bit of an excerpt from the help PDF that may assist you in interpreting the Ribbon:
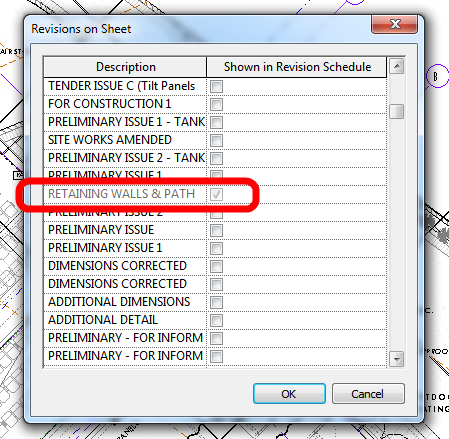
Text Change type
With this additional feature you are able to type the text of your dimensions, annotations
and change text of your project on time and to appoint a uniform. The change affects
from here to all families in the project located. 

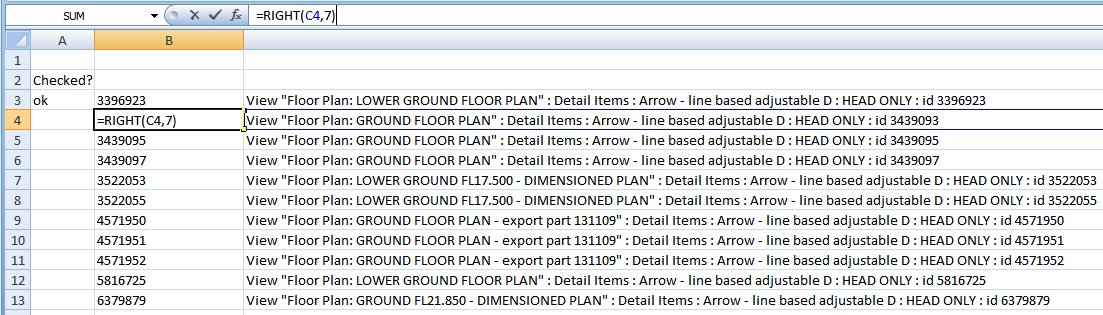
search for objects that match the filter rules, GE
starts and earnings in the lower left of the dialog box is displayed.


The text type-name can be changed by this function automatically. The advantage here is one
unambiguous syntax and therefore a similar designation of text types. If the name of Textty-
groups want to change so you can uncheck “Rename” is activated. 

http://translate.googleusercontent.com/translate_c?rurl=translate.google.com&sl=auto&tl=en&twu=1&u=http://ftp.sofistik.de/freeware/revit/installation/BiMTOOLS/BiMTOOLS_0.pdf&usg=ALkJrhitS-97RqHPah3DBGTEhOTsIHhNcA

I printed a PDF from Revit today, and was presented with this output:

The text was not printed from a linked DWG.

This problem resulted because:

  1. I linked a DWG into a Detail (Section) View
  2. I then rotated the Detail View in Plan.
  3. I moved the linked DWG back into position.
  4. But obviously Revit was not impressed with this course of events!

It was a relatively simple fix – I used Ctrl-X to ‘cut’ the DWG into nowhere, then pasted it back into the view, and also ‘reloaded’ the DWG from the Manage Links dialog.