Have you struggled with the Show only if Instance is cut option in the family element visibility settings.  Was it grayed out?

The following highlighted categories (wall hosted) have ‘Show only if Instance is cut’ option enabled, at the moment in Revit Architecture 2012.

Casework
Columns
Doors
Site
Structural Columns
Structural Foundations
Structural Framing
Windows

via
Revit Sticky Notes: 2D Symbolic Line & ‘Show only if Instance is cut’
(includes workaround)

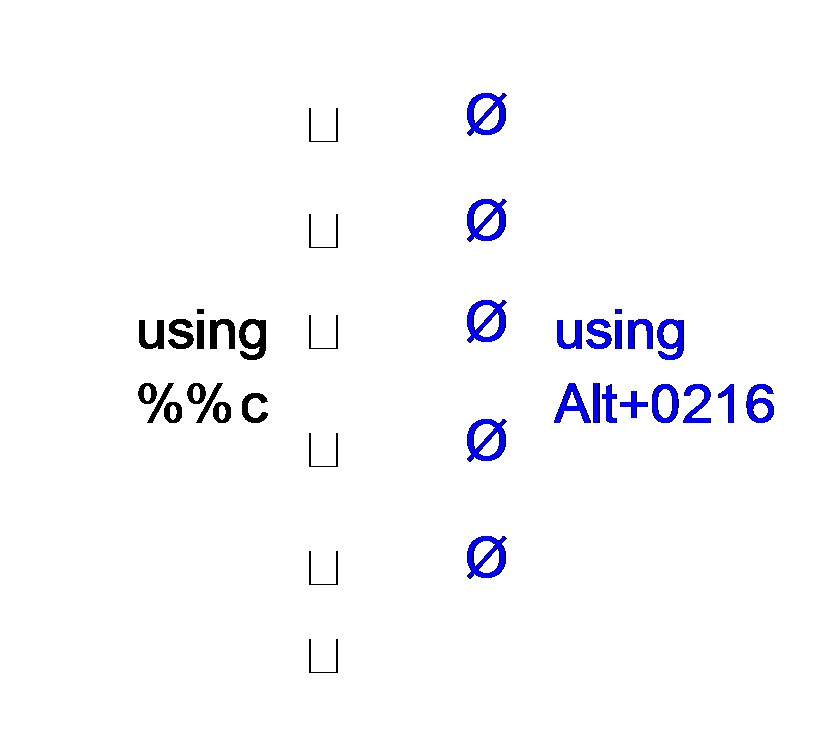
In AutoCAD, you can type %%c and it will get translated into a diameter symbol.  Other control codes may be found here.

However, I have found that this method does not import into Revit correctly.

Instead, you need to use the Alt+0216 code in the AutoCAD DWG file.  When this is imported or linked into Revit, the diameter symbol will display correctly.

You can use the FIND command in AutoCAD to quickly find and replace the offending %%c diameter symbols with Revit-friendly Alt+0216 diameter symbols.

Image and video below to demonstrate:

For related information, check out:
What Revit Wants: How to add symbols to Schedules and Text in Revit

This recent post by RevitKing has a nice list of the main codes you will use:
Revit.King’s BIM coordinator/ Revit Blog: Adding Revit text symbols like (diameter)

ƒ = ALT +0131
™ = ALT +0153
® = ALT +0174
© = ALT +0169
° = ALT +0176
± = ALT +0177
² = ALT +0178
³ = ALT +0179
× = ALT +0215
Ø = ALT +0216
÷ = ALT +0247

Nice ‘checklist’ style post over at RevitKing.  Most things just come back to sensible modelling:
Revit.King’s BIM coordinator/ Revit Blog: Optimal performance for Revit!!!

One of the tips:
Create a family component instead of in-place families when possible, especially for repetitive components. Each in-place family has separate type attributes that Revit has to reference.

To implement this on an existing model, you could convert some of the in-place families to Component families using this method.

If 446 MB is a bit steep for your Ipad, maybe an 18 MB PDF is more appropriate?
Download this .pdf version of the first Autodesk design book to view on your computer or tablet device.

Imagine Design Create (pdf – 17793Kb)

via
Autodesk – Book – Imagine Design Create

This is not exactly the same as the interactive Ipad app, but it seems much of the printed content is similar.  Here is a link to the free Ipad app:
Autodesk® Imagine, Design, Create
By Autodesk Inc.
http://itunes.apple.com/us/app/autodesk-imagine-design-create/id479894743?mt=8

It’s not quite ‘Live Free or Die’, but Autodesk needs to acknowledge the dichotomy that exists between these two aphorisms:

  • Develop innovative software
  • Buy someone else’s innovation and integrate it into your own homogenous ecosystem

I enjoyed the following paragraph from SARUG:

One thing is very clear, Autodesk needs to seek out, listen and respond, through product development, to the end users of their products in order to prioritize and target improvements to their software.  Without that tactical approach they run the risk of client migration to another more responsive solution, (can you say “AutoCAD to Revit (pre Autodesk) circa 2000”) and will be relegated to buying innovative solutions rather than developing them and then having to deal with the two way communication issue anyway.

via
SARUG End of Year Meeting 2011 � Southern Arizona Revit User Group

1. Pick the name you want the Views and Level to use. ie: Level 1
2. Rename both the Floor Plan and Ceiling Plan something different (not Level 1) and nothing already in use. This is a temporary name.
3. Rename the Level to be Level 1
4. Rename the Floor Plan and Ceiling Plan Level 1
5. Now try renaming either the Floor Plan, Ceiling Plan or Level and you will get the ‘renaming’ message again and you can say ‘Yes’

Nice tip on how to fix up the synchronization of Level objects and Plan view names via
REVIT Rocks !: REVIT Tip Cannot Rename Level Name Entered is in Use

A great post over at Revitdialog has unlocked this mystery for us.  Just a little addition to that post – I think it is important to tile your windows first, then do the ordering process.  In other words:

  1. View – Tile
  2. Here you have your currently ‘open’ views in Revit – now, use the Revitdialog tip to re-order them (clicking them in reverse order, finishing at the view you want in the top-left)
  3. Then hit View – Tile again.

 To get the right order you have to work backwards, so if you have 5 panes, you start with picking for the 5th position and work backwards – 4, 3, 2, then 1. However, Revit places the panes in ascending order – meaning the views get placed starting at 1 and goes to 5.

Read more and see the handy pictures at:
Solving the Tiling Mystery

This fixed some persistent crashes on my AutoCAD install – here is the link if you haven’t installed it yet.

It needs to be installed AFTER Service Pack 1.

Direct links copied below:

AutoCAD® 2012 Based Products

acad_2012sp1_x32_ribbonfix.zip (zip – 937Kb)
acad_2012sp1_x64_ribbonfix.zip (zip – 1011Kb)
Readme (htm – 45Kb)

AutoCAD® LT 2012

acad_lt_2012sp1_x32_ribbonfix.zip (zip – 937Kb)
acad_lt_2012sp1_x64_ribbonfix.zip (zip – 1012Kb)
Readme (htm – 45Kb)

via
Autodesk – AutoCAD Services & Support – AutoCAD and AutoCAD LT 2012 SP1 Ribbon Hotfix