When setting up View Filters in Revit, you can only select Filter parameters that are ‘commonamong the Categories that you have ticked… If I haven’t lost you yet, here is a quick way to build a View Filter that uses a custom parameter (like a Shared Parameter) and works across all possible Categories.

  1. Firstly, add the Shared Parameter to all Categories using Manage – Project Parameters
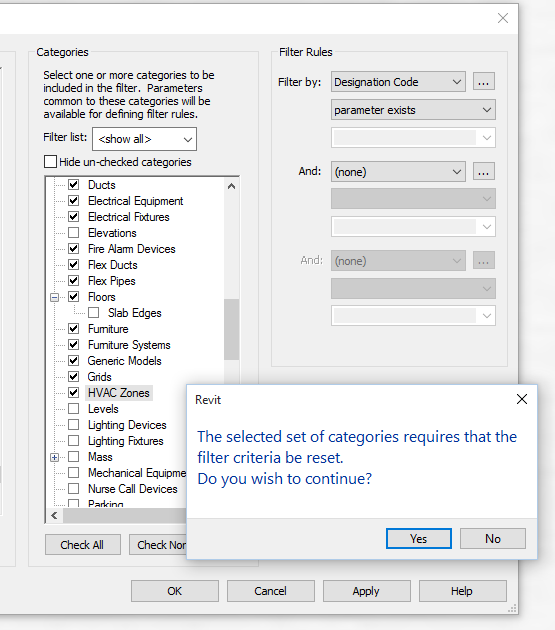
  2. Create a new Filter
  3. Tick one of the top Categories in the list, and choose your desired Shared Parameter as a filter criteria
  4. Now, start ticking the categories to apply this to one by one…
  5. As you go down the list, Revit will occasionally give this prompt: “The selected set of categories requires that the filter criteria be reset
  6. When you see this message, click No, and then move on to ticking the next Category
  7. In this way, you retain you Shared Parameter as a Filter Criteria for as many Categories as possible…

Once again, we just have to know What Revit Wants 🙂

  1. COINS Auto Section Box (download)
  2. QuickViewAccess2013 (2013 download) (2012 download)
  3. ZoomToAwesome (download)
  4. Palladio X BIM – WindowsLayout (download)
  5. Ok, its not a view addin, but – set a keyboard shortcut to Isolate Element, and another one to Zoom Extents.  When you want to find and zoom to a selected element, just type the two shortcuts one after the other … Isolate Element then Zoom Extents.

    A great post over at Revitdialog has unlocked this mystery for us.  Just a little addition to that post – I think it is important to tile your windows first, then do the ordering process.  In other words:

    1. View – Tile
    2. Here you have your currently ‘open’ views in Revit – now, use the Revitdialog tip to re-order them (clicking them in reverse order, finishing at the view you want in the top-left)
    3. Then hit View – Tile again.

     To get the right order you have to work backwards, so if you have 5 panes, you start with picking for the 5th position and work backwards – 4, 3, 2, then 1. However, Revit places the panes in ascending order – meaning the views get placed starting at 1 and goes to 5.

    Read more and see the handy pictures at:
    Solving the Tiling Mystery

    A well known limitation of current Revit versions is that you cannot easily transfer a Legend View between projects.

    However, you can do the following with Legend Views:

    1. Save to Project as Image (just right-click on the Legend View in the Project Browser – you will probably have to open or activate the view before this command will ungray itself)
    2. Export the View as an Image
    3. Export the View as a DWG

    If you are going to export the view as an Image, I recommend a minimum DPI setting of 150.  You can then import this image to another file.  If you Save to Project as Image, you can just copy-paste the image between open projects, or use the Save to New File command on the actual Rendering view itself.  Obviously, you need to manually update this image whenever the Legend changes.

    If you Export as a DWG, you could then Link that DWG into other projects.  When you want to globally update the Legend View, you could re-export the Legend from the original RVT project and over-write the Legend DWG you exported and linked earlier.  You would probably have to tweak the visibility settings a bit to make this Legend-export-link method to work effectively.

    Hope some of these ideas are useful to you!

    Let’s say you want to take a door from one Level of the building, then use the Create Similar tool to make an instance of this door on a different Level.
    This is quite easy.  Just open a view from each plan, select the Door, trigger the Create Similar command, and then switch views.
    The Create Similar tool is still running, so you can happily place your Door.
    Really quick video is provided below:

    We were given the ‘Slanted Column’ ability when some of the Structural tools were recently incorporated into Revit Architecture. If you have been pulling your hair out trying to place one of these slanted columns in a Plan view (where the tool is greyed out), the answer is simple. Go to a Section, Elevation or 3D View to place them!

    You will likely need to set an appropriate workplane to ‘draw’ these slanted columns on.

    The Brace tool is also quite cool – have a go at the ‘3D snapping’ capability in the Options bar (try it in a 3D view, obviously).

    If you are interested in reading further, check out:

    http://revitclinic.typepad.com/my_weblog/2009/04/slanted-columns.html

    http://bimandbeam.typepad.com/bim_beam/2009/06/revit-structure-2010-slanted-column-parameters.html