Having some problems with a Railing that will not show up in a Detail View unless balusters are added to it!  Video:

I’m almost certain this is related to this previously posted bug:
Extents of Revit 2013 Railings bug – when no balusters exist in definition

More on Revit 2013 railings:
Automatic and Manual Railing Support locations in Revit 2013

Revit 2013 railings – almost 7 months old, but have you used them?

An interesting post by Daniel Burrus on LinkedIn has been doing the social media rounds.  Some quotes:
Every profession has both a science and an art. The science can be taught, and people can be equally good at the science of any profession. The key to differentiate yourself in your profession is to develop the art side, not just the science side.

The same is true with any profession, whether you are in sales, IT, customer service, or even medicine. After all, if healing was only a science, it wouldn’t matter who your doctor was. But you and I both know it does matter who your doctor is, and it’s not because of the science; it’s because of the art. It’s about what the individual brings to their medical practice—their uniqueness, their problem-solving ability, their diagnostic capabilities, and their way of solving problems in real time when they’re working on you.

Obviously, this principle holds true for Revit.  Just knowing how the tools work and where to find them in the Ribbon does not mean that you know the Art of Revit.  The Art of Revit involves:

  • Understanding What Revit Wants.
  • Being able to analyze 5 different ways of doing things, and being able to choose the best one.
  • Solving problems by thinking through the process, not just by asking someone.
  • Finding completely new ways to solve old problems.
  • Knowing how to break the rules, and knowing when the rules should be broken.

Of course, the Art of Revit also involves being able to do cool things like Marcello and David

Heads-up via this tweet from Aaron:

Led me to this page:
There Is a Science and an Art to Every Profession | LinkedIn

Install the Google Drive desktop utility and the Skydrive desktop utility.  After syncing both of these utilities / folders, you will have an offline version of both sets of documents in folders like:

Then, use FreeFileSync to sync folders locally.  For example, I made a subfolder on my Skydrive called Google_Drive and synced all of my Drive documents to that Skydrive folder.  You would have to do something similar in the opposite direction too.

Once the desktop utilities have re-synced, you now have access to all of your docs from each cloud.

Note:  Skydrive docs can’t open .gdoc yet.

You may have guessed that I have started using Skydrive due to my recent acquisition of a Windows Phone 8 device, a Nokia Lumia 820…

More info:
Google Drive Help

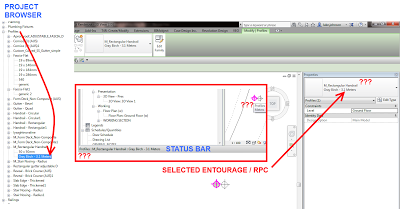
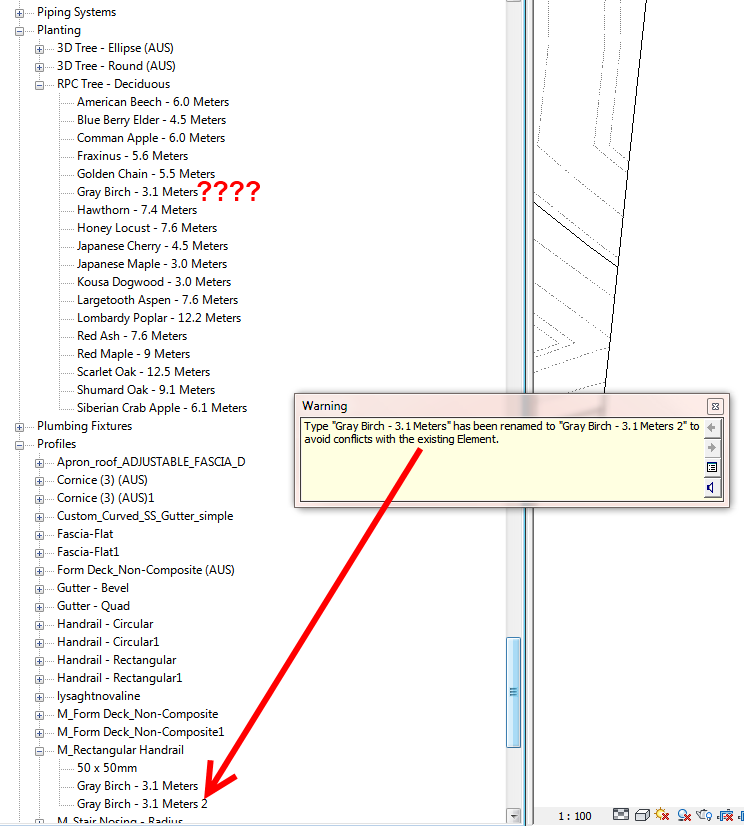
I copied some Planting / RPC from one project (in a Design Option) to another project (in the Main Model).  This is what I got:

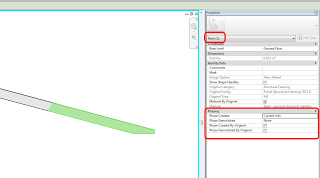
Somehow the Planting instances appeared as a Type of an existing Profile family???

I closed the project and re-opened with Audit.  This did not fix the issue.  Create Similar is greyed out when selecting the RPC, and Create Instance is greyed out for that Type in the Project Browser (not surprising, given that it is on a subnode of Profiles).

This is one of the weirdest things I have ever seen in Revit, and I have seen quite a few…

I can copy and paste the elements with no issue.

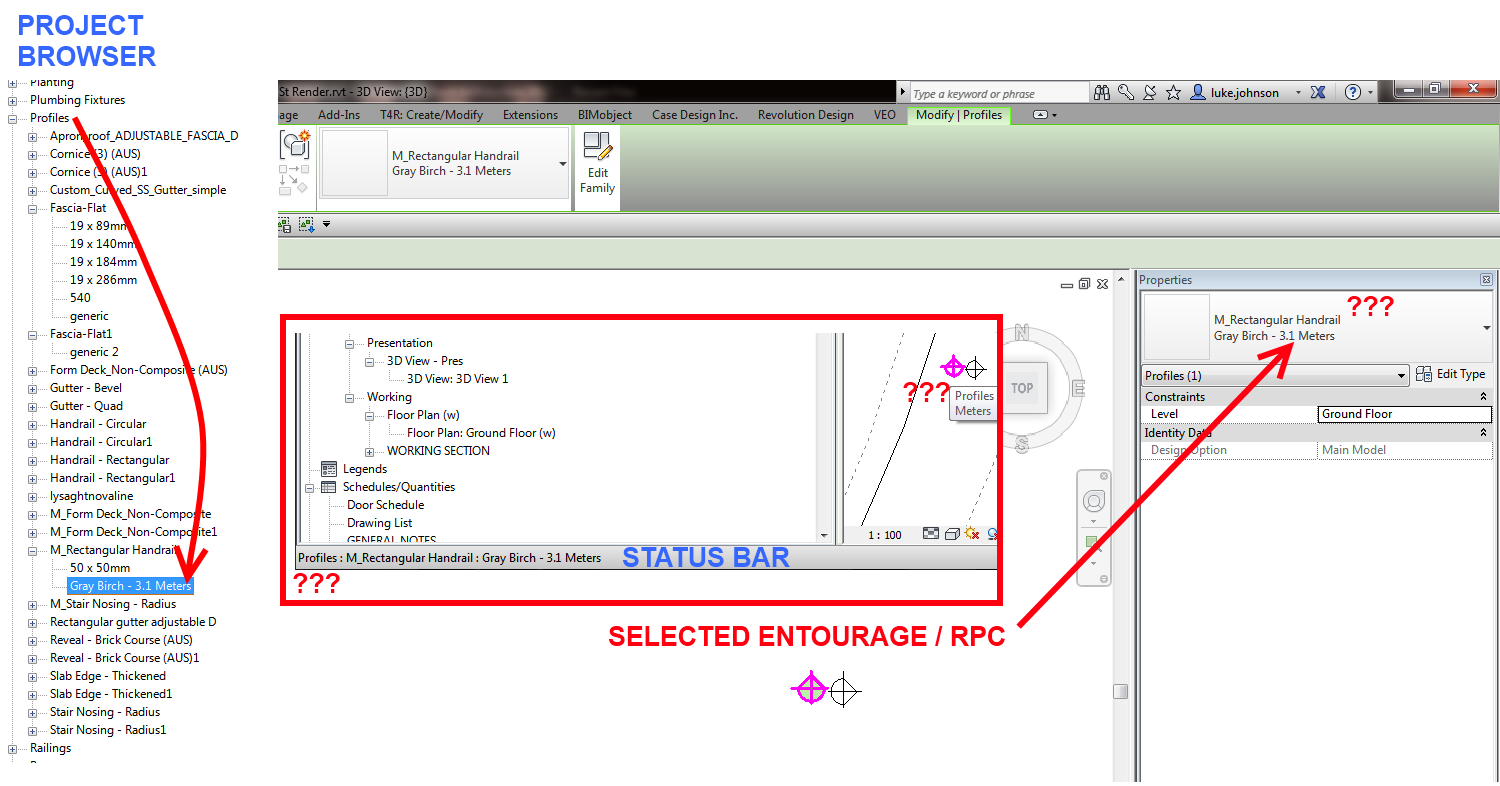
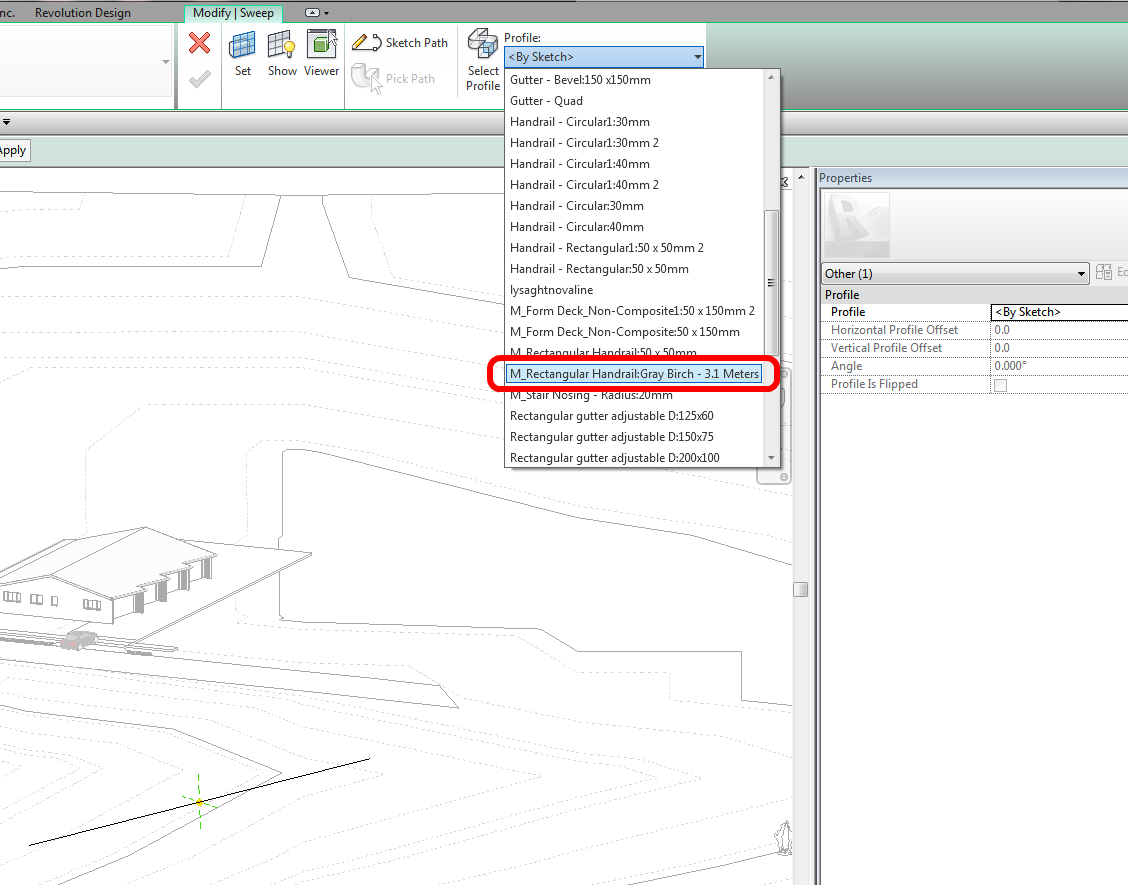
And guess what, it even shows up as an option in the Sweep / Select profile list:

Not surprisingly, when I try to use this as the Sweep Profile, Revit ‘Can’t Create Sweep’.

I deleted the Type and the copy / pasted again but using Edit Design Option rather than unticking Exclude Options – I had the same result.

Apparently, Revit can put your Entourage families into one of the Types of Profile family!

Next try, copied the Type from Project Browser of source RVT:

Great tip from James Herndon:
The secret lies in the original array line itself, that line, the one that shows up next to the array and lets you change the number of objects inside of the array, is actually an element in and of itself, and you need to select it too before you perform the mirror or copy function.

 Now you can see that after I’ve mirrored the array the new array has an array object associated with it and will let me change the array after the fact.
via
The Revit Blog: Arrays – Part II

Interestingly, you can select the Array line and add it to a Group.  You can also use the IDs of Selection tool to get the Element ID of the array itself:

IFC Exporter for Revit 2013 | Autodesk Revit | Autodesk Exchange Apps
or
http://sourceforge.net/projects/ifcexporter/files/2013/IFC%20Exporter%20for%20Revit%202013%20v2.7.0.msi/download

Apparently this is version 2.7.  I may be wrong, but there doesn’t seem to be an easy way to check the ‘version’ on Autodesk Exchange Apps.  If you download the MSI, you can check the properties of the file, where you will see that the digital signature is timestamped:
‎Wednesday, ‎23 ‎January ‎2013 10:39:38 AM

You could also check the IFC Exporter page on Sourceforge:

From the documentation:
The source code for this application is available on open source, at the SourceForge project : http://sourceforge.net/p/ifcexporter/home/Home/
This application is a good complement to the IFC Exporter UI client app, also available on the Exchange store. However, it is not required to get the latest version of that application when installing this application. Nor is it required to use this alternate UI when getting the latest IFC Exporter UI.

More info:
24th January 2013, version 2.7.  Read more at BIM Blog
http://translate.google.com/translate?u=http%3A%2F%2Fbimblog.typepad.com%2Fautodesk_bim_blog%2F2013%2F01%2Fifc-exporter-v27-for-revit-2013.html&hl=en&langpair=auto|en&tbb=1&ie=UTF-8

Today I received a shiny chrome 4gb USB key from CSR containing their Gyprock Revit files (currently, 48 RVT files with a single wall type contained in each).

I had followed the instructions at this link:
Gyprock : The Gyprock™ Revit Family

You could also download this PDF form (click the link then File – Download), fill it out and email to designlink@csr.com.au

Most of you already know that 360 Cloud Rendering will allow you to create a 360 degree panoramic view directly from Revit.  But did you know that you can download and view that interactive panorama offline?

Skip to the cool part of the video (embedded below).

Here’s how:

  1. In Revit 2013, Render in Cloud is on the View panel.  If you have lots of 3D views it can take a while to load the first dialog.
  2. Obviously, make sure you choose Interactive Panorama.  Use ‘Advanced’ Exposure (this may allow for more flexibility later).  Note: Set your DPI before choosing ‘Interactive’.  Small will match the views crop dimensions
  3. Once you have started the Render, it can take a long time to upload the data, but you will get an email telling you when it is ready.
  4. Download Panorama from http://rendering.360.autodesk.com/mygallery.aspx.  Mine came as a jpg.
  5. Download the offline viewer – http://advsys.net/ken/kube/kubegl.exe
  6. Run kubegl.exe
  7. It will prompt you to open something – choose the panorama jpg.
  8. Once loaded, you will be in a full-screen viewing mode.  You can use your mouse to ‘look around’.  Use UP and DOWN arrow keys to zoom in / out and LEFT and RIGHT arrow keys to pan.

Pretty cool huh?

Step by step video:

Heads-up via
Google Translate of http://bimblog.typepad.com/autodesk_bim_blog/2013/01/autodesk-360-panoramabilder-offline-ansehen.html

After writing most of this post, I found a related LinkedIn thread about kubegl at:
http://www.linkedin.com/groups/Autodesk-360-panorama-rendering-is-68075.S.131414706

I couldn’t find a simple way to embed or share the 360 interactive rendering (see feature request here), but here is the source jpg:

A few notes:

“not down-loadable”??
Test: Cloud Rendering in Revit 2012 « microsolresources

Some thoughts on exposure settings:
http://feedback.autodesk.com/cloudservices/topics/adjust_exposure_settings_from_revit

http://advsys.net/ken/kube/kube.htm

Hey Luke.
Here a small tool i made to clean op the journal files that revit leaves behind on the computer.
It seems it doesn not clean these files out of itselve, and can take up a lot of space on the computer pretty fast.
If anyone sees room for improvements they can use the contact button to mail them top me, so i can put it in a next version.
As gmail/hotmail wont let me sent a zip with an exe in it (install file) i uploaded it to my site, and can be downloaded here:

Attached in this mail is a screenshot

Kind regards
Dante van Wettum
The Nederlands