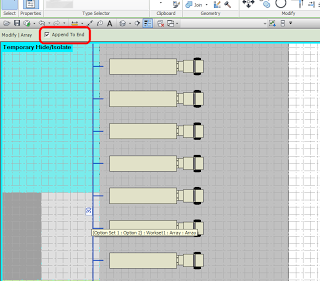
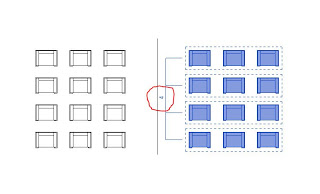
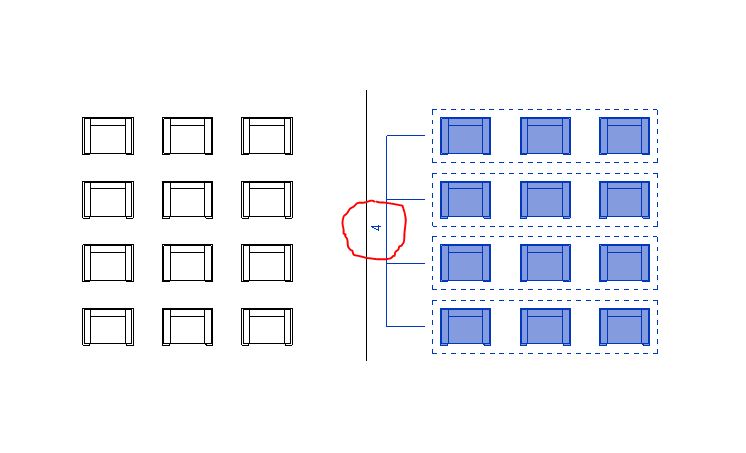
Revit doesn’t like to deal with an array that has 1 instanced element or component (although there is one exception). The array will break. So, the way to handle it is to have a separate single instance of a component for that scenario, and then the actual Array for whenever you need two or more instances.

To accomplish this, you need

  • some formulas to hide or show the required elements, and 
  • another formula to maintain the array at 2 or more. 

It looks something like this:

That particular example also caters for some other ‘switches’ that may turn off the array (notice the if-or formula.)

Typically when editing Revit families, if you want to deal with arrays and stop them breaking when the count is 1, you set up some IF() formulas in Revit. However, a recent comment by David over on Revit Beginners describes another possible method:
Thank you Luke. Another possible solution is to nest the element into an adaptive component family, then nest the adaptive onto a conceptual mass family surface and use the repeater tool which can have an array count of 1. 

I posted about this method a while back:

Download the example file here

Did you know that any array in Revit can be switched between the Next and Last object methods?

Just select an existing array – and have a look in the Options Bar…

It will look like this in German:

Read at revit-family-planner:
http://translate.google.com/translate?sl=auto&tl=en&js=n&prev=_t&hl=en&ie=UTF-8&u=http%3A%2F%2Frevit-family-planner.blogspot.com.au%2F2013%2F08%2Fdie-optionsleiste-oder-neues-beim-reihe.html&act=url

In the past, whenever you built a parametric array in a family, you needed to handle the “break” condition – that is, if the array value drops to 1, you need an IF formula to actually keep it as 2, hide the array and show the single element.  It works, but it is clumsy and needs some parameter obfuscation.

That is why a Divided Path,

  •  with a Repeated 2 point Adaptive family with Reference Line connecting the points,
  •  hosting “whatever” you want,
  •  on a non-driving point that lives on the Reference Line,

 is better – because when the number of divisions of the Divided Path is set to 2, there is still only one repeated element.  No formulas or duplicated parameters needed… Also, Revit error checking usually kicks in when you try to set the Divided Path to “1” and it will prompt you before the thing breaks.

Very useful in situations like this curved adaptive Window family – it can have any number of panels, from 1 to 200 (thanks Aaron).

EDIT  Following Aaron’s comment, here is some more “proof of concept”:

Download the example file here

When you select an Array element (the line with the blue number), did you ever notice the little checkbox in the Options Bar?

By toggling this value, you can tell Revit to either add extra elements between the first and last element (thus squashing the elements closer together), or append elements to the end of the array using the current spacing.

Heads-up for this great little tip goes to Revit Family Planner:
Die Optionsleiste oder Neues (?) beim Reihe-Befehl

Great tip from James Herndon:
The secret lies in the original array line itself, that line, the one that shows up next to the array and lets you change the number of objects inside of the array, is actually an element in and of itself, and you need to select it too before you perform the mirror or copy function.

 Now you can see that after I’ve mirrored the array the new array has an array object associated with it and will let me change the array after the fact.
via
The Revit Blog: Arrays – Part II

Interestingly, you can select the Array line and add it to a Group.  You can also use the IDs of Selection tool to get the Element ID of the array itself:

I previously posted about how to duplicate Array Group types and swap them in and out here.

Interestingly, I created a detail Array Group in Revit 2013 today and noticed that it did not immediately appear in the Project Browser.  Further to this, I could not Duplicate or Rename the Array Group Type.  What to do?

The short answer – group the Array Group.  This will force Revit to populate the Project Browser with the Array Group type name.  It also allows you to Duplicate and Rename the Array Group.  All of this then allows you to use the swap-in-swap-out method I linked to above.

Watch the short video here:

This video demonstrates a peculiar workflow, in which Revit allows you to change the Type of an Array member without breaking the array.

This example uses a Polar array based on a copy-to-2nd method. You will notice that the reliability of this method actually depends on how far the array is pushed. In general terms though, this hack may prove useful in some situations.

While editing a Group, you can’t create an Array.  There are two workarounds:

  1. Make the array ‘outside the group’ and then Add it to the Group.  This requires you to Finish Group, make Array, Edit Group, Add… etc
  2. You could use a line based Component as an array ‘guide’ to provide you with the intervals you need, and then Copy Multiple.  If you are in a Detail Group, use a Detail Component, if you are in a Model Group, use a Generic Model.

Here are some links to download my array guide components
These components have two instance properties – one to control the size of the ‘tick’, and one to control how many elements / divisions are in the array.

Download example Detail Component here

Download example Generic Model here