While the free Labs Point Cloud Feature Extraction for Revit 2012 is very hard to find these days, there is a version of this tool available for AutoCAD:
Point Cloud Feature Extraction | AutoCAD | Autodesk Exchange Apps

Use this plug-in to create geometry and primitive shapes that align with the features of the point cloud. To help isolate the shapes, planes, and sections you want to extract, you can crop, or hide, one or more areas of the point cloud.

EDIT  It looks like this in AutoCAD 2014:

Just import a point cloud, select it, and the tools become visible in the Ribbon.

This technique allows file operations and programs to be initiated from an in-canvas Revit modelling session, without the need to switch to Windows Explorer.

Basically, you just need a Symbol family with URL instance parameter.  In the URL parameter, paste a fully resolved path to the script or exe file (you can use Shift + rightclick to quickly get this from Explrorer in Windows 7).  Now, when you select the Symbol family, click on the dots in the Properties Palette  – the exe or script will run, directly from Revit

Potential uses:

  • Launch any program
  • Launch a program that may be useful in-canvas (like Colorette)
  • Launch a search program like Locate32, that can be used to search for Revit content and drag-drop into the Revit session
  • Copy point clouds to local drive
  • Map network drives
  • Archive RVT folder script, perhaps using 7-zip
  • Run Autodesk program update packages (some of these may require Revit to be shutdown)
  • Run add-in installers (that will probably require Revit to be updated)
  • Copy macro updates
  • Delete Revit backup files script
  • Clean up Journal folder
  • Make a backup of Keynote file or Shared Parameter file (perhaps used before editing)
  • Run Windows Task Scheduler tasks
  • Shutdown the computer

Once you have the Annotation family loaded and placed, just add the suitable path, and then select the element and click where the little dots should be:

The command is instantly triggered.

In a worksharing environment, you could set up a Drafting View where you placed different instances of this “linker” family to trigger various project-related scripts.

This idea grew from this post and this one about copying Point Clouds.

Some up-to-date info on data exchange between Tekla and Revit, including IFC and SDNF workflows (from revit structure blog):
The main purpose of the IFC import into Tekla is to allow the fabricator to accurately build a model from the consultants Revit model. However, you can convert certain objects from the IFC file to native Tekla objects such as beams, columns, footings etc. This is clearly useful rather than building a model from scratch. I tried this on a few beams and columns and again found no discrepancies with the original Revit Structure 2014 model, however, as you would expect the stairs translated to a bounding box. See the below image including the report.

I also imported an IFC model from Tekla to Revit with some fairly good results that are fine for coordination purposes. I would imagine that this may be better in a product such as Navisworks… 

The best way to incorporate the analytical model from Tekla to Revit is to transfer the model as CIMsteel (Note that you will need to install the SDNF Import/Export for Autodesk Revit 2014). This gives you the option of transferring the analytical model

Read more:
Revit Structure 2014 and Tekla Structures 19.1 | Autodesk Revit Structure

From Darren Snook:
Essentially, 2 URL parameters are added to the family. The first is pathed to a csv file, which allows much easier editing than the text file. The second points to a batch script, which will copy the csv files to text files for Revit to use as the catalogue to load from.

Video:

Read more / via:
Revit @ Waterman: Type Catalogue Tips

Here’s a question though:  In 2014-world, does this scenario become a little different – as Type Catalogs can exist in the family?

You may have tried installing various codecs so that you don’t have to resort to Microsoft Video 1 when exporting and compressing animations from Revit and Navisworks.  However, many of these will not work, partly due to the complication of 32 bit vs 64 bit environments.

Happily, this Xvid compressor will work when installed on Windows 7 64 bit, even with 2014 version Autodesk products:
Xvid.org: Downloads

The Xvid Home profile works nicely – good compression and still good quality.  The result is far better than having to deal with huge uncompressed AVI files, or the poor looking Microsoft Video 1 versions.

I know that some of you use Cinepak Codec by Radius – I have a feeling that the aforementioned Xvid codec would offer better compression, but perhaps you will need to ensure the “audience” of your animation has the necessary codec installed.  Alternatively, you could open the Xvid-encoded AVI file in Windows Movie Maker and export as a WMV – something that almost every Windows user will be able to view.

Further reading on codecs:
Why does the System Device Enumerator report different list for the Video Compressor Category on a Windows 7 x64 for the 32 and 64 bit versions?

Configuring Session Recording – Thycotic Software

If you are using a 64 bit system, simply loading the DivX/XviD codecs does not seem to work. I suspect they’re not supported but have yet to research this, so above only applies to 32bit installations. If anyone knows more about this please post.

Update: the 64 bit DivX codec works in Navisworks if you install it to the C:Program Files (x86) folder instead of the C:Program Files. (Presenter gives the best quality, but divX give good results much much faster)
via
Animation Resolution
Fixing Walkthrough Corruption for very large AVI files produced from Revit and Navisworks
When exporting very large (like 4gb) uncompressed AVI files as a Walkthrough from Revit, the index for the AVI will likely become corrupted and will appear to split and duplicate itself when you play the file.

It may be possible to salvage some of the file using VirtualDub.  Just open the file in VirtualDub and it will detect the error and try to rebuild the file index.  Then, Save As an AVI file again.

Otherwise, you need to use another compression codec (as shown above), or break the walkthrough up into bits and then join it back together later.

An old thread at RevitCity discusses some of these issues:
RevitCity.com | Rendering Walkthroughs

I previously discussed VirtualDub in this post:
What Revit Wants: How To Create a Revit Walkthrough and then Upload it to Youtube

On a lighter note, this Autodesk help page references a very old piece of software called Autodesk Cleaner.  Heard of it?
Autodesk – Autodesk Revit Architecture Services & Support – Improving AVI video quality of walkthroughs

EDIT The merging of DesignScript and Dynamo was confirmed by Ian Keough:

There is some interesting “fluidity” of language in discussing DesignScript, Dynamo, Revit and Vasari in the following two class descriptions of AB2551…  I guess all will be revealed at the AU class on Thursday, Dec 5, 8:00 AM – 9:30 AM.

From this:
snapshot of the page as it appeared on 22 Oct 2013 12:40:35 GMT

To this:
1 Nov 2013

via
Enhanced Parametric Design with Dynamo Visual Programming for Autodesk® Revit® and Autodesk® Vasari™.

“Official” links have now appeared.  Enhancements Lists are finally here:
RVT enhancements
RAC enhancements
RST enhancements
RME enhancements

Original direct links are below the first line.

Another Autodesk post describes how UR2 improves building analysis, including:

  • improved handling of sandwiched materials (mm…mmmm)
  • improvement to Analytical Surface precision of around 10-20%

Read more:
http://autodesk.typepad.com/bpa/2013/11/revit-2014-update-release-2-now-available-for-download-further-improvements-to-automatic-energy-analytical-model-creation-us.html

Onebox – Direct link for RVT version:
http://updatesdl.autodesk.com/updates/files/rvt2014ur20.exe

Revit Architecture – Direct link for RAC version:
http://updatesdl.autodesk.com/updates/files/rac2014ur2.exe

Revit Structure – Direct link for RST version:
http://updatesdl.autodesk.com/updates/files/rst2014ur2.exe

Revit MEP – Direct link for MEP version:
http://updatesdl.autodesk.com/updates/files/rme2014ur20.exe

Readme:
http://updatesdl.autodesk.com/updates/files/autodesk_revit_2014_update_2_readme0.htm

Heads-up

Official pages:
Revit 2014 (One Box) Update 2
RAC 2014 Update 2
RST 2014 Update 2
RME 2014 Update 2

Main Autodesk page for RAC
Note: After Update Release is applied correctly the build number specified on the Help>About dialog will be 20131024_2115.

 
Readme (select language version):

English (htm – 30Kb)
Enhancements Documentation (select language version):

English (pdf – 208Kb)

To make the swappable profile, use a Generic Model Adaptive template, but don’t add any Adaptive points.  Set the 2 reference planes in the template to “Defines Origin”.  You can parametrize this as much as you like (just don’t use Reference Lines – you need a closed profile of Model Lines as per any Profile).  Then, load this into another new Generic Model Adaptive family.  Host the Profile component on a hosted point (that is, one that has been placed on a line).  You will need one of these nested Profiles at each end of a line to control the form properly.

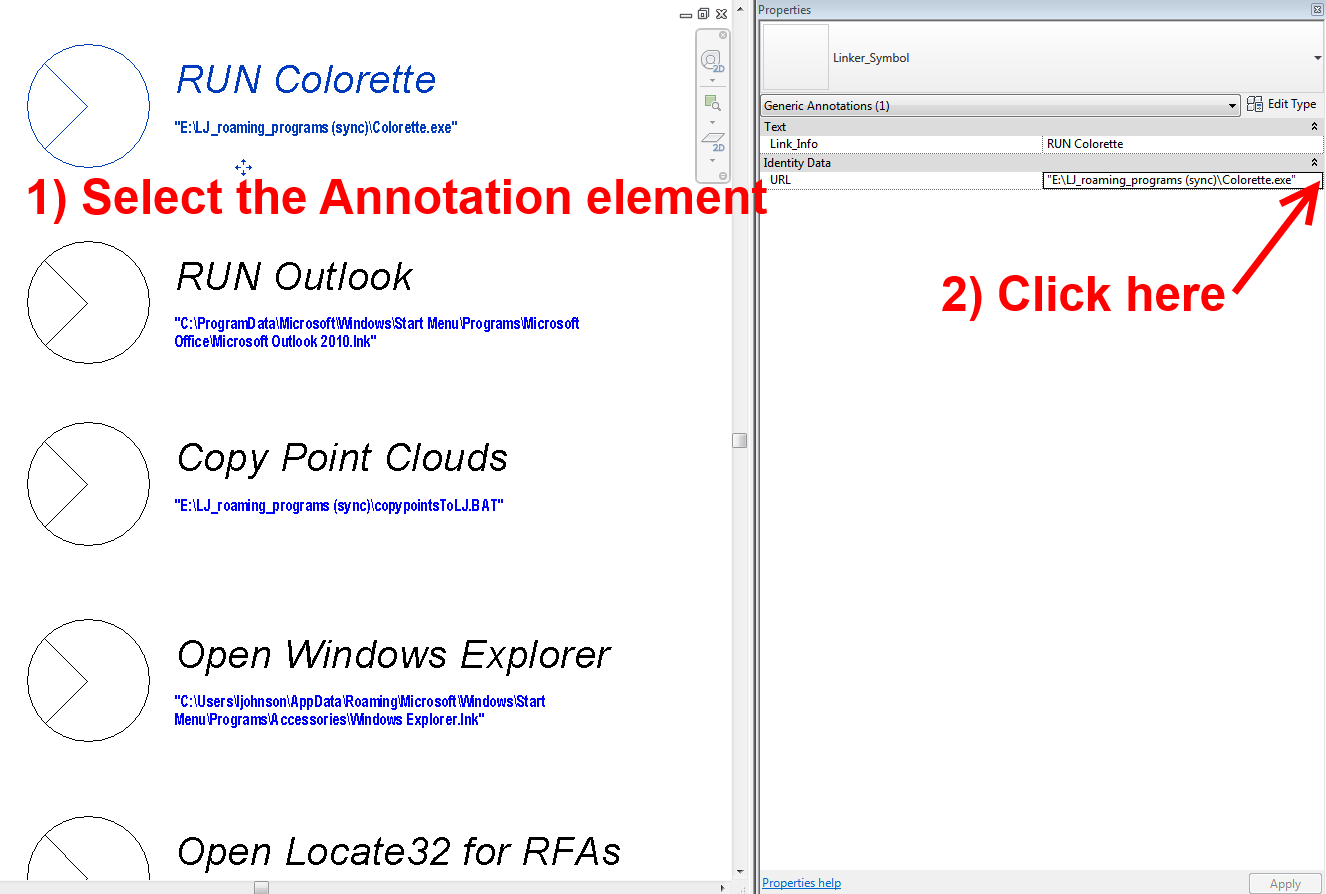
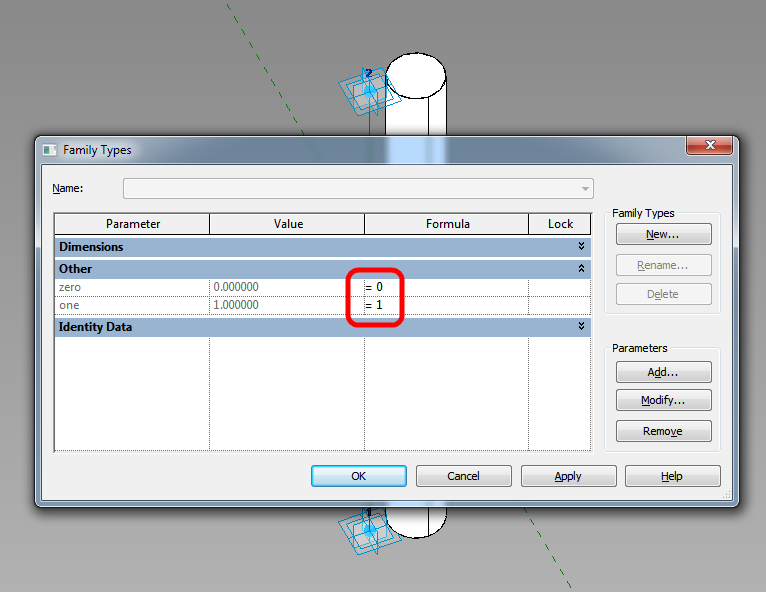
I am in the habit of using hosted points to host Profiles now.  For example, in a 2pt Adaptive with a Reference Line, I will add 2 hosted points to the Reference Line to carry the Profile instances.  These hosted points will be forced to the end points by using a parameter for zero, and another one for one, and forcing these values by putting 0 and 1 in the Formula box of the Family Types dialog (see image).

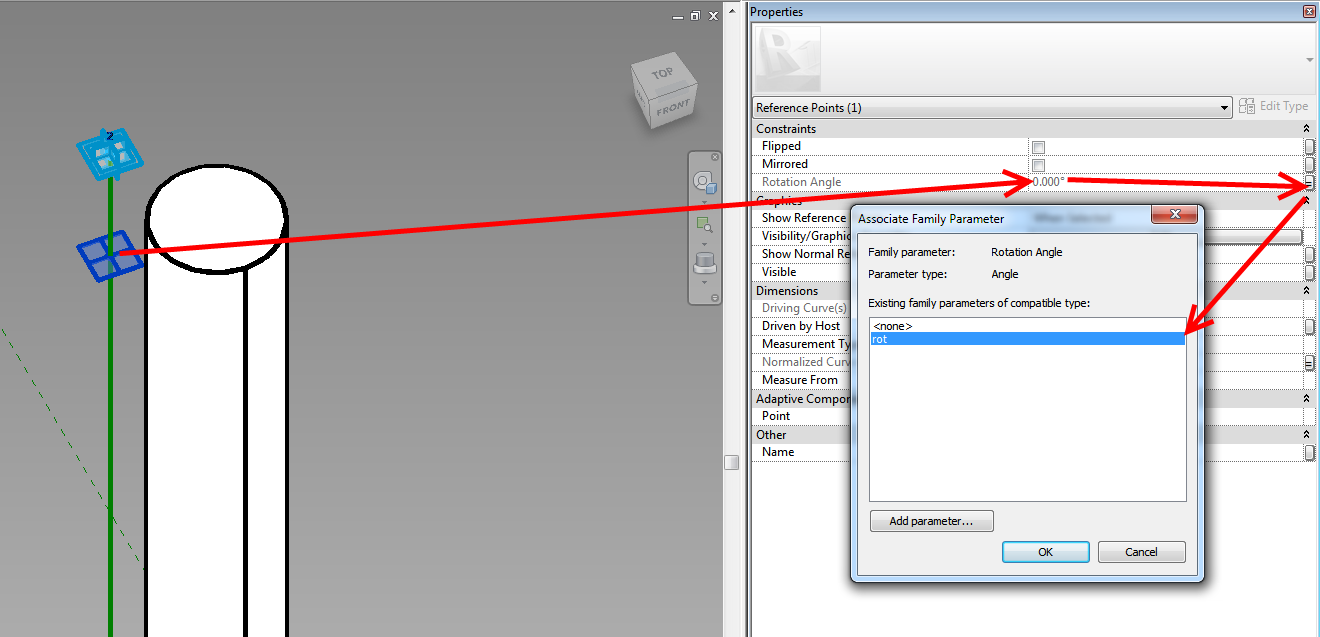
If you are using hosted points (make a new point, and drop it on a Reference Line – it will be come a small dot if it is hosted on the line), you can actually adjust the rotation Angle using a parameter – this makes it easy to rotate the profile around the hosting line.

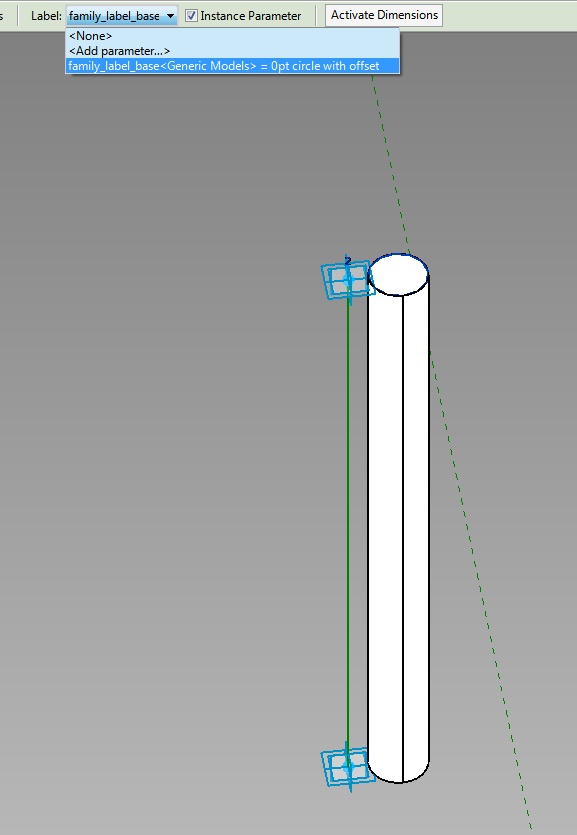
Here is the really cool part – you can apply a Label parameter to the Profile instance in the host family, and then directly swap Profile shapes (different nested RFAs or types in the same RFA, both work).  This even works from the Project Environment.

If you want to drive the profiles parametrically via the host family, you will have to make them un-Shared (otherwise you can’t map parameters from Type to Host).  You can swap between un-Shared and Shared profiles using the Label parameter.

Finally, to create the form, select the Profile families (the ones at each end of the Reference Line) and click Create Form.  Unlike other form creation scenarios, you do not want to select the “lines” by Tabbing through – you actually want to select the family itself.  The Label parameter will allow you to swap these families, which will drive the Form.

In the image below, all of these are one Adaptive family – with profiles swapped, and parameters adjusted, including rotation about the axis.


Download the above example here

Credit:  I’m fairly sure I read about this general idea somewhere… it was a while ago.