If you want to learn some more about the View Cube, check out:
Scott Chatterton: Revit View Cube Tips
One thing that Scott doesn’t mention in this particular post is How to change the ‘Front View’ on the ViewCube in Revit.

What Revit Wants + Black Grid AI
AI Empowered Project Management
If you want to learn some more about the View Cube, check out:
Scott Chatterton: Revit View Cube Tips
One thing that Scott doesn’t mention in this particular post is How to change the ‘Front View’ on the ViewCube in Revit.
The problem – you want to subscribe to an online newsletter, but they don’t offer an RSS or Atom feed. You don’t want to disclose your personal email address.
You can use the following service to set up a ‘bridge’ between a nominated email address and an RSS feed. Then you can simply subscribe to the RSS link that the you are provided with:
Emails to RSS Forwarding
It takes a little bit of setting up, but it does solve the specific problem described above.
There are a few freely available applications for AutoCAD that allow it to do some powerful spline editing – tools we don’t have in vanilla Revit just yet. You can use the tools below to do some line operations in AutoCAD and then Link / Import the resulting elements into Revit:
Splines to Polylines
Download VLX from page below and use APPLOAD in AutoCAD to load it, then SP2PL to run it:
http://www.cadforum.cz/cadforum_en/download.asp?fileID=1488
Polylines to splines
Copy / paste the script from the page linked below into a text file, then save as pl2sp.lsp
APPLOAD in AutoCAD, then PL2SP to run it
Here is a routine that allows you to turn a “Fit Curve” Polyline into a Spline…
AutoLISP: Polyline to Spline | AutoCAD Tips:

Free Add-In developed for use by Autodesk Revit programs in the Structure and MEP disciplines. This application is recommended for use with IFC-based model exchange between GRAPHISOFT ArchiCAD and Revit applications. The Add-In for Revit applications variously enables direct import of ArchiCAD IFC models and IFC model export to ArchiCAD, or serves to optimize Revit’s standard IFC import and export functions used to exchange data with ArchiCAD.
via
Interoperability Downloads
The download page linked above was updated: Wednesday, August 22, 2012
Heads up – Revit3D
First of all, this was a bit too funny not to share:

Finally! I am now subscribed to BIM itself! What will this new entity reveal? Has BIM become self-aware?
Enough of that…
From the BIM/IPD [AUS] website:
The Australian Institute of Architects and Consult Australia formed a BIM and IPD Steering Group in mid-2011 with participation of leading experts from architecture, engineering and construction. The purpose of this group is to develop resources and guidelines for practitioners in the Australian building industry. The Steering Group has formed four Working Groups with focus on particular themes to jointly produce material that will be managed and updated via this website.
There are a few handy resource pages, including the following:
| BIM QnA > | BIM STANDARDS > | |
| BIM GLOSSARY > | COLLABORATION DOCUMENTS > | |
| REPORTS > | LEGAL DOCUMENTS > | |
| WORKING GROUP PUBLICATIONS > | CONTENT LIBRARIES > | |
| REPORTS > |
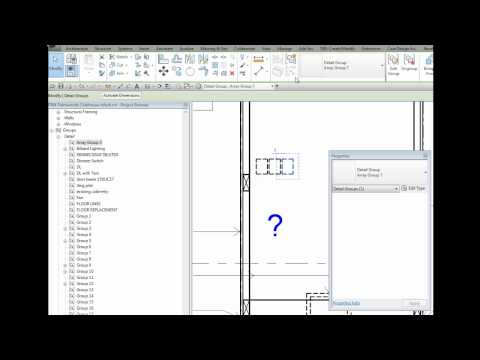
I previously posted about how to duplicate Array Group types and swap them in and out here.
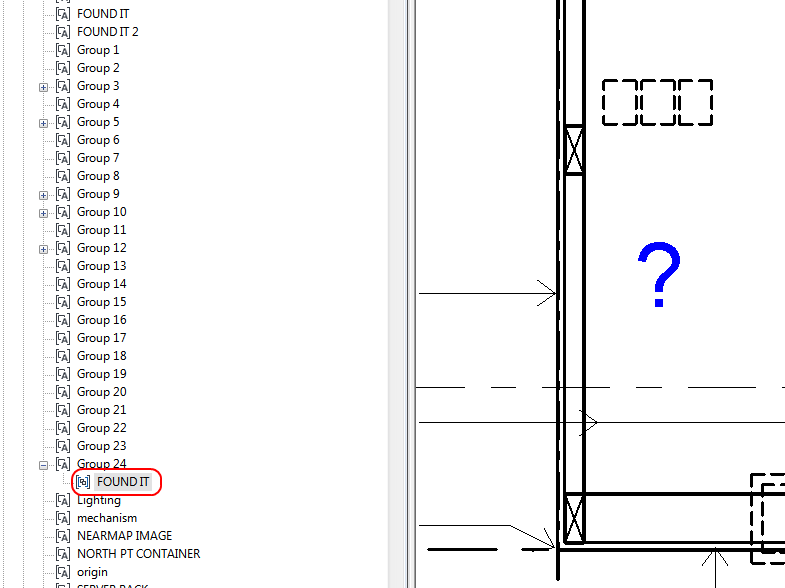
Interestingly, I created a detail Array Group in Revit 2013 today and noticed that it did not immediately appear in the Project Browser. Further to this, I could not Duplicate or Rename the Array Group Type. What to do?
The short answer – group the Array Group. This will force Revit to populate the Project Browser with the Array Group type name. It also allows you to Duplicate and Rename the Array Group. All of this then allows you to use the swap-in-swap-out method I linked to above.
Watch the short video here:
Follow these steps:
That should get you to the Room Separation line entry in Visibility / Graphics. Then, you can:
As you probably know, I’m a big believer in Keyboard Shortcuts.
However, in all honesty, if you have mouse and are using Revit 2013, it is probably going to be quicker to:
This interesting article appeared on AUGI recently. It likens building procurement with what it takes to raise a child … an allegory that, while seeming a little far-fetched, it does seem to carry through quite consistently. Here are a few quotes:
We are doing this collaboration trick together on multi-gazillion dollar projects, based on the rudimentary idea that we all, to some degree, use the same definition. To me that sounds like a disaster waiting to happen. BIM was supposed to make all this more easy. We were supposed to make the entire design and build process less prone to errors. Yet, while we were doing our thing for a few hundred years with those awful “traditional” methods, at least it was clear who did what, how, and when.
…
When we look at the design process from first conceptual design (birth) to being construction-ready (graduation), we, the professionals in the AEC industry, need to teach our buildings.
The BIM philosophy states that we should do this as a continuous process with a regular addition of skills without gaps or dropoffs.
To do that, we need an educational plan, called a BIM Execution Plan, which defines who does what, when, where and how; and perhaps most importantly, illustrates the ways in which all these elements are tied together.
IPD is a logical next step, where we get one team of teachers to work the educational plan throughout the entire process of growing up. When you use IPD to nurture a building, the BIM-E/BEP is called an IPDP.
via
Parenting Your Design – BIM & IPD | AUGI
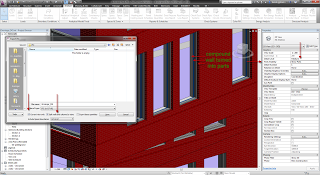
Some tips on using IFC with Parts from http://danielgijsbers.blogspot.com/2012/08/revit-parts-and-ifc.html

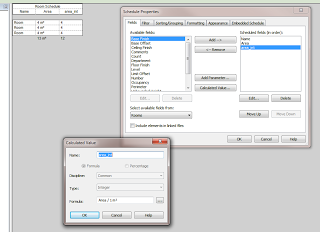
The problem – even when you use Rounding (by changing precision settings in the schedule), the totals are still calculated from the most accurate measurement Revit has available. So, for 3 areas of 4.4m² Revit says that:
4 + 4 + 4 = 13m²
One workaround is to convert the Areas into Integers (using a Calculated Parameter), and hide the original Area column … still doesn’t exactly work sometimes. While you get an illusion of consistency, you tend to lose precision. The reason is that the overall rounding of the figures does not necessarily match the individual rounding of figures.
For example, lets say you have 3 areas of 4.4m² each. Using rounding to 0 decimal places by using the precision settings, you will get 13m² for the total, but using the integer method above you will get a less accurate but more consistent 12m².
I wonder if a percentage based technique could be used? It still wouldn’t be ideal, particularly if there were some ‘dumb’ constants that had to be added to Calculated Parameters.
What about you? How do you solve this precision vs consistency problem? One obvious way is to simply use more decimal places in your schedule – but then you cannot use the Integer method, and you can still run into the same problem… For example, 3 areas of 14.45m², using rounding to 1 decimal place:
4.5 + 4.5 + 4.5 = 13.4m²
Download the example file here
Here is what the Integer method looks like:

Some other info:
It’s possible with ordinary schedules too… There are a few things you need to do:
1. Sort your schedule on the units you want to differentiate on.
2. Add a calculated value, percentage, which calculates the percentage of a single element to the unit total (that’s why you need to sort on units, otherwise you can’t use the unit total in the percentage calculation)
3. Multiply Area by percentage in a calculated value, and check the “calculate totals”
4. Check off “Itemize every instance”. If you did it correctly it now shows proper totals.
This takes some fudging to get it right. If you can’t get it done, post an example.
via
2012: Total Cost in a schedule – Page 2