While you can use Highlight in Model from a Schedule, there is no similar command relating to a ‘current selection’.  If you have somehow selected an object and want to “find” it so you can actually see it, what can you do?

This:

  1. Select the object
  2. Manage – IDs of Selection
  3. Ctrl+C (copies the ID)
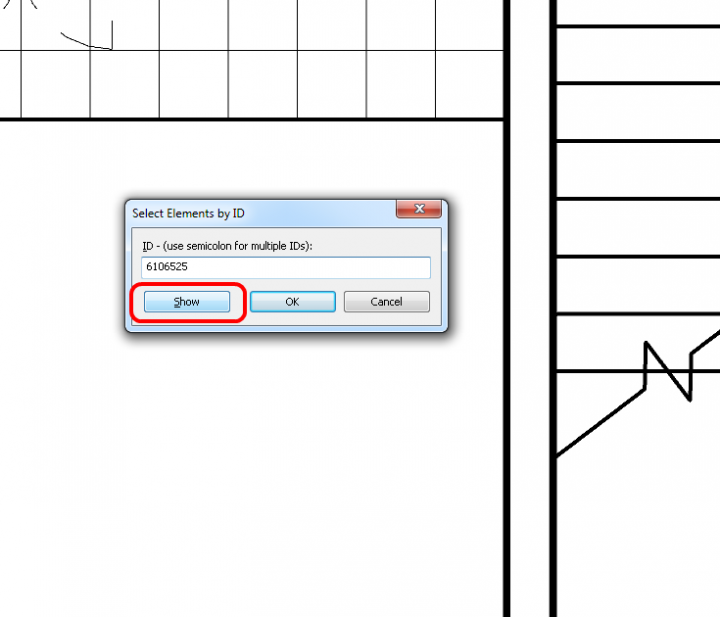
  4. Manage – Select by ID
  5. Ctrl+V (pastes the ID)
  6. Don’t press OK, instead
  7. Click Show.  You can cycle through various views by pressing Show multiple times.
To speed this process up, map some keyboard shortcuts to IDs of Selection and Select by ID.

I have posted about Profiles and Adaptive components before, but more recently Tim Waldock put together a nice, detailed post on the subject over at this link.

In the post, he states:
You can host it on a divided path node; but don’t bother to convert it to a repeater because it cannot then be used to create a solid form.

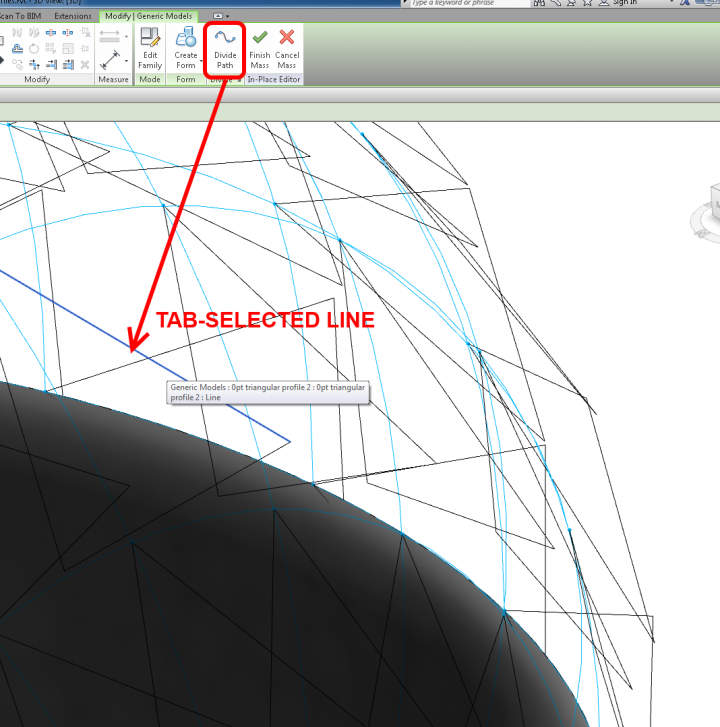
Technically, this is true.  If the element is not a Repeater – just a set of Profiles in an Adaptive, you can then Tab-select until you get the “closed” loop of lines, and use these to generate forms.  In other words, you aren’t selecting the Component – just the lines inside the component.  It can be a little fiddly, but it does work.  This is only really necessary if the normal workflow of selecting the Components and using Create Form does not work or is not available.

However, when it comes to Repeaters, even the above idea does not work.

Neither does “doubly nesting” another shared Component inside the Repeated Component.

One of the few things you can do is to select a Line in the Repeated Component and use the Divide tool.

You are then left with using the Repeater to set up a “rig” to place multi-point line families on or between, and using this skeleton to generate forms.  In some ways, it depends how parametric and adjustable you need the resulting form to be…

You can’t simply use a Floor Tag to tag the thickness of a Floor in Revit…

However, you can:
Convert the Floor to a Part, and use a Parts Tag

Parts tags can natively report thickness of the Part.

EDIT There is another method that comes via Kym Vdz on Facebook, it refers to this post on RFO (you will need to login to download).  I haven’t looked into this deeply yet, but it seems to basically use a Floor-based family with a shared Reporting parameter to pass the Floor Thickness into a nested Generic Annotation… there is always many ways to solve a problem in Revit!

Julien writes “you should try this family….hope you like it. it reports the slab thickness. just place it on a floor.

credits to: Revitez!: Utiliser les paramètres de rapport pour coter l’épaisseur d’une dalle dans un plan d’étage

Attached Files Attached Files
By now, most of us are using Navisworks for some sort of aggregation, model checking or clashing.  So why would anyone want to use Revit Inteference Check (on the Collaborate tab, Coordinate panel)?  Basically, because its “in-canvas” and doesn’t require workflow-disconnect (export NWC, find Clash, Switchback, modify, refresh NWC).

Instead, we can run a clash report within Revit, close the dialog, fix the problem, then refresh the report.  Much easier.

For one recent Basement Carpark Design, we already had Parking families set out, and the Structural model linked in.  All I had to do was edit the Parking family, add a Shared Nested family of suitable Category (in my case, Electrical Equipment), run the Interference Check, fix or mark up the problems, and then switch “off” the shared nested component (using a visibility switch on the shared nested component).  Quick and easy.

Obviously, there is a lot it can’t do (especially compared to Navis), but some things it can do nicely.  Read on for some Q and A:

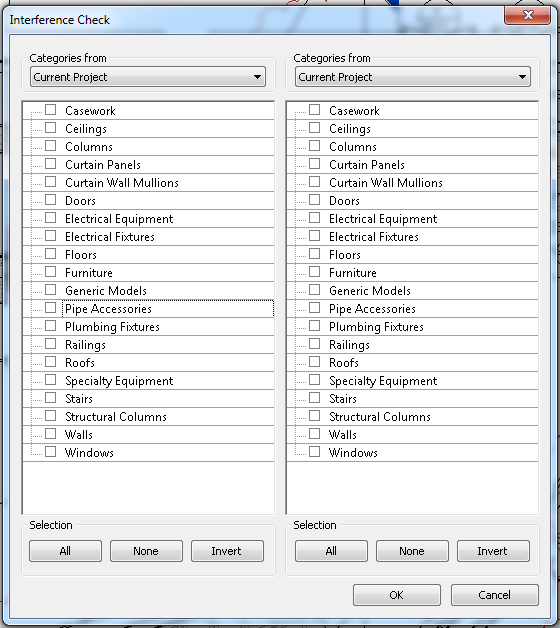
Is there a limit to the Categories you can use in an Interference Check?
Yes, see image below

Can you clash against a Shared Nested form of one of the above Categories?
Yes!

Can you clash against a Linked file in Revit?
Yes, of course – the above Category limitation still applies

Can you clash against selected objects?
If you select objects before starting the command, only items matching above Category limitations and present in the selection will be available as a tick box.

Will collinear 3D faces trigger a Interference in Revit?
Unfortunately yes.  You can work around this by offsetting one of the forms by 1 or 2mm to “ignore” those clashes.

Will an invisible (unchecked) Extrusion or Family be included in the Interference Check?
No

Will an item that is completely transparent (either based on a View setting or Material setting) be included in the Interference Check?
Yes

Can you clash against a Void form?
Yes

While you can’t “Save” a Search Set, you can Refresh your previous Interference Check in Revit.  Just do this:
Interference Check – Show Last Report – Click Refresh
Note: pressing “Refresh” does not re-run the Check, it just re-checks the things already in the list to see if any have been fixed.

To make “finding” the clashes quicker after the report is run – open a few key views first.  As these are in memory, when you click “Show” on an item in the report, Revit will look in these open views first.

Helping google:
Revit interference checking shared nested

Sometimes you just need to hear an idea and you innately know “this is going to be useful…”

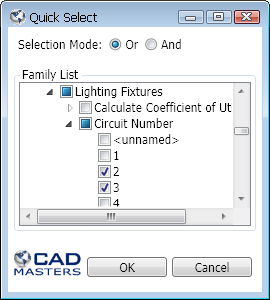
Quick Select command for Autodesk® Revit® to select by element type and its properties. Expand the element or family type and select the properties that you wish to filter by. Click OK and all those elements will be selected. 

  • When in “Or” mode, the command will select all elements that match any of the properties. 
  • When in “And” mode, the command will only select elements that match all the selected properties. 

Example of potential uses:

  • select all Casework on a particular Level – done
  • select all Filled Regions with a given area – done
  • select all Walls whose Top is Attached – done

As with most addins I post about – its free.  Download on Exchange at:
this link

Heads-up via:

Did you miss the recent update to Whitefeet Tools?  These are probably the oldest and most robust database editing tools for Revit.

The highly experienced developer, Mario Guttman, is also actively working on Project Hummingbird (a set of Grasshopper components that facilitate the creation of Revit native geometry).  Check it out at:
http://ghhummingbird.wordpress.com/ 
and download at
http://www.food4rhino.com/project/hummingbird

The latest version of Whitefeet can be downloaded by following the instructions at:
http://www.whitefeet.com/Tools/

via

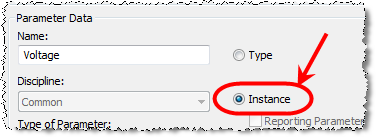
Can you change built-in parameters from Type to Instance based, and vice versa?  This post shows you can. 

The essence of the workflow is to

  • start a family with the desired template, 
  • add a value to the parameter, 
  • change the Family Category to something that doesn’t have that parameter built-in, 
  • switch the parameter to Instance, 
  • then change the Family Category back to the original

Read the more detailed version here:
http://aectechtalk.wordpress.com/2013/12/26/change-revit-voltage-parameter-from-type-to-instance/

(It is based on changing voltage parameter to Instance based for Electrical Equipment)

I previously posted about Up and Running with Autodesk Navisworks 2014 by Deepak Maini a while back, but I think it definitely deserves another mention.  Here is a selection of usability and productivity tips I thought you might find useful in the coming year:

1) Merge – in the scenario where a Navisworks coordinator issues an NWD to three different teams, who all do markups in their respective NWD files, they need to save as NWF before returning the file (for merging) to the initial coordinator. This avoids having duplicate geometry.

2) Home – Project – Scene Statistics will show you if any Object Enablers are missing

3) To preview a model in isolation, without having to close the current project, and before fully Appending it to the main scene, you can use the Import Sheets and Models tool

4) To change the pivot point while orbiting in 3D, move the cursor over the desired vertex and then scroll the wheel button of the mouse once.

While using the Walk tool, scrolling the mouse wheel up or down is equivalent to tilting your head up or down (similar to “Look” on the Steering Wheel

5) Holding the SHIFT key down and selecting any object will select everything in the Autodesk Navisworks scene. Repeating this process will cycle through various selection resolutions.

6) The Move and Rotate tools show on a “toggle” basis – to turn these gizmos off, select any object and then from the Item Tool ribbon tab, clear the Move or Rotate tool.

7) You can add new parameters to objects directly in Navisworks – right-click in the blank area of the Properties window and select Add New User Data Tab; a new custom tab is added with the default name of User Data. This is sensitive to the selection resolution (ie. Can be added to a entire layer etc). Along similar lines: Navisworks does not allow you to view properties of objects in different layers or categories at one time. For example, if you select the curtain panels on all the layers, the Properties window will be grayed out. So you will have to create the custom properties one layer at a time.

8) Quick Properties settings are stored in the software, not in the Navis project file

9) Section boxes – if you have used a custom alignment, using the same alignment again will rotate the plane 180 degrees (like mirroring it). Also, the Fit Selection tool will (unsurprisingly) resize the sectioned view to fit selected objects.

10) To permanently turn “on” the options to save the object visibility and material overrides using the Options Editor. From the left pane, expand Interface and click on Viewpoint Defaults. From the right pane, select the Save Hide/Required Attributes and Override Material tick boxes. Henceforth, whenever you create a viewpoint in any file, these two options will be turned on.

11) Use Ctrl+G to turn Gravity on and off

12) To use Measure tool to move objects or models into position: First, measure the distance between any two points that are supposed to match in the scene. Then, select one of the files from the Selection Tree and use the Transform Objects tool (in the Ribbon) to move the selected file

13) Markups, Commenting and Tags – Redline markups can only be added in a saved viewpoint

To add a line break to various text entry boxes in Navisworks, such as Redline Markups, you can use the P (backslash P) switch

Redlines, Comments or Tags? As I mentioned in my previous post about using Revit and Navisworks, using Comments is quite powerful (moreso than redlines) in a lot of ways, as it allows for easy searching. However, Tags are even better, as they relate directly to a model element and they can still be searched as with comments.

This is just a selection of awesome tips you will find in this great Navisworks resource.  Here is how you can get it:

Australia / NZ purchase page:
here

Amazon page for the Up and Running book:
http://www.amazon.com/Up-Running-Autodesk-Navisworks-2014/product-reviews/1482605279