Update: check out this page for the 64-bit Xvid codec

I encountered a problem today related to walkthrough creation in Revit 2010 64 bit with Vista 64 bit. I was exporting a large walkthrough to uncompressed AVI format, and the file size would reach 4.00 GB (4,294,967,296 bytes), and then corruption of the AVI would result. It appears that a 4 GB limit was being imposed at some point in the walkthrough creation process.

Therefore, I tried to use an encoding format. When using Revit 32 bit, I recall that I had a number of options in the Video Compression ‘codec’ dialog when exporting a walkthrough. However, in Revit 64 bit, I only had a couple of basic options (Microsoft Video 1, Intel IYUV Codec, Full Frames (uncompressed)).

After some searching, and trialling a few different ideas, I found that I could access some decent codecs in this box after installing Shark007’s 64 bit components (link below).

64 bit Encoding Components

In addition to the above, it is recommended that you install Shark007’s 32 bit Codec Pack (link below):
Vista Codec Package 5.5.3 Final

After installing both of the above and restarting Revit (you may also need to restart Windows), I was intermittently able to access an additional filter in the dialog called ‘ffdshow’ – clicking ‘Configure’ opened up a whole range of encoding formats for use!However, there appear to be a few problems:

  1. The ‘ffdshow Video Codec’ encoder only appeared in the Video Compression dialog when a certain ‘Size Crop’ and resolution were selected. For me, the only settings that consistently seemed to work were: Size Crop width = 150 mm, and export resolution 886 x 500.
  2. The corruption still seemed to result if the uncompressed AVI format would have exceed 4 GB (even while using a compressed codec).
  3. Choosing H264 actually crashed Revit.
  4. WMV 8 using libavcodec simply did not proceed past the first frame.

Given the above limitations, my solution at this point is:

  1. Split the walkthrough into parts that have a size less than 4 GB (ie. part 1 = frames 1 to 100, part 2 = frames 101 to 200 etc) and use FULL FRAMES (UNCOMPRESSED) AVI format.
  2. Use VirtualDubMod to ‘append’ these segments together, and
  3. Use VirtualDubMod to ‘Save As…’ a different format. I was able to choose ‘Cinepak’ compression in VirtualDubMod, which turned my approx 5.4 GB uncompressed AVI into a 167 MB file in only about 5 mins of processing time.

After spending quite a few hours trying to make this work in a satisfactory and simple manner, I decided to contact our reseller and lodge a support call. I will let you know if I learn anything helpful.During this investigation, I tried a few things without success. They may be of interest to you (see links below).
Windows Media Encoder 64 bit

Xvid 64 bit

x264 64 bit

We were given the ‘Slanted Column’ ability when some of the Structural tools were recently incorporated into Revit Architecture. If you have been pulling your hair out trying to place one of these slanted columns in a Plan view (where the tool is greyed out), the answer is simple. Go to a Section, Elevation or 3D View to place them!

You will likely need to set an appropriate workplane to ‘draw’ these slanted columns on.

The Brace tool is also quite cool – have a go at the ‘3D snapping’ capability in the Options bar (try it in a 3D view, obviously).

If you are interested in reading further, check out:

http://revitclinic.typepad.com/my_weblog/2009/04/slanted-columns.html

http://bimandbeam.typepad.com/bim_beam/2009/06/revit-structure-2010-slanted-column-parameters.html

Revit is a very acceptable OOTB (out of the box) tool. If you are using Revit OOTB, there are really only two variables that determine your productivity. Assuming you have zero customised content, these variables are:

  • your own skill and ability
  • the performance of your computer

We are all working to try and keep our skills on the cutting edge. But is your hardware keeping up its end of the bargain? Our company made a significant investment into some middle to top-of-the-line workstations a few months ago, for which I am very grateful. If you are looking to purchase a new system, or upgrade an existing one, you should definitely review the
Model Performance Technical Note (you may have accessed this via Subscription, but this is a direct link to the PDF).

The following AUGI forum links may also be of assistance to you:

Revit 2010 – Graphics Cards that work (and those that don’t)


Happy with your hardware?

Video card D3D compatibility – Revit 2010 on Vista / Win7

Revit Running on Intel Mac

Non-Mac hardware benchmarks using the 2009 benchmark journal

Rendering speed in Windows 7 64 & Revit 2010 64bit

Feel free to comment if you have any thoughts or recommendations.

Some dead links below… here is a current one.

You may be interested in becoming either an ‘Autodesk Certified Associate’ or an ‘Autodesk Certified Professional’. If you are interested, check out the Revit Architecture Exam Guides. Direct link to the Revit Architecture 2010 Certification Exam Guide here.

Other links that you may find useful:
Revit Architecture 2009 Certification Exam Guide
Exam Preparation
AutoCAD Certification Exam Guides

UPDATE: Check out my Supertip post at https://wrw.is/2010/04/supertip-3-keyboard-shortcuts.html

The Subscription Advantage Pack for Autodesk Revit Architecture 2010 has generally been received quite well. I am a little annoyed that I recently spent quite some time creating some parametric truss families, and now they give us the Structural tools! In reality though, it is a welcome and helpful update.

The new Keyboard Shortcuts dialog is great – it allows for easy viewing and updating of shortcuts. However, it does not allow you to ‘sort’ the priority of shortcuts that begin with the same letter. Here are a few tips on using the new dialog:

  • To open the dialog, go to the View tab, User Interface button, Keyboard Shorcuts…
  • To import your old shorcuts, click on Import, change the ‘Files of type’ drop down list to *.txt files, browse to your ‘Program’ folder and select the ‘KeyboardShortcuts.txt’ file. You can choose to overwrite or merge your shortcuts.
  • To ensure that a given shortcut works with a single key configuration (ie. Move triggered by M-Space, remove all other shortcuts beginning with ‘M’ and reassign them.
  • TIP – You can use the ‘number’ keys and assign shortcuts to these! If you are a gamer, it will be quite natural for you to select the number keys to trigger various weapons, powers or actions. Now, you can set Move to 1, Copy to 2, Rotate to 3 and so forth. These are your powers now!
  • TIP – By clicking the ‘shortcuts’ column heading in this dialog, it will sort the commands by their related shortcuts. This is a quick and easy way to see if there are any duplicates.

Enjoy the new Keyboard Shorcuts dialog and feel free to post any tips or comments you may have.PS – Here are some relevant AUGI forum links for your perusal:Help w/ new keyboard shortcuts?Subscription Advantage Pack for Revit

How do you get rid of all the remnants of Revit 2010?

Check out this page at Autodesk Revit Architecture Services & Support.

It’s interesting to see where Revit stores it’s stuff in the Registry.

However, I’m not too sure on the recommendation to ‘Use the End Task feature to end any anti-virus programs’ before reinstalling Revit. Anyone see any complications with this?

EDIT May 2012

I recently had this issue after reinstalling graphics drivers and using Revit 2013.  I followed the tip on this Autodesk page to run Revit on the primary Windows monitor – this fixed the problem for me.  You can then drag the Windows 7 toolbar to the secondary monitor if you want max screen real estate on your Primary…

EDIT 3/2011
This issue is still annoying some users.  There is a very comprehensive set of comments over at:

http://do-u-revit.blogspot.com/2009/10/whos-dragging-my-stuff.html

A few different solutions are mentioned at that page.

One of our users experienced a very unusual error today. It seemed to appear randomly (no known cause). But it had happened to him before…

Basically, when any object was selected in Revit, Revit would interpret this as a ‘drag’ command, and the object would be moved upward by a certain amount (about 5% of the screen).
We ruled out Direct3D and mouse problems.

However, when logging in as a different user, the problem wasn’t there! So, we reasoned, it must be a user specific setting.

I deleted the UIState.dat file, as Autodesk Support had told me to try this for a different problem. How do you do it? See below quote from Autodesk Support:
To fix the issue, the UI state can be reset to default settings by removing the UIState.dat file by browsing to the appropriate product folder located in one of the following locations:
· For Windows® XP: %USERPROFILE%Local SettingsApplication DataAutodeskRevit
· For Windows Vista®: %LOCALAPPDATA%AutodeskRevit

However, this DID NOT fix up the click-drag problem.

I then went to the registry:
HKEY_CURRENT_USERSoftwareAutodesk
and exported all of the Revit subtree (for backup purposes).

Following this, I deleted [HKEY_CURRENT_USERSoftwareAutodeskRevit] and all the sub-components.

Amazingly, THIS FIXED the issue!!

I am obviously quite happy with this result. Please use this fix at your own risk.

Have you mastered file and folder navigation in Windows Vista yet? If you haven’t, here are a few simple tips, guaranteed to increase your productivity (well, hopefully 😉

  1. Use Vista ‘Links’.
    What is it? It is a special list of shorcuts to your favourite locations. When you open Windows Explorer, these show up as ‘Favourite Links’ in the top-left area of the window. To add items to the list, simply drag and drop from the ‘Folders’ list into the ‘Favourite Links’ area (be careful not to drop items ‘on top’ of each other!) Once you have a good list of your favourite locations, its time to put them to good use, so…
  2. Add your ‘Links’ to your Taskbar.
    In Vista, simply right-click on your Taskbar, go to ‘Toolbars’ and click on ‘New Toolbar…’ In the resulting dialog, click on your ‘Links’ folder (you can get to it by going to your main ‘username’ folder, then you will see the ‘Links’ folder) and then click ‘Select Folder’.
  3. Make your ‘Links’ visible in the Start Menu.
    Click on the Start button, then right-click in a blank area and go to ‘Properties’. Click the ‘Customize…’ button, scroll down to ‘Personal folder’ and click on the ‘Display as a menu’ radio button. Click OK twice, and now your Personal Folder can expand to show your ‘Links’ directly from the Start Menu!
  4. Use your Links in Revit.
    You can add the ‘Links’ list to your Revit Places. Simply go to an ‘Open’ dialog in Revit, browse to your ‘Personal folder’ (this is the one that is usually your name), then drag the ‘Links’ across to the Places area in Revit. I then drag this to the top of the Places so I can quickly access the ‘Links’.

I’m sure there are other ways to use this ‘Links’ list. What are your Vista navigation tricks and methods? Feel free to comment. I hope this has been of some help to you all. Happy Reviting!

As a follow up to my previous post (Exposing the Revit Database), I will now explain how to install and use the RvtMgdDbg add-in for Revit, which allows you to “Snoop” the Revit database.
What does RvtMgdDbg really stand for? ‘Rvt stands for Revit, Mgd for Managed, and Dbg for Debug.’

It is most commonly used by programmers in the Revit API. You may find it useful, however, in just understanding the structure of the database. You can also use it to find information that otherwise may be very difficult to obtain.

How do you get this RvtMgdDbg, and how do you make it work?

It’s not too difficult:

  1. Download the RevitAPI_2010_Webcast.zip file (I got this link from The Building Coder) (or if you are part of the ADN, download from 2010 alpha version).
  2. Extract the RevitAPI_2010_Webcast.zip file.
  3. Go in to the RvtMgdDbg_0504 2009 subfolder. Then, double click the RvtMgdDbg2008.sln file.
  4. If your PC is set up correctly, Microsoft Visual Studio Tools for Applications 2.0 should open up.
  5. Now, just click on the ‘Build’ menu, and then click ‘Build RvtMgdDbg2008’.
  6. If all goes well, you can now close Microsoft Visual Studio Tools for Applications 2.0.
  7. Go to the RvtMgdDbg_0504 2009bin folder. RvtMgdDbg.dll should be present in this folder.
  8. There are a few different ways to do the next couple of steps. I’ll just describe one simple way…
  9. Go to your C: drive and make a folder called RVTMGDDBG.
  10. Copy the RvtMgdDbg.dll file into the C:RVTMGDDBG folder.
  11. In your Revit program folder (usually C:Program FilesAutodesk Revit Architecture 2010Program), open the file Revit.ini
  12. Scroll down until you see the [ExternalApplications] subcategory.
  13. Check the EACount= value
  14. Change the EACount= value by increasing it by 1 (eg. if 2, change it to 3)
  15. After the final EAAssembly line (eg. EAAssembly1 or EAAssembly2 etc), add the following lines (you need to replace the question mark with your EACount= value PLUS 1):

EAClassName?=RvtMgdDbg.App
EAAssembly?=C:RVTMGDDBGRvtMgdDbg.dllThere you go! Close and save the Revit.ini file.Now, to try it out…

  1. Open Revit.
  2. Make a new project.
  3. Make a bit of wall.
  4. Select the wall you just made.
  5. In the Ribbon, go to the ‘Add-Ins’ tab.
  6. Click Snoop Current Selection… button on the RvtMgdDbg panel.
  7. A window should come up showing you the properties of the wall you made.

Or, to browse most of the Revit database at once:

  1. On the RvtMgdDbg panel, click Snoop Db…
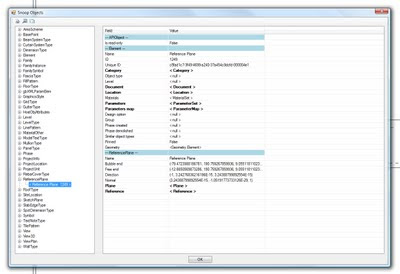
  2. The window should look something like this:


You can now browse around and learn how the database is put together.Keep in mind that there may be issues and bugs with this method. For instance, on one version of RvtMgdDbg that I was using, it seemed to cause Revit to prompt me to Save Coordinates (on a project with linked Revit models using shared coordinates) – even though I had not moved the linked models.So, be careful! You might want to use this on ‘test’ projects to start with. If you want to remove this add-in, simply reverse steps 15 and 14 in the first list (remove the lines you added to Revit.ini and reduce the EACount= value by 1).Feel free to comment or contact me if you have any problems or questions related to the above method.If you are really interested in the Revit API, head over to http://usa.autodesk.com/adsk/servlet/index?siteID=123112&id=2484975 and check out some of the material on that page.