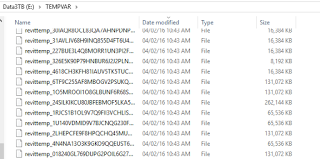
Do you have a problem with your SSD getting maxed out by a bloated TEMP directory (%temp%) ? In Revit, you might have an issue with revittemp_ files, particularly if you are using massive federated models with lots of Revit links…

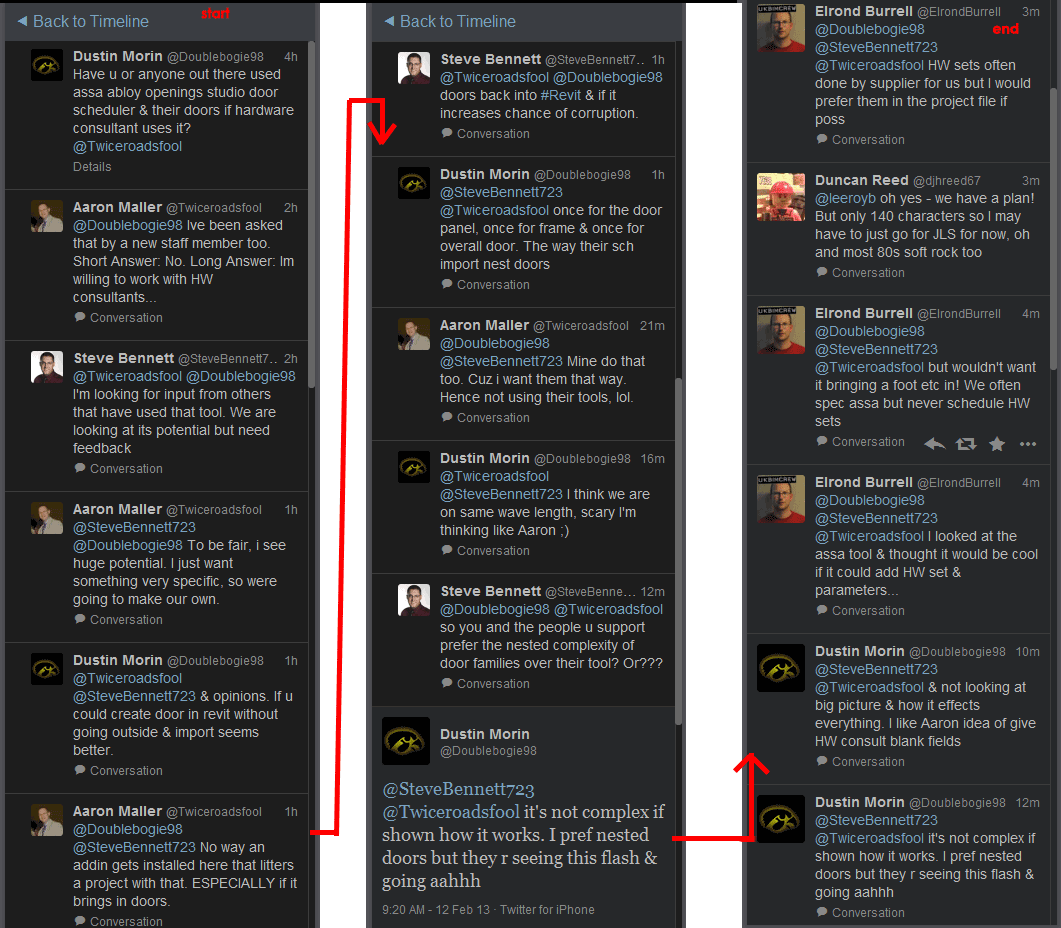
Maybe this is an ‘edge case’, but I’ve tweeted about this issue a couple of times:

Three big Revit instances. The revittemp files in %temp% folder cause disk space problems, even with 512gb SSD. pic.twitter.com/A0dpL6ca0u

— Luke Johnson (@lukeyjohnson) January 20, 2016

To stop this problem from affecting your main, system SSD hard drive disk space, you can move your Windows Temp directory. Here’s how:

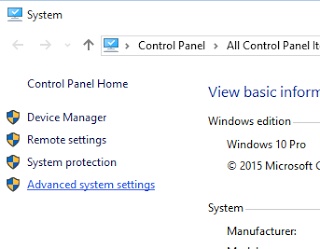
Go to This PC, Properties:

temp1.png

Go to Advanced system settings:

temp2.png

Go to Advanced tab, Environment Variables:

temp3.png

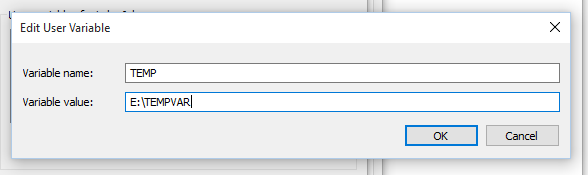
Then for TEMP and TMP, edit the path:

temp4.png

And input a location on a larger, secondary hard drive:

temp5.png

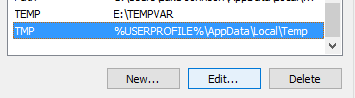
Here are the same screenshots for TMP:

temp6.png


temp7.png

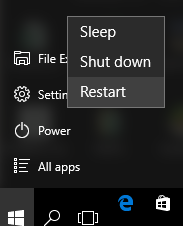
Then, restart your computer:

temp8.png

After restart, you should see files showing up in the new TEMP directory:

temp9.png

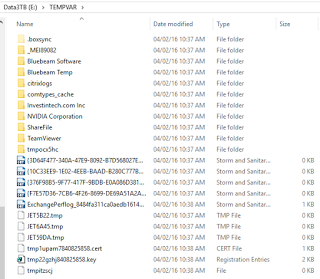
And when you open Revit file with links, you may see the revittemp_ files starting to appear:

temp10.png

In Windows 7, I constantly used Shift+right click to access the Copy as Path option.

To enable this in Windows XP, you can use:
Path Copy Copy 

This works on 64-bit (x64) Windows XP too.

I tried some other tools (like PathCopyEx), but Path Copy Copy seems more reliable.  In the settings, you should enable the “Add quotes around copied paths” option:

I recently posted about a Window Studio, now here is a Door and Door Hardware Studio (addin for Revit) …  Assa Abloy Openings Studio (AOSS).

Unfortunately, it is very limited in availability.  When I inquired about it, Assa Abloy told me:
Not at this time we let it to professionals who we work with directly.
The main problem is that it is an American tool for our North American

brands.
So sorry it is not available at this time.

Interesting chat on Twitter as to its usefulness:

Company link:
Openings Studio – assaabloydss.com – School Safety, Locks, Doors, Access Control

Note: you don’t need to put in your address when filling in the register form…

There is the beginnings of a tutorial channel on Youtube:

Also:
Door Scheduling Made Easy Thanks To ‘Openings Studio’ By ASSA ABLOY | Floosted by Architizer .
 
72 min NYC-RUG session about ASSA ABLOY Openings Studio for Revit on Vimeo:

ASSA ABLOY Openings Studio for Revit from Alfred Huang on Vimeo.

Related NYC-RUG link:
ASSA ABLOY Openings Studio for Revit. – New York City Revit User Group (New York, NY) – Meetup

Heads-up:
Twitter conversation

Links via:
Architizer Blog � Door Scheduling Made Easy Thanks To ‘Openings Studio’ By ASSA ABLOY

EDIT via Autodesk Forum

Revit 2014 was just released and an updated version of Andersen’s Window Studio is being tested right now.  Release date is expected in 7 – 10 days, but a pre-release version has been made available for current Revit 2014 users.  This is a 64 bit version of Window Studio 12.1 that has been recompiled using the Revit 2014 API.  Please report any issues you might run into (it is still undergoing testing).  I’ll remove this link when an official version is offered on andersenwindows.com..

Pre release of Window Studio 13.0 for Revit 2014

There are many new features exp>ected in the 13.1 release scheduled for late summer.  One of those features will be the inclusion of exterior trim as designed in Window Studio.  For the intervening months, the following advice might help anyone trying to create their own trim and group it with an Andersen Window.  Hopefully, this workaround will only be needed for a short time.

Since I last posted my last comment about trim, I was sent a generic trim .rfa file I’ve been using.  I was able to place the trim family on my host wall and change the parameters to “almost” match the native Andersen trim.  The model I was sent does not have any cornice,  drip cap, or brick mould so those features would have to be added using the family editor.  I wish I knew the original creator of this trim file so I could give him/her credit, but I’m afraid I did not obtain that info.

Here’s the file.  I took the RO measurements of the Andersen window to set the height and width parameters for this generic trim.  One limitation is that this works for single units only (without editing).  The authentic Andersen trim will render horizontals and verticals for an entire design with no editing needed.  Space between mulled units will either show a 3.5 or 4.5 board or the connecting strip for frame-to-frame joins.

Window Trim RFA File

Christopher Oace
Andersen CAD Support 

Go here to register and download:
http://www.comehometoandersen.com/servlet/Satellite/IQ/Page/awBrochureRequest/ContentServer

Direct link to 64 bit version:
Download

Active / current forum thread:
http://forums.autodesk.com/t5/Autodesk-Revit-Architecture/Andersen-Window-Studio/td-p/3499264

I’m a big fan of Keyboard Shortcuts.  Revit, Windows, AutoCAD – I believe they are all faster when you use keys instead of the mouse alone.  I have previously posted about Revit keyboard shortcuts on various occasions.

However, this little utility is centred around teaching you the Windows and Microsoft Office keyboard shortcuts that will help you most …

Download and install Keyrocket
(direct link)

Run it by pressing Windows+K

You can easily search through keyboard shortcuts for various programs.

It will give you little tips from the tray when it thinks you could use a particular shortcut.

via
Learn Windows and Office Keyboard Shortcuts the Easy way • Raymond.CC

Have you mastered file and folder navigation in Windows Vista yet? If you haven’t, here are a few simple tips, guaranteed to increase your productivity (well, hopefully 😉

  1. Use Vista ‘Links’.
    What is it? It is a special list of shorcuts to your favourite locations. When you open Windows Explorer, these show up as ‘Favourite Links’ in the top-left area of the window. To add items to the list, simply drag and drop from the ‘Folders’ list into the ‘Favourite Links’ area (be careful not to drop items ‘on top’ of each other!) Once you have a good list of your favourite locations, its time to put them to good use, so…
  2. Add your ‘Links’ to your Taskbar.
    In Vista, simply right-click on your Taskbar, go to ‘Toolbars’ and click on ‘New Toolbar…’ In the resulting dialog, click on your ‘Links’ folder (you can get to it by going to your main ‘username’ folder, then you will see the ‘Links’ folder) and then click ‘Select Folder’.
  3. Make your ‘Links’ visible in the Start Menu.
    Click on the Start button, then right-click in a blank area and go to ‘Properties’. Click the ‘Customize…’ button, scroll down to ‘Personal folder’ and click on the ‘Display as a menu’ radio button. Click OK twice, and now your Personal Folder can expand to show your ‘Links’ directly from the Start Menu!
  4. Use your Links in Revit.
    You can add the ‘Links’ list to your Revit Places. Simply go to an ‘Open’ dialog in Revit, browse to your ‘Personal folder’ (this is the one that is usually your name), then drag the ‘Links’ across to the Places area in Revit. I then drag this to the top of the Places so I can quickly access the ‘Links’.

I’m sure there are other ways to use this ‘Links’ list. What are your Vista navigation tricks and methods? Feel free to comment. I hope this has been of some help to you all. Happy Reviting!