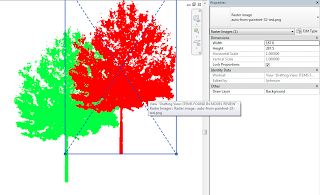
You need to save as PNG – but not any old PNG will work.

I have consistent success using Paint.NET, deleting the “background” so it is empty (checkerboard), then saving as a PNG.  But here’s the main lesson – make sure you tick 32-bit.  No other option seems to work, only 32-bit PNGs seem to respect transparency in Revit.

You can even use Bring to Front, Send to Back etc to overlap these images.  Quite useful for Entourage in coloured Plans and Elevations…

Found some very interesting information on Wikipedia about 32 bit and 64 bit processor architecture – check it out (italics by me):

AMD licensed its x86-64 design to Intel, where it is marketed under the name Intel 64 (formerly EM64T). AMD’s design replaced earlier attempts by Intel to design its own x86-64 extensions which had been referred to as IA-32e. As Intel licenses AMD the right to use the original x86 architecture (upon which AMD’s x86-64 is based), these rival companies now rely on each other for 64-bit processor development. This has led to a case of mutually assured destruction should either company refuse to renew the license. Should such a scenario take place, AMD would no longer be authorized to produce any x86 processors, and Intel would no longer be authorized to produce x86-64 processors, forcing it back to 32-bit x86 architecture. However, the agreement provides that if one party breaches the agreement it loses all rights to the other party’s technology while the other party receives perpetual rights to all licensed technology.
http://en.wikipedia.org/wiki/X86-64

If you want to read more about MAD, http://en.wikipedia.org/wiki/Mutually_assured_destruction

Have you mastered file and folder navigation in Windows Vista yet? If you haven’t, here are a few simple tips, guaranteed to increase your productivity (well, hopefully 😉

  1. Use Vista ‘Links’.
    What is it? It is a special list of shorcuts to your favourite locations. When you open Windows Explorer, these show up as ‘Favourite Links’ in the top-left area of the window. To add items to the list, simply drag and drop from the ‘Folders’ list into the ‘Favourite Links’ area (be careful not to drop items ‘on top’ of each other!) Once you have a good list of your favourite locations, its time to put them to good use, so…
  2. Add your ‘Links’ to your Taskbar.
    In Vista, simply right-click on your Taskbar, go to ‘Toolbars’ and click on ‘New Toolbar…’ In the resulting dialog, click on your ‘Links’ folder (you can get to it by going to your main ‘username’ folder, then you will see the ‘Links’ folder) and then click ‘Select Folder’.
  3. Make your ‘Links’ visible in the Start Menu.
    Click on the Start button, then right-click in a blank area and go to ‘Properties’. Click the ‘Customize…’ button, scroll down to ‘Personal folder’ and click on the ‘Display as a menu’ radio button. Click OK twice, and now your Personal Folder can expand to show your ‘Links’ directly from the Start Menu!
  4. Use your Links in Revit.
    You can add the ‘Links’ list to your Revit Places. Simply go to an ‘Open’ dialog in Revit, browse to your ‘Personal folder’ (this is the one that is usually your name), then drag the ‘Links’ across to the Places area in Revit. I then drag this to the top of the Places so I can quickly access the ‘Links’.

I’m sure there are other ways to use this ‘Links’ list. What are your Vista navigation tricks and methods? Feel free to comment. I hope this has been of some help to you all. Happy Reviting!