Here is how you can assign a material parameter to a painted surface in a family:

  1. Go to Family Types dialog box
  2. Add – Material Parameter
  3. Paint
  4. Choose the material that you made – it will have the suffix (param)
  5. Done!  Save and load into project…

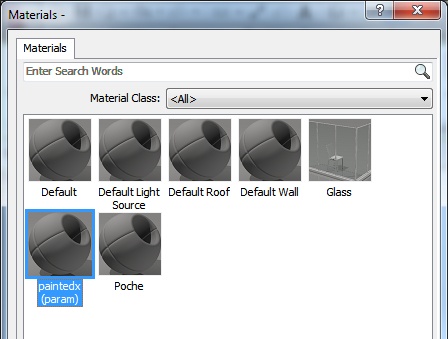
You can do this for multiple different materials on different painted surfaces.

This method was mentioned on the French ‘Mastering Revit’ blog:
Translated version of post

Original post
Revit mastering: Peindre

Have you struggled with the Show only if Instance is cut option in the family element visibility settings.  Was it grayed out?

The following highlighted categories (wall hosted) have ‘Show only if Instance is cut’ option enabled, at the moment in Revit Architecture 2012.

Casework
Columns
Doors
Site
Structural Columns
Structural Foundations
Structural Framing
Windows

via
Revit Sticky Notes: 2D Symbolic Line & ‘Show only if Instance is cut’
(includes workaround)

Nice ‘checklist’ style post over at RevitKing.  Most things just come back to sensible modelling:
Revit.King’s BIM coordinator/ Revit Blog: Optimal performance for Revit!!!

One of the tips:
Create a family component instead of in-place families when possible, especially for repetitive components. Each in-place family has separate type attributes that Revit has to reference.

To implement this on an existing model, you could convert some of the in-place families to Component families using this method.

If you want to find out the actual file size of families that are living in your project, follow these steps:

  1. In Revit 2012, export all families to RFA files (File – Save As – Library – Family – ). 
    In 2011, you might be interested in this method.
  2. View the exported folder in Windows Explorer.
  3. Sort By – Size
  4. You will see the most bloated families at the top.

Here is an example:

To reduce the size of the largest families, I can now:

  1. Open them from the project
  2. Delete any unnecessary data (such as imported DWGs)
  3. Purge and then 
  4. Reload them into the project.

I anticipate significant size decreases for my (currently) 547 mb project!

I received the ‘Unacceptable list separator’ error while trying to:

  • load a family from file into a project, and
  • load types into the family from a Type Catalog.

I assumed the problem was to do with Type Catalog.  The family I was trying to load was from the ‘Australia’ default content – 

AustraliaStructuralFramingSteelCHS-Circular Hollow Sections (AS 1163).rfa

To fix this issue I followed these steps:

  1. Open the Family
  2. Export the Types to a Type Catalog file.  The exported Type Catalog should only include one type, but the syntax should be correct…
  3. Open the exported Type Catalog in Excel – as a comma-delimited file
  4. Open the ORIGINAL Type Catalog in Excel – as a comma-delimited file
  5. Copy the fields from the ‘Original’ default Type Catalog into your new ‘fixed’ Type Catalog (there may be more columns in the ‘fixed’ version, just Auto-Fill the other fields as necessary)
  6. In Excel, save the ‘fixed’ version as:
    Other Formats – CSV (MS-DOS)
  7. After closing the file, rename it so that .TXT is its extension.
  8. Use this fixed Type Catalog to load all of the types into the opened Family.

Do you get annoyed by the warning:

Can’t create duplicates in Edit Group mode.

If you are editing a group, and want to make a Duplicate of something, simply scroll to the item in the
Project Browser – right-click – Duplicate.

EDIT (added 5 Dec 2011):

In other words, this tip allows you to create a new Family Type in Edit Group mode. You may get annoyed when you aren’t allowed to make new Family Types when you are in Edit Group mode and Revit just keeps telling you:
Can’t create duplicates in Edit Group mode.

Just use the Project Browser instead – scroll down to the family in question, right click on a Type and Duplicate.  Revit will let you do this, even while in Edit Group mode.

Do you have some awesome in-place families that you would like to convert to normal Component families, so that you can load them into other projects?

Here’s how:

  1. Open the Project containing the In-Place family
  2. Edit the In-Place family
  3. Select all of the elements in the family
  4. Group all of these elements using the Create Group tool.  Give the Group a name.
  5. Select the Group
  6. Do not Finish Editing the In-Place family yet!
  7. Go to the ‘R’ button (Application Menu) – Save As – Library – Group
  8. You will notice that the filetype is RFA!
  9. Save the Group somewhere.
  10. You Component Family IS the file that you just saved.

 I’m sure there are limitation to this method, but I think it is very cool.

Here is a quick video:

Credit for this tip – KarelCAD support document

You want to know which families are cuttable and which are not.  Revit 2011 help gives the answer:

Cuttable families (link):
Casework
Ceilings
Columns
Curtain Wall Panels
Doors
Floors
Generic Models
Roofs
Site
Structural Columns
Structural Foundations
Structural Framing
Topography
Walls
Windows

Non-cuttable families (link):
Balusters
Detail Items
Electrical Equipment
Electrical Fixtures
Entourage
Furniture
Furniture Systems
Lighting Fixtures
Mechanical Equipment
Parking
Planting
Plumbing Fixtures
Specialty Equipment

What is a cuttable family?

If a family is cuttable, the family displays as cut when the cut plane of a view intersects that family in all types of views.  From Revit 2011 help.