Interesting aberration that you could use to your advantage – reposted from SARUG:

I had Sam override the visibility setting for the masked region and make it transparent, in the linked file, and then update the link.  For some baffling reason the ceiling could now be seen and the ACAD file was properly masked where the ceiling was.
The only thing I can figure is that the override to transparency was carried through to the active project revealing the ceiling but the masked region was still seen as a masking element as it related to the ACAD file.

via
AutoCAD in Revit – A Bizarre Linked File Approach | Southern Arizona Revit User Group

“In Revit, the default font is Arial, for example, is therefore the DWG file represent fonts in Arial.
The “shxfontmap.txt” is located at:
C: Users AppData Roaming Autodesk Revit Autodesk Revit 2013
First you should make a backup copy of “shxfontmap.txt” are created, they can then be opened with Notepad.
Note: Please do not use software to edit the file, which could change the formatting of text, such as Word.

At the end of the file is then added to “txt.shx Arial” or “Arial italic8.shx” added.

After the names of the SHX once is “Tab” and then use the new font specified.”

via
Google Translate
of
Autodesk BIM Blog – Darstellung von SHX Schriften f�r DWG Dateien anpassen – Revit Architecture/MEP/Structure 2013

I previously posted a way to generate PAT files from an exported DWG file.  One of the comments to that post gives a great alternative method – so unique it actually made me smile.

You may have noticed that when you export a DWG file, Revit temporarily creates PAT files in the export folder, and then it deletes them, just leaving DWG and PCP files.

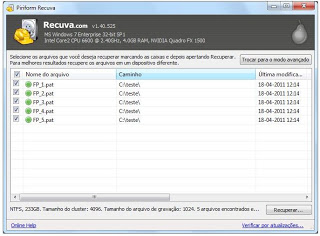
To recover the deleted PAT files, you can simply use the program Recuva!

I’m not sure how well this works for network shares or NAS devices, but it should definitely work if you export the DWG to a local drive and immediately recover the PAT files (before doing anything else).

Pretty tricky huh?

Image from http://ricardocc.com/

via
Recuperar os ficheiros *.PAT gerados pelo Revit | Truques e Dicas | Revit | Blog

From IMAGINiT Technologies Support Blog:
We can add a modifier to the export dialog box for the items we want to adjust, make sure that you also do this to the sub-categories of the element also, and select the Phase Created modifier and add it to the list, in the separator space, add the separator type you want to use…this will give us
something similar to the following in the cad file:  A-DOOR-Existing

Read more at:
Revit Export: How to Export Phases to the Correct Layer – IMAGINiT Technologies Support Blog

Steve made a few interesting points today about Revit and DWG (Import) extents.  I previously posted about Revit accuracy and precision here.

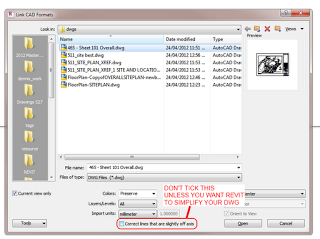
However, did you notice this new setting when importing a DWG in Revit 2013?

If you UNtick the box that says Correct lines that are slightly off axis, then Revit 2013 will bring in the DWG as-is.  It won’t try to straighten things up to make the DWG more Revit-friendly.

Obviously, use this with care.  But for me, 9 times out of 10 I want the DWG to come in EXACTLY as it was drawn.

Oftentimes, you will want to flatten a DWG file before bringing it into Revit, so that Revit isn’t confused by all the Z-values… you can use FLATSHOT or the DXB plotter methods, as described below:

Issue
You want to create a flattened two-dimensional (2D) drawing of a three-dimensional (3D) model.

Solution
If you are using AutoCAD 2007 and higher, the FLATSHOT command is available to convert 3D solids to flattened 2D views. (Note this command is not available in AutoCAD LT.)

The other method to create a 2D drawing from a 3D model is to:

  1. Configure a DXB plotter using the Add-A-Plotter wizard

Read the rest at:
Autodesk – AutoCAD Services & Support – Flatten 3D model to 2D

DWG import and export (free)

Currently, the best way to exchange DWG/DXF with SketchUp is to use SketchUp 7.1 & the DWG/DXF import plugin for SketchUp 7.1 (Free)

As of now, both SketchUp version 7.1 and the optional installer are available for download. Only the Pro version of SketchUp 7.1 is available for download, but that’s OK – it will revert to the Free version after 8 hours use, and you will be able to continue using it.
via
Jim’s SketchUp [Plugins] Blog: SketchUp 8 Free & DWG/DXF

Direct links
Google SketchUp Pro 7 Download

DWG/DXF import plugin for SketchUp 7.1 (Free)
Windows 
Mac 

The DWG/DXF importer isn’t available in Google SketchUp 7.1, however it is offered in Google SketchUp Pro. You can download this optional plugin for Windows or Mac that enables the DWG/DXF importer.

IFC2SKP
Last updated: June 2008
IFC2SKP works inside SketchUp and has the ability to load IFC datafrom popular BIM (CAD) applications such as Revit, ArchiCAD and Microstation. The plug-in will not only load the geometry or object data into SketchUp from the IFC file format but it will also display the BIM data of each imported objects. IFC2SKP has been updated to work in SketchUp 8.  
via

http://sketchup.google.com/download/plugins.html

Direct link:
Download IFC2SKP Program File

OBJ importer
If you need an .obj importer plugin for Sketchup, you can check out FluidImporter.
FluidImporter is super fast (entirely written in C++) and completely free.

via
Downloads | FluidRay – Physically Based Renderer

Older OBJ importer:
View topic – [Plugin] Import OBJ with Materials v1.9 20110223 • SketchUcation Community Forums

Various Sketchup resources and plugins:
Resources – SketchUp Sage

EDIT Keep in mind that if you import an SKP directly into Revit, it will create materials for each shading material as “Render Material xx-yy-zz” in the Material Library.  You can check which is which by looking at the colour on the Graphics tab, but you will need to manually map Render Appearances from here.

Also, remember that you can save all related material resources if you go via 3dsMax.
There have been many posts about how you can control Sketchup materials in Revit using Object Styles.  However, this relies on the existence of different layers for each distinct material in the original file.  If you have an SKP file and would like to create the layers you need (without using Sketchup itself), you can use this method:

  1. Import Sketchup SKP file in to 3ds Max Design
  2. Export as FBX file
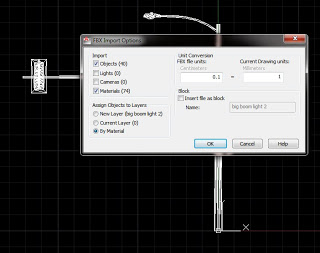
  3. Use Import command in AutoCAD, choose the FBX file – choose to have a layer for each material (Assign Objects to Layers – By Material)
  4. For some reason, I had to untick the Block option – otherwise the file would not import at all.
  5. Save the DWG file
  6. Import to Revit – you now have granular control over each Material / Layer combination through Object Styles…

Note – this method uses only Autodesk tools, it does not require Sketchup to be installed.  If I remember correctly, you can instruct Sketchup to export different layers for each material when exporting a DWG (?)

If you have an alternative way of doing this, feel free to comment.