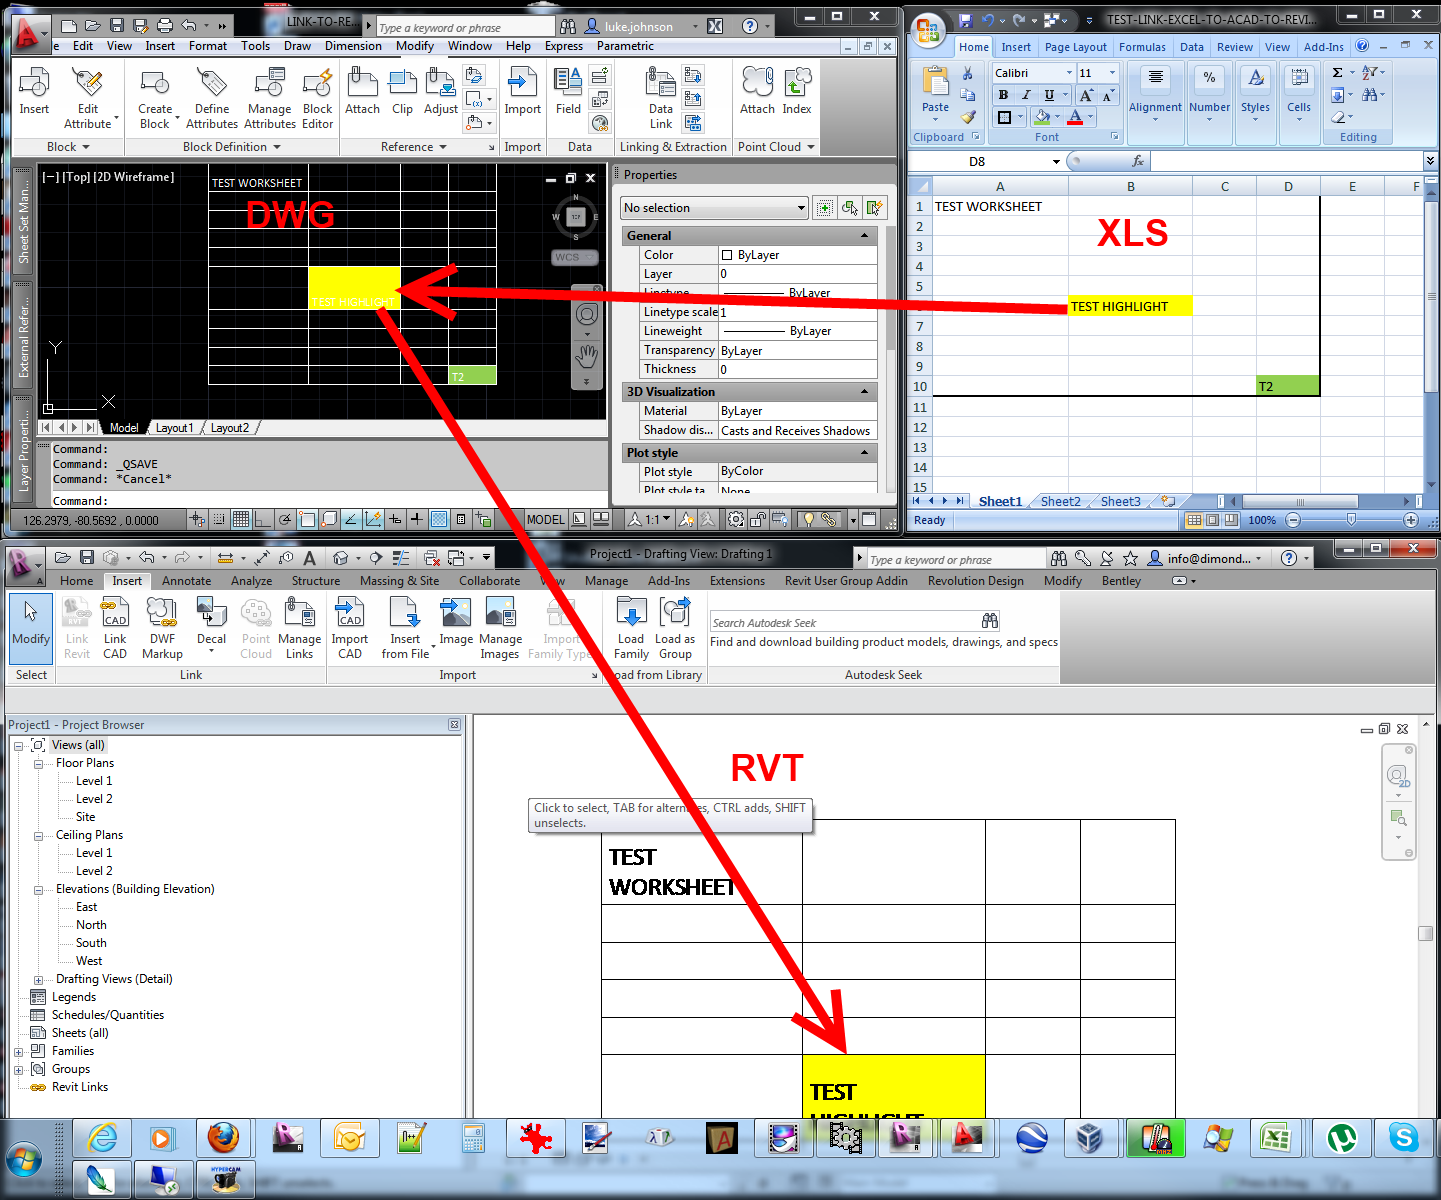
There is a way to link Excel data into Revit, and retain the ability to ‘update’ that data when it changes.  Essentially, it involves using AutoCAD as a middle-man to get the job done.  In simple terms:

  1. Link Excel into AutoCAD DWG
  2. Link DWG into Revit

When you want to update the Excel spreadsheet in Revit, you have to:

  1. Save Excel spreadsheet
  2. Open AutoCAD DWG and update Data Link
  3. Save DWG file
  4. Reload DWG link in Revit

This all works surprisingly well.  Check out the video below as a demonstration:

Here is a little diagram of the concept:

Process via
RevitCity.com | Importing Excel into Revit

In words:

  1. Save Excel File
  2. In AutoCAD – Insert – Data Link – new Excel Data link
  3. TABLE command
  4. From a data link – select Data Link, Ok
  5. Use 0,0 as insertion
  6. Save DWG file
  7. New Drafting View in Revit, link the DWG in Origin to Origin
  8. Its a two step update process whenever you change Excel.  Save, in AutoCAD / update link, Save DWG, in Revit – reload. Done.
This hotfix restores the ability to apply material family parameters to faces of family elements using the Paint tool.

Make sure that Update Release 2 has been applied prior to adding the hotfix. Verify that the build number of Revit 2012 is 20110916_2132.

The Readme contains the latest information regarding the installation and use of this update. It is strongly recommended that you read the entire document before you apply the update to your product. For your reference, you should save the Readme to your hard drive or print a copy.

revit_2012_material_hotfix.zip (zip – 4430Kb)
Readme (htm – 87Kb)

via
Autodesk – Autodesk Revit Architecture Services & Support – Hotfix – Autodesk Revit 2012 – Apply material family parameters using the Paint tool

Free Standards Guide – Energy Efficiency

This guide provides information on Standards and Certification schemes relating to energy efficiency and climate change and covers topics such as solar panel systems, energy efficient products, nuclear energy, wind turbines and more.

Download here: Guide to Standards – Energy Efficiency

via
SAI Global

KarelCAD with Autodesk Australia will be presenting a FREE Webinar to showcase
the NEW Cloud Subsciption Capabilities.

We invite you to attend!

    Date:     Friday 14th October @ 10.30am AEST
    URL:     To log onto the webinar go to:

https://www.livemeeting.com/cc/autodesklearning/join?id=oloang&role=attend
    Entry Control:     Free Entry

via email version of
KarelCAD invites you to a Cloud Webinar

Have you ever wanted to make a Component Family with the Category set to Walls?  Or Roofs?  Or some other system Category?  There are no templates for this, and it doesn’t show up in the Family Category dialog box, so you may think that you limited to using In-Place families when you want the category to be Walls, Roofs or similar.

Think again.

An interesting offshoot of the method that I described at this link is that when you save the In-Place family as an RFA, it adopts the Category that it had AS an In-Place Family!!

In simple terms:

  1. Make an in-place Wall family with some geometry in it.
  2. Save it as an RFA
  3. Load the RFA into your project
  4. It is a Component family with the Category set to Walls!

And guess what – it shows up in a Wall Schedule 🙂  I’m a little scared of what the repercussions of this hack may be, so please use at your own risk.

Have a great weekend everyone!

If you want to find out the actual file size of families that are living in your project, follow these steps:

  1. In Revit 2012, export all families to RFA files (File – Save As – Library – Family – ). 
    In 2011, you might be interested in this method.
  2. View the exported folder in Windows Explorer.
  3. Sort By – Size
  4. You will see the most bloated families at the top.

Here is an example:

To reduce the size of the largest families, I can now:

  1. Open them from the project
  2. Delete any unnecessary data (such as imported DWGs)
  3. Purge and then 
  4. Reload them into the project.

I anticipate significant size decreases for my (currently) 547 mb project!

Learn from the best. The following selection of AU Virtual certification preparation classes are now available online.

AB7000
Autodesk® Revit® Architecture Certification Preparation, Part 1
AB7001
Autodesk® Revit® Architecture Certification Preparation, Part 2
AC7163
AutoCAD® Certification Preparation, Part 1
AC7164
AutoCAD® Certification Preparation, Part 2
CI3863
Incredible AutoCAD® Civil 3D® Users: Prove Your Credibility with Civil 3D Certification, Part 1
CI3865
Incredible AutoCAD® Civil 3D® Users: Prove your Credibility with Civil 3D Certification, Part 2
DG7160
Autodesk® 3ds Max® Certification Preparation, Part 1
DG7161
Autodesk® 3ds Max® Certification Preparation, Part 2
DG7166
Autodesk® Maya® Certification Preparation, Part 1
DG7167
Autodesk® Maya® Certification Preparation, Part 2
MA6300
Step Up and Get Certified in Autodesk® Inventor®, Part 1
MA7170
Step Up and Get Certified in Autodesk® Inventor®, Part 2
CM5033
Mastering the Skills: The Ultimate Autodesk® Certification Preparation Guide Revealed!

View the preparation classes at:
Autodesk University – Certification Preparation Classes