Do you love or hate Revit Fill Patterns? Here is a collection of some tips and tricks related to Fill Patterns, or ‘hatching’ in AutocadSpeak.
Overview
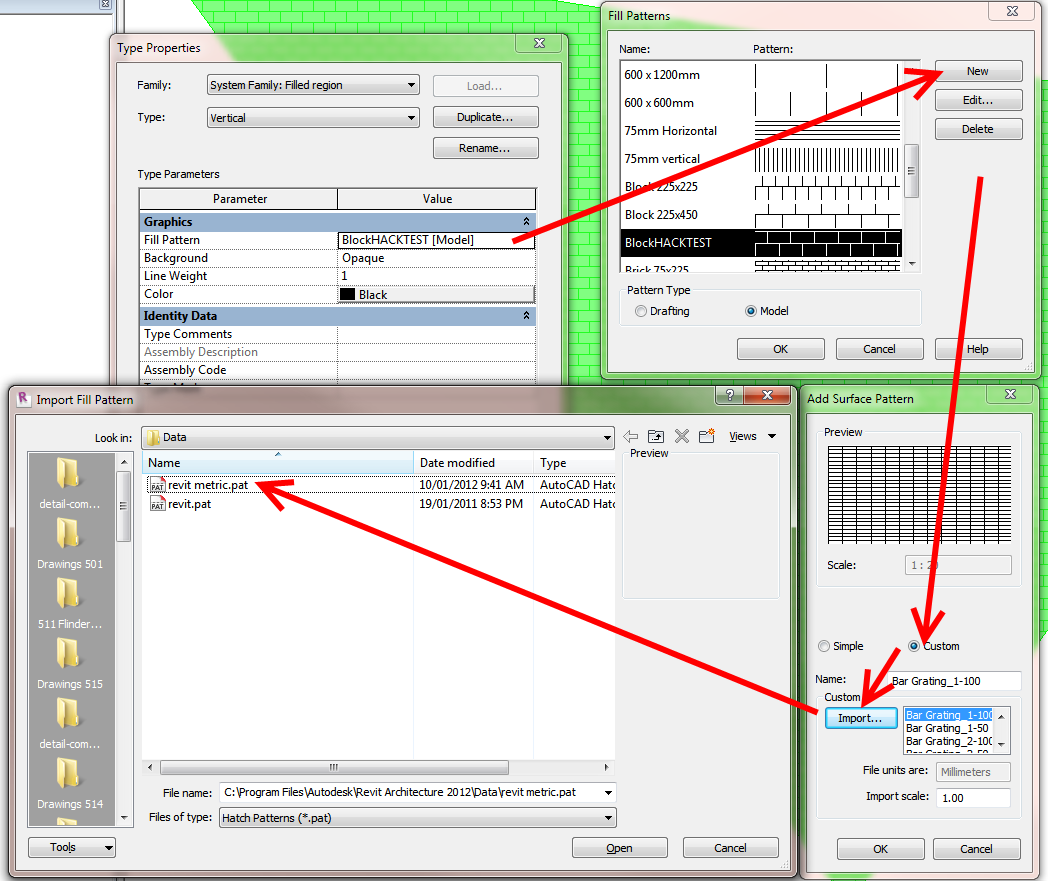
On your system, open up your Revit installation directory, and the Data subdirectory. There should be two PAT files here:
revit.pat (This file contains the standard set of custom fill patterns distributed with Autodesk Revit.)
revit metric.pat
If you want to load some of these patterns into your project, use the normal procedure (Fill Patterns – New – Custom -Import). Copy the location of the PAT files from your navigation bar in Windows 7 into the dialog and hit Enter. Click on one of the files and you can select one of the patterns to load.
General Hatch tips
(refer to “C:Program FilesAutodeskRevit Architecture 2012Datarevit.pat”)
- Once a pattern is imported, it is stored in the project, independent of the original file.
- Drafting patterns are defined in paper units. If you import the pattern at scale 1 and print at 100% zoom, the pattern’s dimensions on paper will be exactly as specified in the file, regardless of view scale.
Location of Default Revit fill patterns
Default Revit fill patterns are stored in the revit.pat and revit metric.pat files in the Revit program group Data directory. The revit metric.pat file contains various metric masonry and iso patterns.
via Creating a Custom Fill Pattern – WikiHelp
Differences between AutoCAD and Revit .PAT files
(refer to “C:Program FilesAutodeskRevit Architecture 2012Datarevit.pat”)
- AutoCAD has an 80-character line size limit, Revit’s is 4096.
- AutoCAD allows arbitrary sequences of dashes, spaces and dots, Revit coerces them into dash-space format by inserting zero spaces and dashes.
- AutoCAD has a notion of dots, Revit expands them (including the zero dashes it inserted) into short dashes.
- AutoCAD has a maximum of 6 components to a line pattern, Revit has no limit.
- AutoCAD does not allow spaces in a pattern name, Revit does.
- AutoCAD allows only one pattern per a custom file, with pattern name matching file name, and with the file residing in a known location. Revit has none of these restrictions.
- AutoCAD and Revit utilize different logic to decide whether a pattern is acceptable.
I previously reposted a method on how to bring AutoCAD hatches into Revit with correct scaling.