I received an interesting email from fellow Revit professional, Kale Munster – see below:
Mate,
Something that you might like to add to your blog. I have done a pretty severe stress test on the sketch edit mode overnight with approximately 5000 edits and it was stable (Revit Structure). One unfortunate thing that is back to happening is that the contextual “finish sketch” buttons decide to disappear again. This is as a result of double clicking on a family. Once the family opens and you return to the main file, they disappear. Easiest work around I have found is in the blog post below:
http://do-u-revit.blogspot.com.au/2011/08/missing-panels-in-contextual-modify-tab.html
Kale Munster
www.rmaeng.com.au

The workaround from Do-U-Revit that Kale links to should help in the short term. Here’s a quote:
“The second method makes the panels reappear so you can continue editing the sketch or finish/discard; here’s how you do it:

  1. Start a new family, pick any one;
  2. Load it into your project;
  3. Once you get the error that it cannot be placed in this mode, hit Ctrl+z to undo.

For some reason the panels come back. Obviously, do not switch back to the open families or you’ll lose them again!”
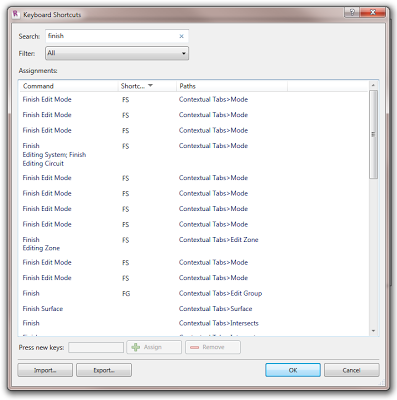
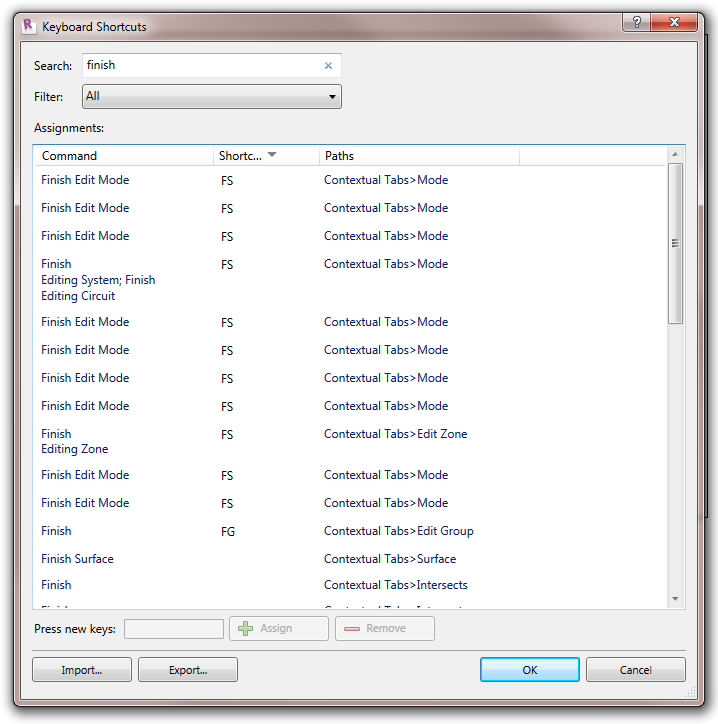
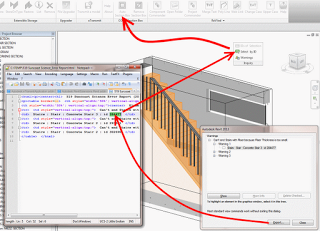
Alternatively, you could use my method, which is to apply a Keyboard shortcut to all of the ‘Finish’ commands.  See link and image below:
Disappearing ‘Finish Sketch’ or ‘Finish Mass’ Ribbon Elements

Here are a few interesting (and in some cases controversial) quotes from new Revit blogger, the Pragmatic Reviteer.

CPU – single threaded speed is the most important thing.


In my experience, the main key is that there is simply no need or value in “professional” grade cards like the Quadro and FireGl/FirePro series.


For the next few years, Windows 7 x64 is a safe bet for all non tablet needs, especially for Revit use.


Gigabit Ethernet is a must

Read more at:
Infrastructure Requirements Increase | the Pragmatic Reviteer

I have posted about hardware a few times, but some of my posts may be showing their age:
What Revit Wants: Revit Hardware

What Revit Wants: Revit Hardware – compatibility and performance

Web Update 1 was released a couple of days ago, and has been blogged, tweeted and reblogged.  Here are the key links:


For Revit Architecture:

Readme (select language version):
English (htm – 32Kb)
Enhancements Documentation (select language version):
English (pdf – 115Kb)

Main page:
http://usa.autodesk.com/adsk/servlet/ps/dl/item?siteID=123112&id=20121970&linkID=9273944

For BDS or Revit OneBox:

Revit 2013 UR1 (32-bit) (exe – 52419Kb)
Revit 2013 UR1 (64-bit) (exe – 70831Kb)
Readme (select language version):
English (htm – 32Kb)
Enhancements Documentation (select language version):
English (pdf – 190Kb)

Main page:
http://usa.autodesk.com/adsk/servlet/ps/dl/item?siteID=123112&id=20121968&linkID=16831210

Revit MEP

Revit MEP 2013 UR1 (32-bit) (exe – 52419Kb)
Revit MEP 2013 UR1 (64-bit) (exe – 70831Kb)
Readme (select language version):
English (htm – 32Kb)
Enhancements Documentation (select language version):
English (pdf – 121Kb)

Main page:
http://usa.autodesk.com/adsk/servlet/ps/dl/item?siteID=123112&id=20122070&linkID=12828318

Revit Structure

Readme (select language version):
English (htm – 34Kb)
Enhancements Documentation (select language version):
English (pdf – 183Kb)

Main page:
http://usa.autodesk.com/adsk/servlet/ps/dl/item?siteID=123112&id=20122015&linkID=9280927

Personally, I am most excited about the first item on the enhancements list:

  • Improves stability when closing a sketch editor, such as slab, site, etc., which create a large number of points. 

We have experienced many crashes running Revit 2013 and editing large sketches… hopefully this is fixed now.


A lot of you may have heard about it already, but if you haven’t:
Chameleon is a plugin for both Grasshopper and Revit with a focus on interoperability, simulation, and efficient practice workflows. Chameleon’s main advantage is its ability to facilitate easy transfer of geometric data between Grasshopper and Autodesk Revit, but also includes other valuable tools to make life easier, both in Grasshopper and Revit.

This latest version includes upgraded the functionality of the Curtain Grid management tools for Revit users. These tools now allow control of curtain panels in addition to the grids and mullions. There is also a preview to show the results of changes before accepting.
via
CHAMELEON � HIROSHI JACOBS

Heads-up / read more:
http://www.formfollowsperformance.com/2012/07/chameleon-grasshopper-revit-geometry-transfer-and-edit-params/

Steve’s post:
http://revitoped.blogspot.com.au/2012/07/chameleon-for-grasshopper-and-revit.html?spref=bl

More Grasshopper resources:
Perkins+Will Grasshopper Users Group

On a slightly unrelated note:
Video showing point based parametric functionality from Grasshopper to Revit Adaptive component (more about Geometry Gym here):

Quote:

To follow up the discussion of my quick and dirty Revit model OBJ exporter, I want to point out that Adam Nagy completed his series of posts on the AEC DevBlog on a Revit model exporter and viewer for iOS using an even more minimalistic custom data format for uploading to the cloud and viewing on an iOS mobile device:

  • Part 1: Revit add-in to upload geometry data to a storage service
  • Part 2: An iOS application to download and display the model using OpenGL
  • Part 3: Interactive view orientation and manipulation using gestures

While the OBJ format I looked at is more heavy-weight than Adam’s minimal custom format, my implementation includes some other enhancements which make it quite effective as well.
I have also heard of other home-grown viewer implementations with some support for switchback, individual element tagging and object identification based on VRML and on the Unity gaming engine.
If you are interested in a finely tuned exporter with more complete coverage and control over what gets exported, you might want to take a look at the open source STL exporter.
Finally, for high-end exporter requirements, the Revit IFC exporter is also open source.

 via
The Building Coder: Running Language Code and More Exporters

You have a project with heaps of Warnings / Errors, but you are struggling to find the associated elements.  Here is a quick way:

  1. The first problem is that not all of us can remember 6 random digits easily, but we also can’t copy the element ID direct from the Warnings box (yet).  So… I use Notepad++ (you could easily use Firefox or IE – all of these programs all you to Reload the source error report HTML file when you re-export it).  
  2. Export your Error Report to some neutral location like C:TEMP  
  3. Open the Error Report in Notepad++ / Firefox / IE (you could also use this method if you prefer)
  4. Now you can simply copy the element ID to the Clipboard (Ctrl+C)
  5. Go to a 3D view in which the element will be visible (use the 33 reasons if you need to)
  6. Use Select by ID (tear it off the Ribbon if you like by holding Ctrl)
  7. Paste the Element ID (Ctrl+V)
  8. Use COINS Auto Section Box
  9. Your Warning / Error element will be visible and highlighted

I have run into an issue when using a Key Schedule, Area Plan and View Template.  My Area Plan uses a Color Fill Scheme which uses a Key Schedule as its basis for the different colors of shading. If I change an entry in the Key Schedule, it seems to ‘break’ the Color Scheme on the Area Plan.

To correct this issue:

  1. Un-apply the View Template (set view to
  2. Open the View Template Properties
  3. Open the Color Scheme dialog for the affected View Template
  4. Set the Schemes to (none), then
  5. Reapply the original Color Scheme by clicking its name.
  6. Press OK a few times

The Color shading for the scheme should now re-appear.

Borissofff strikes again – many of you may already be aware of this, but you can get an interesting exterior rendering effect in Revit if you set the time to somewhere near or during the night, and then adjust the Exposure to a suitably pleasing level.

Translated:
But what if you set in the Preferences of the sun, while at the hour of the night (or so), we obtain precisely the situation where there is no source of direct light, the sky!

If you turn Reneder, we completely black picture!

But! Adjusting the exposure, especially of its magnitude, reducing it to about 3-4 units (you can see the other values), you can get the desired renderer without harsh shadows!
via
Google translate
of
http://borissofff.blogspot.com.au/2012/07/revit_13.html

I love to see Revit tools used in somewhat unintended ways.  In this case, Jay Holland divides an In-Place Mass Face and applies a Pattern Based Roof Tile to the divided surface – cool!

His sample files (click the download link or the little maximize arrow):

Read more at:
BIM Aficionado: Pattern-Based Curtain Panel Roof Tile

Image from BIM Aficionado