Curtain Walls in Revit are strictly a Family of the Walls Category. Then you have Types for each type of Curtain Wall. What if you want to select all Curtain Walls at once? You can’t multi-select types in the Project Browser to do this, but…

You can make a suitable Schedule to do it. Here’s how:

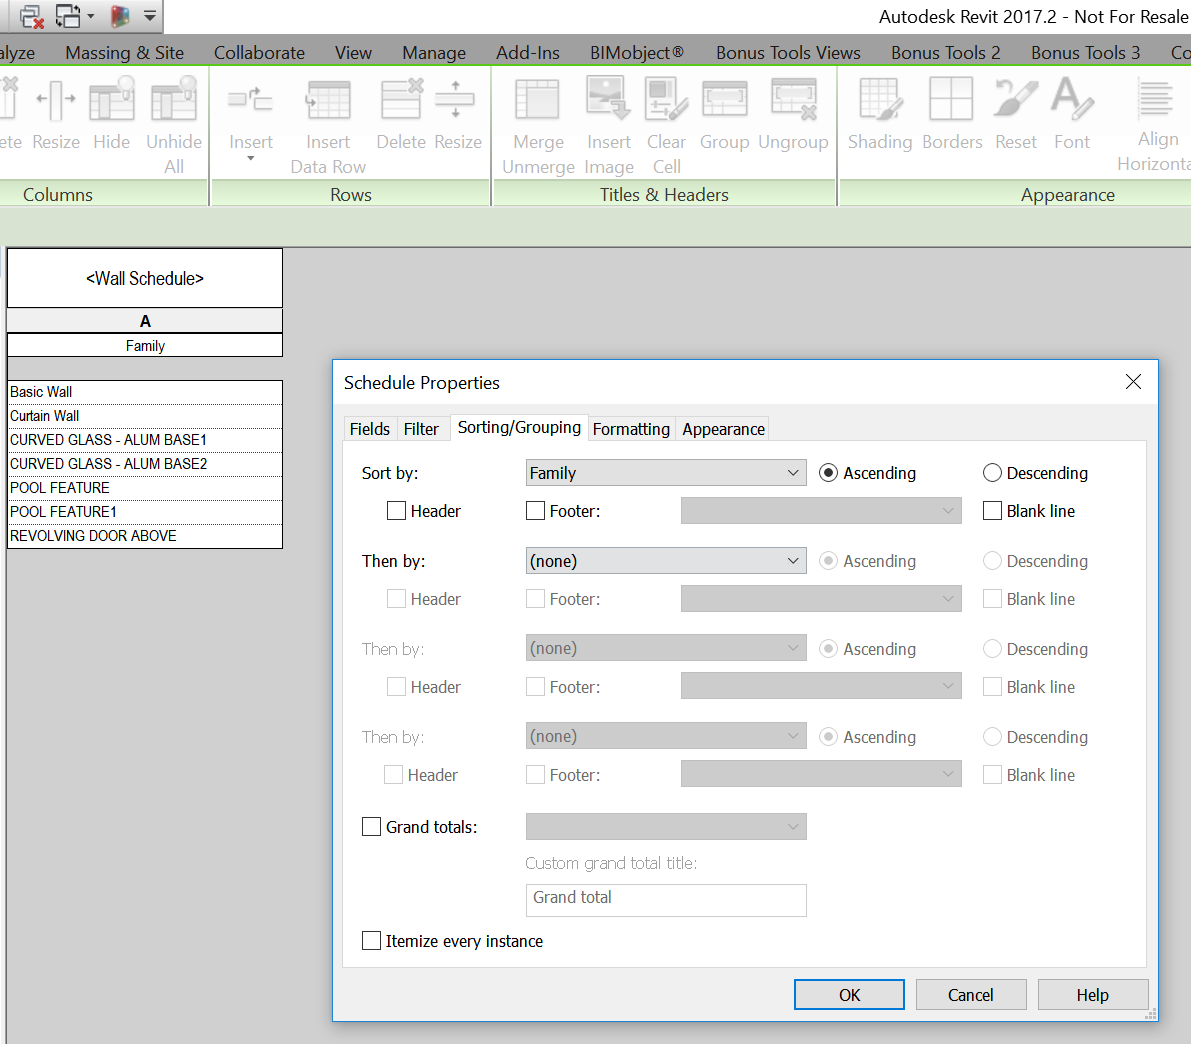
  1. Make a new Wall Schedule
  2. Only add the Family data field
  3. In Sorting / Grouping tab, Sort by: Family and untick ‘Itemize every instance’
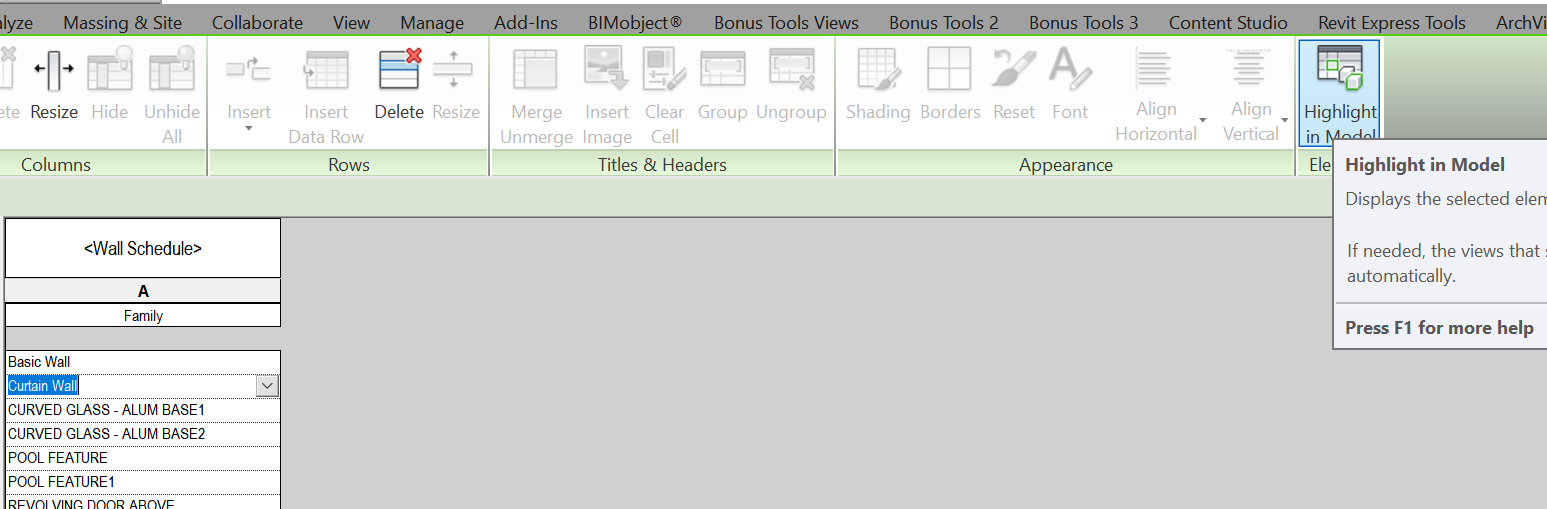
  4. Now, in the schedule, click inside the Curtain Wall cell, and
  5. Use Highlight in Model to select them all

You could then use Save Selection, or Temporarily Isolate Elements in View, depending on what you want to do next.

Revit Wants you to use a good, clean, consistent technique when setting up Curtain Wall mullions for high quality detailing. Here is one way to set these up for nice corner joins – the advantage is that the curtain wall can be properly ‘joined’, you do not need to Disallow Joins and hack the glazing position:

When finished, and the endpoints share a common location, the corner looks like the figure below.


Why is this preferable to assigning a single mullion to one curtain wall and leaving the adjacent curtain wall without a mullion?  That would require that the edge handle of the CW without the mullion to be manually aligned to the edge of the mullion where it crosses the panel’s path; a feature that should be automatic in Revit.  Changes to the mullion profile won’t necessarily be reflected in the open-ended CW and is an opening for errors.

via Jon McFarland at
CurtainwallBIM: Mullion Halves

HyunWoo Kim describes how to make a Curtain Wall that has actual curved glass panels (uncommon, but possible) by making a Curtain Wall type with a Basic Wall as the Curtain Panel masquerading as Curved Glass.  He adds Wall Sweeps to the Basic Wall type to “pretend” to be Curtain Wall Mullions.

I have used a similar method to make curved Balustrades / Railings (making a Rail Type that is actually the glass panel and apply Glass material to it).


Original Post:
Enjoy Revit: Curved Curtain Wall

 John Flanagan details an interesting concept in a recent post – he shows how you can use a Basic Wall with two Glazing layers separated by a core layer to essentially model double glazing systems.

You then simply add this Basic Wall to a Curtain Wall type as the applied Panel.  Great idea!

Read the whole post at:
Create a Curtain Wall type with double-glazed pane – Blog – CADline Community

Link is dead so I have resurrected the content from archive:

From Philip Chan’s blog:
The concept is simple, I make a Generic family (it can be any category actually) as a solid (in this case, just a simple extrusion), let the family intercept the curtain wall, then use “Cut Geometry” to cut out the curtain panel.

Once I made all the cut in the curtain wall, I have a yes/no parameter to control the visibility of the solid so that I can “turn off” the solid. As a result, it would appear that the curtain wall is cut out by a void. The good news is you can use the same family to make multiple cuts and it will work on the mullions as well.

Read more:
http://phil-osophyinbim.blogspot.co.uk/2013/08/curtain-wall-and-engraving.html

I get pretty excited when a new Revit blog comes online – is that sad? Revit: Down to the Details has put out some cool posts since it started two months ago, particularly related to fine detailing and also a few posts on rotating curtain panels – both Pattern and System based.

One that particularly caught my eye was this (also thanks to Andy):
Revit: Down to the Details: Rotating Curtain Panel Revisted

In the words of the blog author, MerryMan:
I pride myself at being very efficient at creating Revit components and sometimes going a bit overboard when it comes to creating some of the details of the object.

I love to see Revit tools used in somewhat unintended ways.  In this case, Jay Holland divides an In-Place Mass Face and applies a Pattern Based Roof Tile to the divided surface – cool!

His sample files (click the download link or the little maximize arrow):

Read more at:
BIM Aficionado: Pattern-Based Curtain Panel Roof Tile

Image from BIM Aficionado

It’s an old trick, but if you want to get rid of excess gridlines and mullions on a wall, just make a new Curtain Wall type that has no type-driven gridlines or mullions:

When you switch to this wall type, Revit will prompt you to delete the gridlines and mullions…

If you want to download an Empty Curtain Wall, use this link:
Empty Curtain Wall file

Martijn is starting up an interesting series of posts about Custom Curtain Wall creation at RevitForum Blog – it would pay to follow this series of posts.

In part ‘zero’, he establishes some groundrules that any decent Revit user will be interested in reviewing. I was particularly interested in his Family creation guidelines. The workflow he presents may look basic enough, but if you do things in this order, you may save yourself much heartache and re-work. Check it out:

When creating Families, there’s a set workmethod:

  • Draw the desired geometry layout in Reference Planes and/or Reference Lines
  • Dimension Refplanes / Reflines
  • Add parameters to dimensions
  • Flex parameters and check if they don’t break
  • Add geometry and immediately assign it to a subcategory
  • Add more parameters to define geometry and add data.

In Family Creation, parameters are placed in one of the following views:

  • Plan View, Level 1
  • Elevation View, Exterior
  • Elevation View, Left.

via Martijn de Riet at
RevitForum Blog: Custom Curtain Wall, pt 0: setup