When a recent update to Autodesk Desktop Connector forced a migration to Autodesk Docs, file paths were generally change like this:
FROM – C:\Users\USERNAME\BIM 360\YOURFOLDERS
TO – C:\Users\USERNAME\ACCDocs\YOURFOLDERS
If you were doing some interesting tricks with BIM 360 Docs, and sharing and federating Revit models as non-initiated files on BIM 360, you may find that links were broken and “Not Found” in Manage Links after that latest Desktop Connector installation.
But don’t worry! You can just set a symbolic link to point from the old BIM 360 Docs location, to the new location. The Command Prompt script looks like this:
The moment after this script was run, I was able to hit Reload from Manage Links in Revit and the new location was detected and links were loaded successfully. Note that they still appear in Revit as if they are in the old location, but really it is reading the latest data from Autodesk Docs, and that new location is being updated by Autodesk Desktop Connector.
At this stage it appears those links are still working, as the Revit CollaborationCache is a different technology to the simple file sharing mechanism of Autodesk Docs.
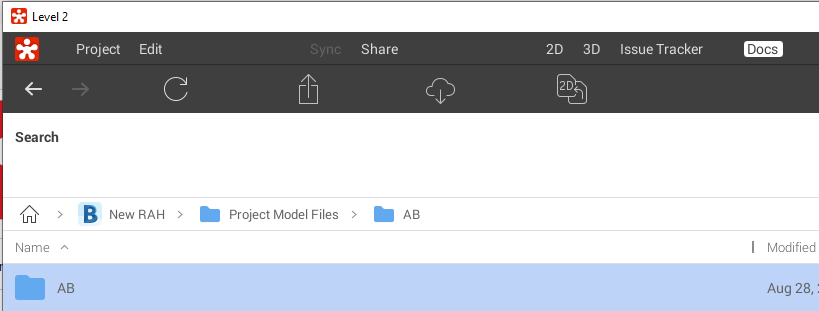
Following the integration of Revizto with Procore and Box, starting today you can also connect Revizto to BIM 360 Docs and BIM 360 Team. This will allow you to browse BIM 360 hosted files within Revizto, attach them to issues, and convert hosted PDFs to sheets that you can easily markup.
Upload PDFs from your project into BIM 360 Docs, and then automatically sync and convert those sheets to Revizto 2D sheets. You can then markup these sheets with the Revizto issue tracker. You could even use the extremely fast ‘viewport sync’ from the Revizto Revit addin to actually enable those PDFs for 2D to 3D overlay. This potentially provides a massive performance enhancement to the existing Revizto to Revit sheet export process.
Store commissioning documents, specifications, and other project documents on BIM360, and then attach those live documents to issues in the Issue Tracker
Take the BIM 360 Docs offline to your device using Revizto, including on our iPad app. In this way, you can take the 3D model, drawings, and Documents offline to the device and take them onsite easily. All interactions with the issue tracker will ‘sync’ when an internet connection becomes available.
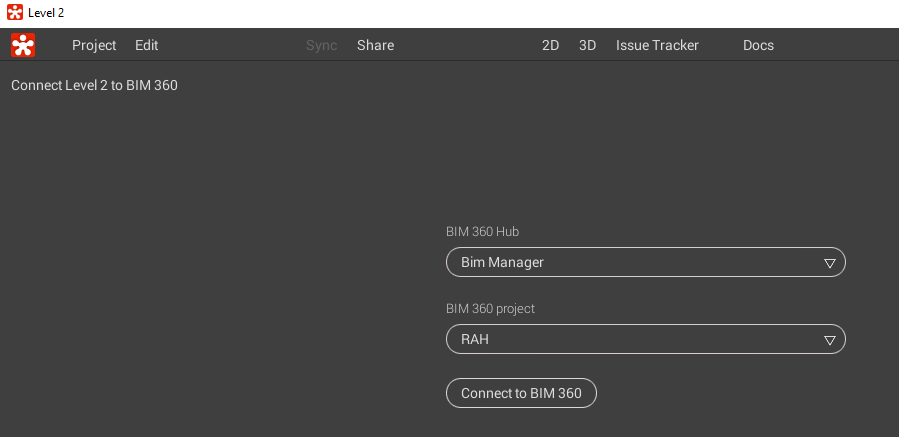
How Do You Enable the Revizto BIM 360 Docs Integration?
Prerequisites:
you should be a BIM 360 Account Admin to install the Revizto BIM 360 app
if you wish to install this integration for BIM 360 Docs / Document Management, you must have access to the Apps tab in BIM 360 Account Admin. From Autodesk website: Note: If you are on an enterprise plan and the Apps or Custom Integration features are not enabled, send an email to bim360appsactivations@autodesk.com to request access. You can also contact support for further help and information.
Install the new version of Revizto (4.10)
Login to BIM360 in your browser to confirm you are a BIM 360 Account Admin
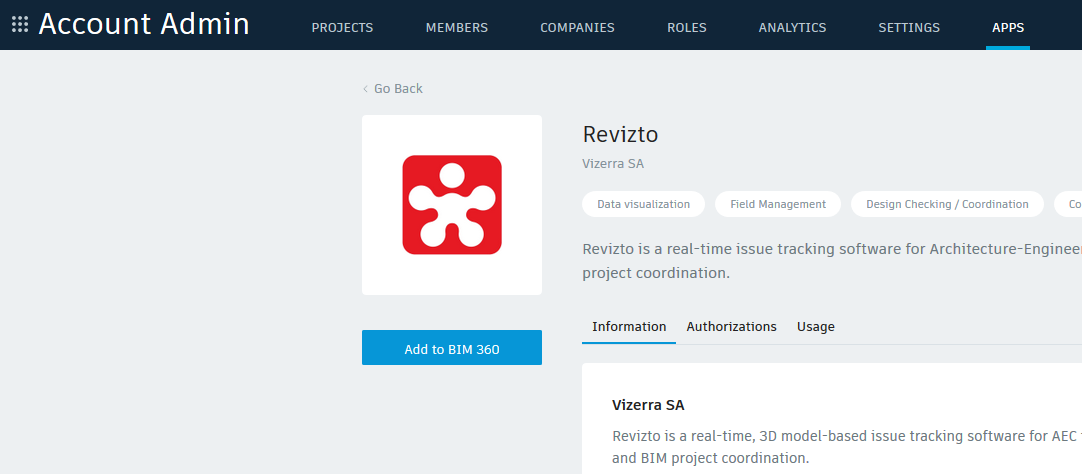
Install Revizto BIM 360 app here – go to Apps tab > Select Revizto> Click Add to BIM 360
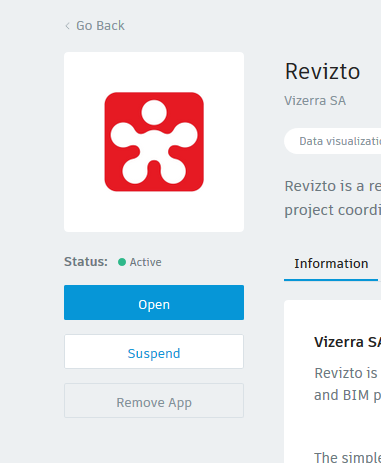
> Authorise
> The app should now be Active
Open Revizto and login to Revizto if necessary
Go to Docs in Revizto and Connect Project to BIM 360: Follow prompts in Web browser:
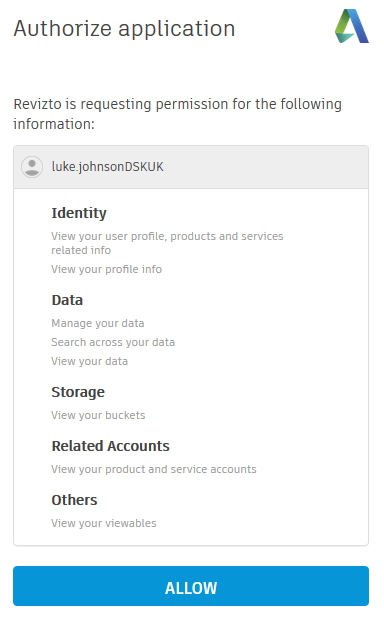
Allow Access:
Select your Hub and Project (if you didn’t enable the BIM 360 Docs app, you will only see BIM 360 Teams hubs here):
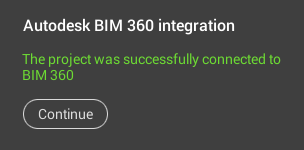
You should receive this message:
Your BIM 360 Docs connection to Revizto should now be active!
There are some other nice enhancements in Revizto 4.10, you see the full Release Notes below.
Release Notes:
Version : 4.10.51843
Revizto app
– New integration with BIM 360 Docs and BIM 360 Team for Revizto Documents. It includes the ability to browse BIM 360 hosted files within Revizto, attach them to issues, convert hosted PDFs to sheets.
– 2D gallery: visual indicators for sheets hosted on Box/Procore/BIM 360.
– 2D gallery: new sheet filter by the number of total issues.
– Image viewer in Issue Tracker attachments and Docs: ability to open any image as 360 panorama.
– Docs: checkboxes for group operations moved to the left side + some other visual tweaks.
– New setting in Cache Management: ability to set max file size for issue attachments downloaded using “Download for field” button.
– Terminology change: Revizto Revisions renamed to Versions to eliminate ambiguity with Revit sheet Revisions. Project -> Revisions dialog is now called Project -> Versions.
– Tooltips in the UI will now show up quicker.
Navisworks plugin
– Export Scheduler now has an option to choose between 2 types of Navisworks licenses: AdLM and BIM 360. Scheduled task will run Navisworks in selected licensing mode.
– Removed the ability to export sheets from Navisworks.
All Revizto products
– Stability improvements and bug fixes.
Other Notes:
Emails sent to Autodesk to get BIM 360 Apps enabled:
I am Account Admin for XYZ – please enable the Apps and Custom Integrations panels as per: Note: If you are on an enterprise plan and the Apps or Custom Integration features are not enabled, send an email to bim360appsactivations@autodesk.com to request access. You can also contact support for further help and information.
Response:
Hi Luke,
I have enabled your Developer Account; you’re all set! – you should now see the APPs & Custom Integrations tabs in BIM 360 Account Admin.
Would you mind sharing which integration is of interest? Or perhaps you’re planning to build a new custom integration? – It’s helpful for us to know what folks are trying to build/solve. – You can explore our existing partner integrations here, or in the APPs tab.
For technical questions about Forge APIs, feel free to reach out to the Forge Team.
Please let me know if you have any other questions.
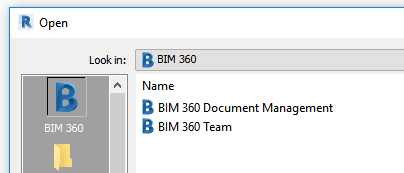
If you have Desktop Connector installed, you probably realise you can ‘upload’ Revit models and other files to BIM 360 Docs by dragging and dropping to the folder in Windows Explorer (using Desktop Connector). However, when you try and link this using the BIM 360 shortcut in Revit, you might not be able to see the file…
Here is a workaround that may allow you to link a non-initiated Revit model into your Revit file:
Ensure you have Autodesk Desktop Connector installed
Start Link Revit command from the ribbon
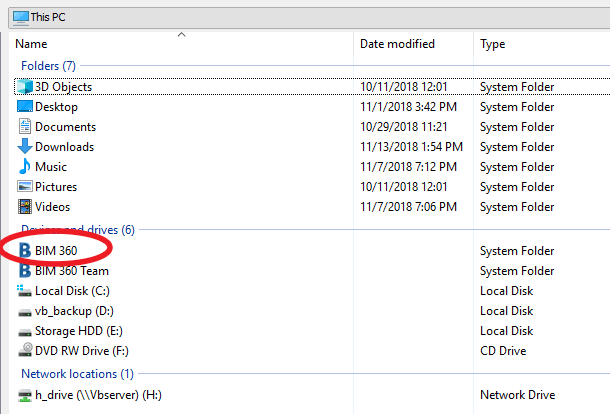
Update: Click on the Address drop down
Click on This PC
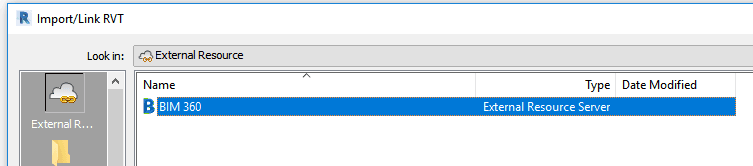
Browse to BIM 360 from the window below:
Select the file (non initiated) that you want to link
You should get the BIM 360 prefix in Manage Links:
Here is a video of this process (with audio, This PC – BIM 360 workflow):
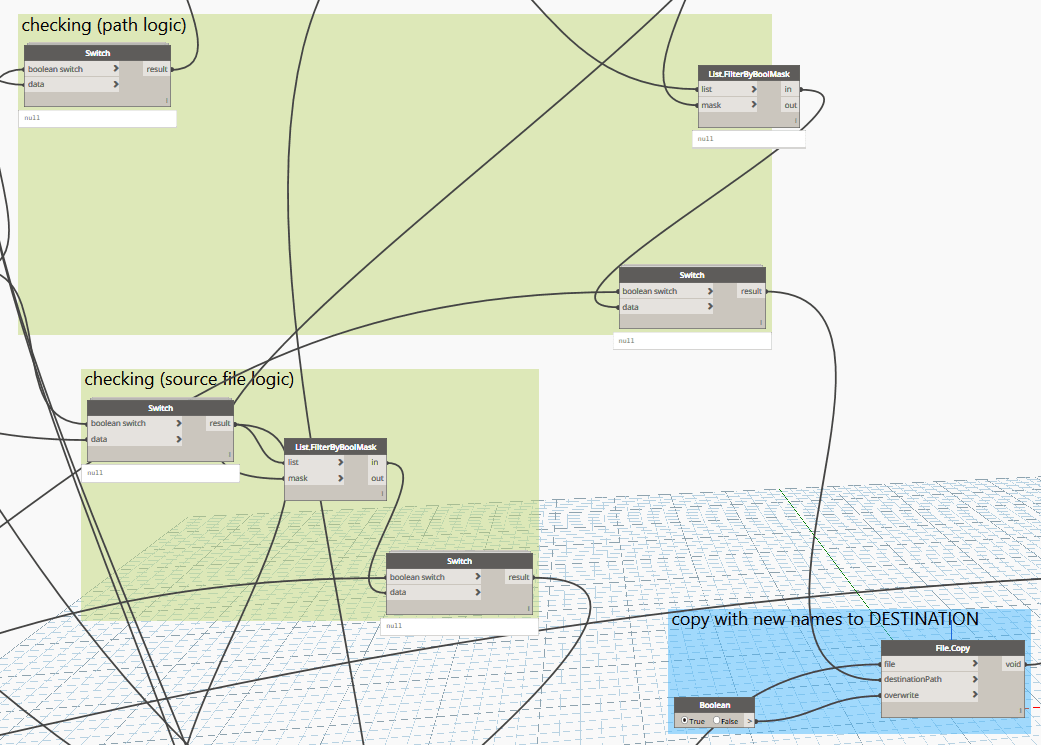
I have developed a working BIM360 to on-premises backup mechanism. There were a few different ways to go…
I initially considered:
Hacking Windows Explorer to touch the files in the BIM 360 node and try and trigger the BIM360 Docs download and copy to local PC or network location
Developing a Forge app that essentially pulls the desired models out of the BIM 360 cloud to desired location?
In the end, I decided to use the Revit API (Dynamo and Python), along with VirtualBuiltApp, to essentially reverse engineer a folder structure from the local CollaborationCache folder. These ideas are hinted at here.
In simple terms, the BIM 360 Docs on-premises backup workflow is:
Create a super federated BIM 360 model (with all other BIM 360 models linked into it)
A Dynamo script reloads all links in order to cache them locally
The same script interrogates, then determines the target file name and folder from VirtualBuiltApp
Dynamo then copies the files into their ‘backup’ location on the local network
Some more detail is presented below:
A) Cache Cleaner CMD Script (may not really be necessary, as the ‘reload’ should overwrite superseded cache anyway):
Kill Revit if Open… be careful of below steps, particularly if Revit has crashed recently. You might need these local copies 🙂
cd "%LOCALAPPDATA%\Autodesk\Revit\Autodesk Revit 2018"
cd CollaborationCache
rmdir oldCache
mkdir oldCache
for /d %i in (*) do move "%~i" oldCache
B) Manual steps to setup Revit model environment to run the script:
Open Revit
Open Federated BIM 360 file (worksets closed)
Unload all links
Open all Worksets
C) Dynamo Script:
Run Dynamo (Python) script that reloads and unloads all links (this collects .rvt into cache). Key Python commands to use are: RevitLinkType.Load() and RevitLinkType.Unload(None).
Potential Problems:
Coordination Monitor alert, no longer exists
Instance of link needs Coordination Review
“Some numerical data within the imported file was out of range. This numerical data has been truncated.”
“Geometry in the file … has extents greater than 20 miles (33km).”
Update: It was pointed out to me by someone on the inside that the workflow I describe below essentially amounts to a back-channel unsupported and in fact inappropriate use of BIM 360 Docs. I was surprised at this, as I had essentially obtained this information from the Autodesk forums. What is wrong with the steps below? The answer is apparently this: A paying BIM 360 Docs customer is not supposed to invite a free user into their projects. This is apparently part of the terms of use for BIM 360 Docs customers. I was not aware of this, and in fact I’m unsure where to find it in the documentation.
Just to be clear, while the steps below *work* at this time, it apparently is an unsupported and inappropriate workaround and there could be risks (financial or otherwise) for BIM 360 Docs customers who invite free users into their projects. You should only invite:
BIM 360 Docs users for which you have paid for and applied an entitlement
BIM 360 Design (C4R) users who have purchased their own entitlement
I expect this workaround may eventually be disabled by Autodesk? You can view if you have exceeded your purchased package of BIM 360 Docs entitlements in the relevant Autodesk Manage pages. For example, it might show 16 of 10 licenses used in red? This is where I think there is potential for Autodesk to back charge users who abuse this current state of affairs.
My advice: check directly with Autodesk about who you can and cannot share your BIM 360 projects with…and proceed accordingly.
Situation:
You are a paying BIM 360 Docs user and would like to invite a non-paying user to collaborate inside a BIM 360 Docs workspace. Perhaps you just want them to be able to upload and download files, but not Collaborate in Revit…
Solution:
They need to create a free BIM 360 Docs account, and then get invited to your workspace.
Previously, this was all working with the old Desktop Connector and b360provider.exe (I think?) but the new versions of Desktop Connector seem to have broken the ability to ‘browse’ C4R Revit models on BIM 360… and guess what? There is no Solution. This functionality is in fact ‘by design’. You can copy and paste a non-C4R Revit model to BIM 360 Docs via the connector, and that RVT will be visible in Windows Explorer. But if you have C4R initialised Revit models on BIM 360 Docs, they will not be visible under the BIM 360 (Preview) node in Windows Explorer. You can only view those C4R Revit files in their folder structure by navigating through Revit 2018.3 or newer.
This is the feedback from Autodesk:
Revit cloud models (C4R models) are not supported in Desktop connector. They won’t be showing up in Desktop Connector. Published C4R models are only available in Revit and Docs.
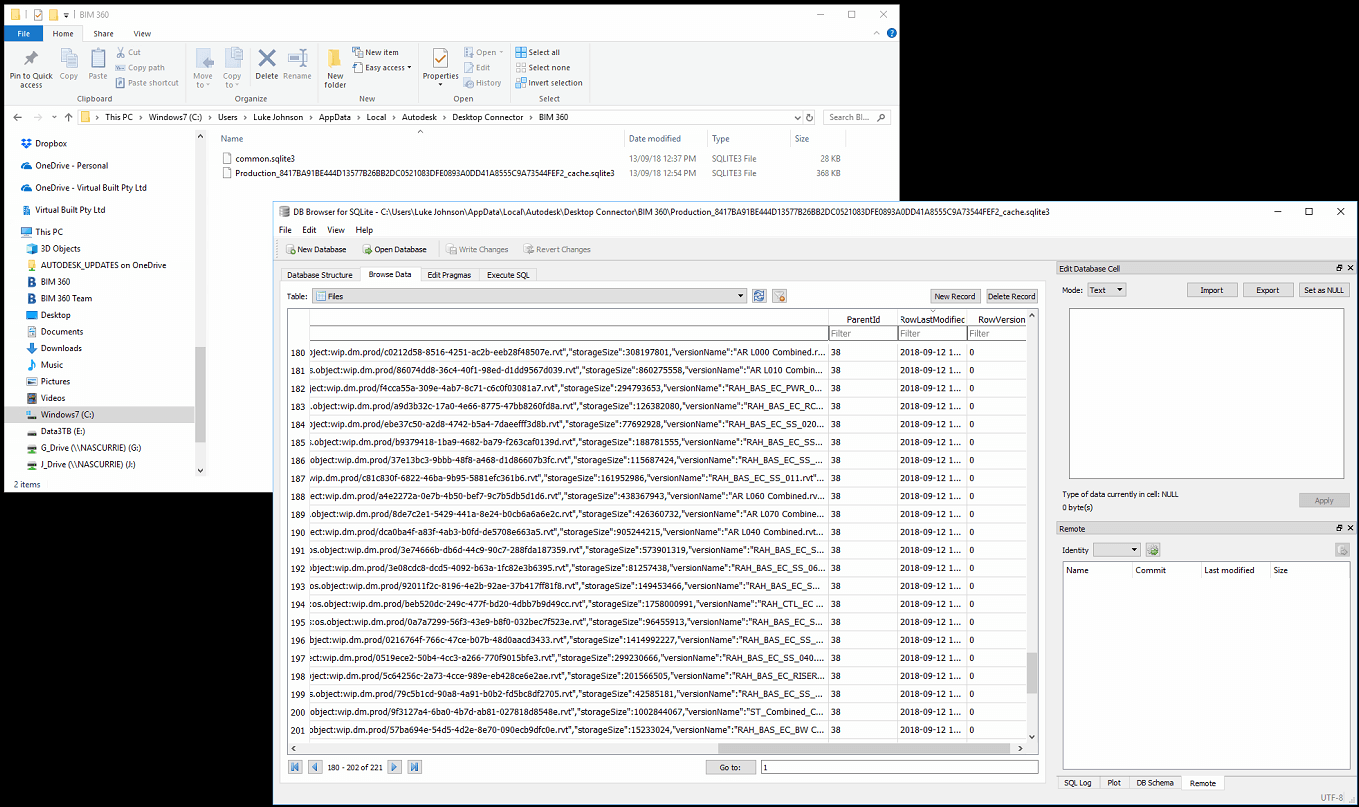
I went looking for another answer, but there really isn’t one. Below is a list of steps I took to play around with the Desktop Connector installation. In the end, the only way I can foresee being able to ‘automate’ onsite BIM 360 Docs backups will be to leverage the CollaborationCache folder. You will need some Revit API know-how to forcibly populate this through some BIM 360 Reload methods (refer here). Unfortunately this will be a flat list of files without descriptive names, so there will have to be some workarounds and cleanup scripts in place (we already have a system of BIM 360 file management in VirtualBuiltApp). I intend to post some more about these workarounds in future.
Keep reading for excessive detail on my Desktop Connector journey …
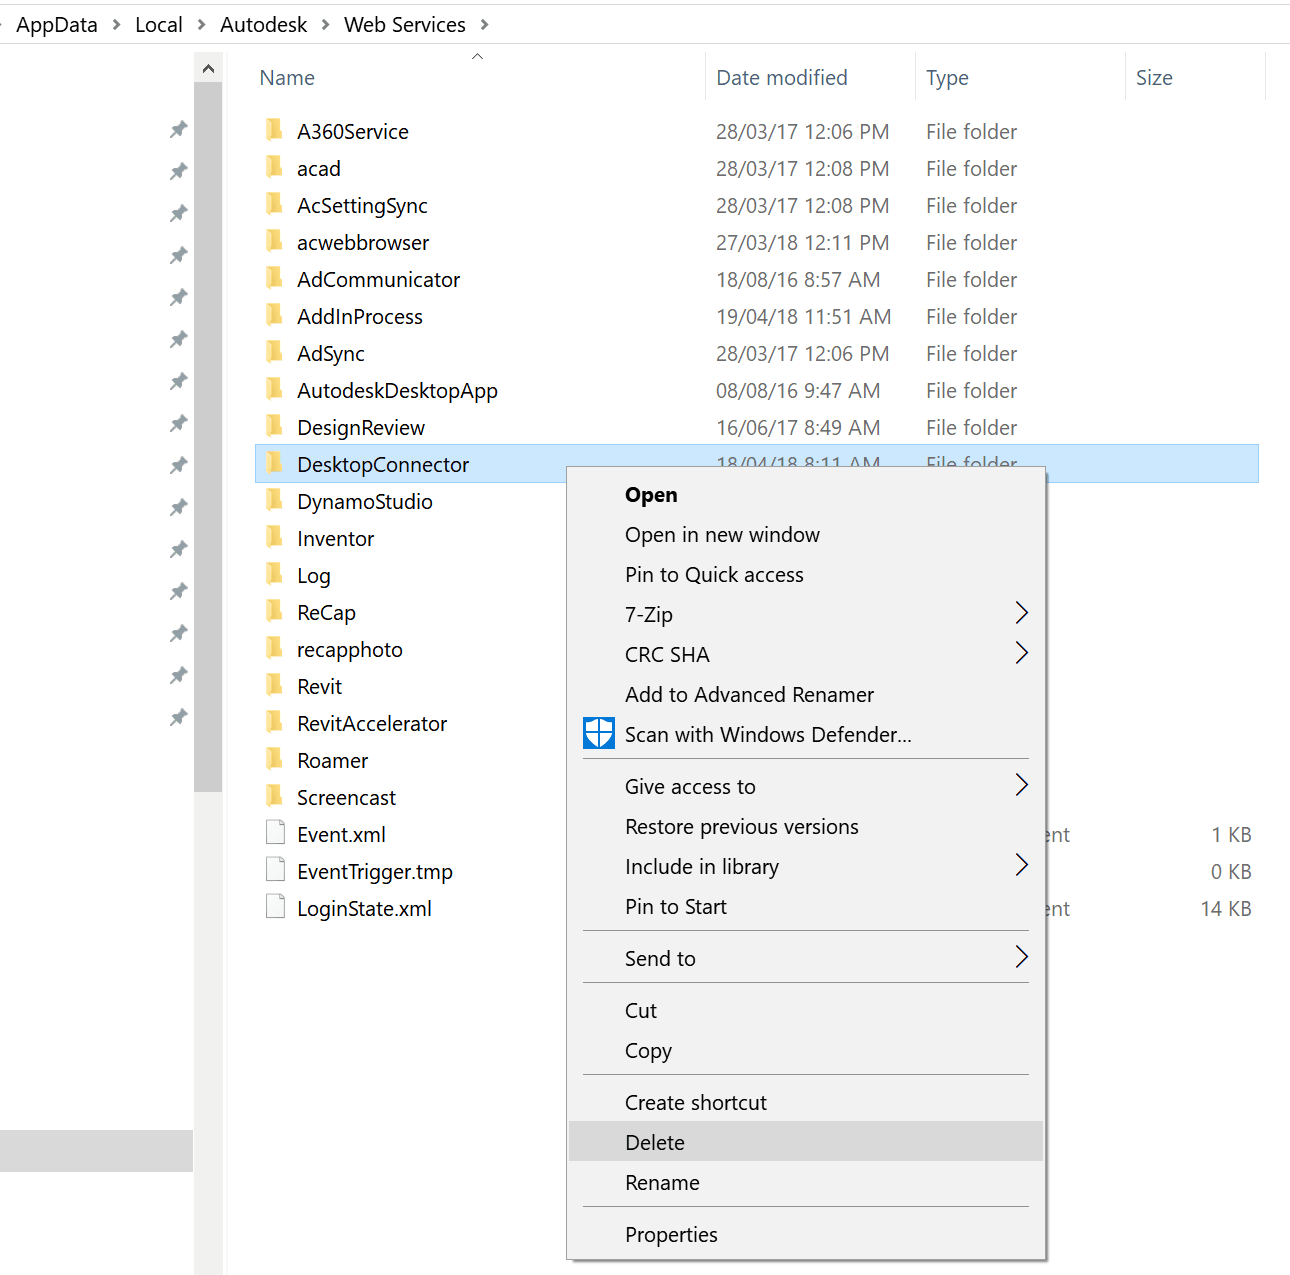
Uninstalled this old version. Interestingly, there were 3 different uninstall processors triggered? Like I had three different versions installed?
Also tried removing this folder and reinstalling:
I found a pile of errors in the diagnostic logs:
CDX pipleline builder output
Output=Warnings received from AddInStore.Rebuild
========================
Could not connect up a part in a pipeline to its neighbors: AddInAdapter Name: "ISecureSettingsProviderViewToContractAddInAdapter" Location: "AddInSideAdapters\Comet.AddInFramework.DataSourceProviders.ProviderAdapters.dll".
and a few of these
========================
Could not connect 2 valid add-in model parts.
========================

========================
While inspecting an assembly, caught a BadImageFormatException: The file is not a valid binary: C:\Program Files\Autodesk\Desktop Connector\AddIns\ADriveConnector\AdWebServices.dll This occurred while inspecting assembly C:\Program Files\Autodesk\Desktop Connector\AddIns\ADriveConnector\AdWebServices.dll.
========================

========================
While inspecting an assembly, caught a BadImageFormatException: The file is not a valid binary: C:\Program Files\Autodesk\Desktop Connector\AddIns\ADriveConnector\AdWebServicesUI.dll This occurred while inspecting assembly C:\Program Files\Autodesk\Desktop Connector\AddIns\ADriveConnector\AdWebServicesUI.dll.
========================
I scanned through the Registry and deleted old references to Desktop Connector.
Found this link with the command line switches: here
Tried an install from elevated command prompt:
C:\Temp>DesktopConnector-x64.exe /install /quiet
Note: you do not actually need the Desktop Connector to collaborate on BIM 360 Revit projects in the cloud. You only need Revit 2018.3 or newer, and the relevant license for Revit Cloud Collaboration (too hard to keep track of the names but I think ‘BIM 360 Design’ is the current terminology).
You will be able to see this link in Revit 2018.3 or newer:
When ‘linking’ Revit models, CAD files, and other resources, you will see this option when working in a cloud workshared model:
These models will be temporarily stored in the CollaborationCache folder:
If you have moved your project onto BIM 360 Docs, it might make sense to store related project resources (Shared Parameter files and Classification resources like Uniformat) in the same cloud as well.
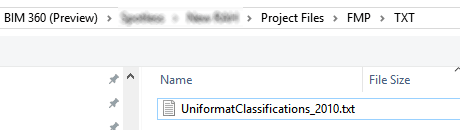
Ensure you can see the BIM 360 (Preview) item in Windows Explorer
Using BIM 360, create a suitable folder under the Project Files area, and upload your resource file, such as UniformatClassifications_2010.txt
Browse to that folder in Windows Explorer:
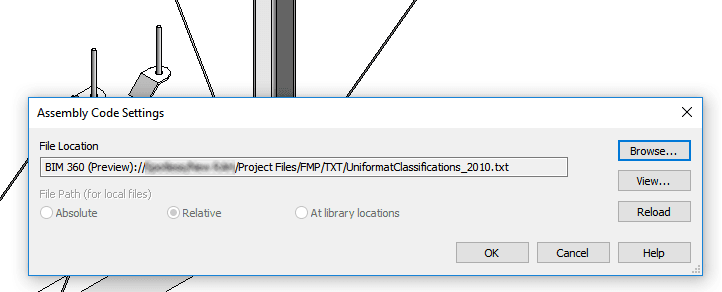
Open Revit
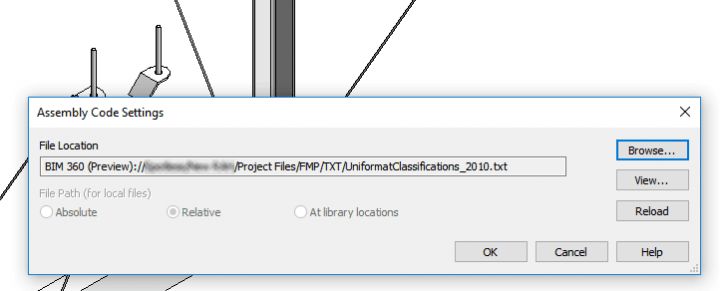
Navigate to Manage – Additional Settings – Assembly Code Settings
Click Browse
Copy and Paste the folder address from Windows Explorer (which actually shows the local sync location for BIM 360 data, typically C:\Users\YourUserName\BIM 360\YourBIM360License\YourBIM360Project\Project Files\
Back in Revit, after navigating to the correct BIM 360 folder, select the text file resource and click Open
Revit detects that this resource is stored on BIM 360 Docs and you can proceed…
Sync your model to save the settings
You should be able to use the same process to save other files like Keynote references and Shared Parameter files in the cloud. Keep in mind that you will still have to manage BIM 360 access control, as you probably don’t want multiple people actually be able to edit these files.
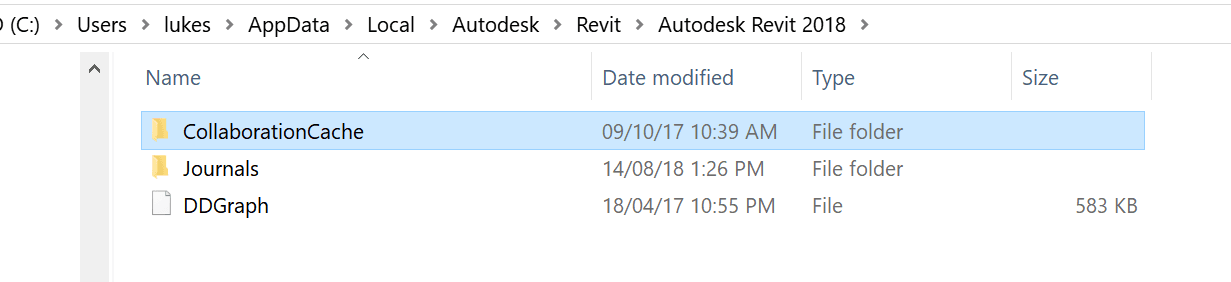
If you are still running a relatively small SSD (like 512gb), you might see that your C drive fills up pretty quickly while working on a large BIM 360 Design Revit cloud worksharing project. See below image, where the CollaborationCache folder is using almost 50gb of space on my machine:
While I realise that the SSD is the best place to have that data in terms of performance, if you don’t have the space available you may consider moving your CollaborationCache folder to a secondary, larger hard drive. I used a symbolic link to do this, with the script below:
if exist "%localappdata%\Autodesk\Revit\Autodesk Revit 2018\CollaborationCache" rename "%localappdata%\Autodesk\Revit\Autodesk Revit 2018\CollaborationCache" CollaborationCache.old
mklink /d "%localappdata%\Autodesk\Revit\Autodesk Revit 2018\CollaborationCache" E:\C4R
if not exist E:\C4R MD E:\C4R
robocopy /mir "%localappdata%\Autodesk\Revit\Autodesk Revit 2018\CollaborationCache.old" E:\C4R
This creates a folder called C4R on your E drive, copies the CollaborationCache over, and sets up the symbolic link. To use it:
Sync all Revit instances and shut down Revit completely
Make a CMD from the code above and run it as Administrator (elevated privileges required for mklink )
In Explorer, confirm you have the symlink and delete the .old folder :
Check out this page from Autodesk Knowledge base. Notice how it describes three different ways of linking for BIM 360 Design projects that involve Revit worksharing:
Method 1 – Controlled Sharing – ‘Consume’ Published Models from Packages
Method 2 – Controlled Sharing – Link from the Shared Folder
Method 3 – Live Linking
Each method requires fundamentally different sharing standards, and varying degrees of prior BIM 360 permissions and team setup.
Notice that Method 1 includes the concept of ‘packages’. The overall intention here is to try to emulate some existing workflows. While BIM files continuously change during project development, in traditional workflows a ‘team’ only interacts with a snapshot of the available BIM data from other teams (a package).
At this point, it is key to keep in mind that these different methods exist, and if you are a BIM Manager on a BIM 360 Design with Revit project, you will need to discuss and agree on the linking Method for managing the Revit data throughout the BIM creation phase of the project.
It is something to think about as we move forward with reliance on cloud services – how important is 100% uptime with collaboration cloud products in the BIM world? Is 100% uptime even possible with current technology services, and the stacks (like Autodesk cloud) that rely on other stacks (like AWS cloud)?