If you have Desktop Connector installed, you probably realise you can ‘upload’ Revit models and other files to BIM 360 Docs by dragging and dropping to the folder in Windows Explorer (using Desktop Connector). However, when you try and link this using the BIM 360 shortcut in Revit, you might not be able to see the file…
Here is a workaround that may allow you to link a non-initiated Revit model into your Revit file:
Ensure you have Autodesk Desktop Connector installed
Start Link Revit command from the ribbon
Update: Click on the Address drop down
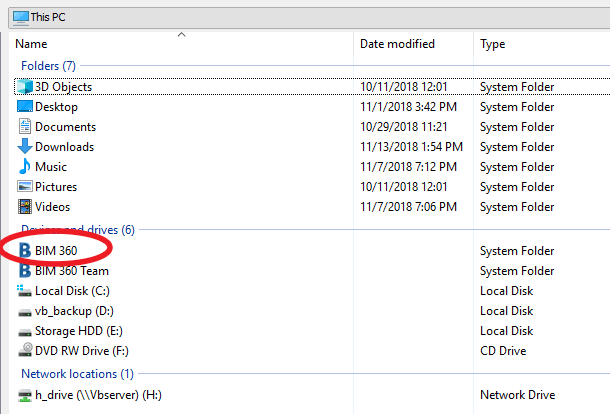
Click on This PC
Browse to BIM 360 from the window below:
Select the file (non initiated) that you want to link
You should get the BIM 360 prefix in Manage Links:
Here is a video of this process (with audio, This PC – BIM 360 workflow):
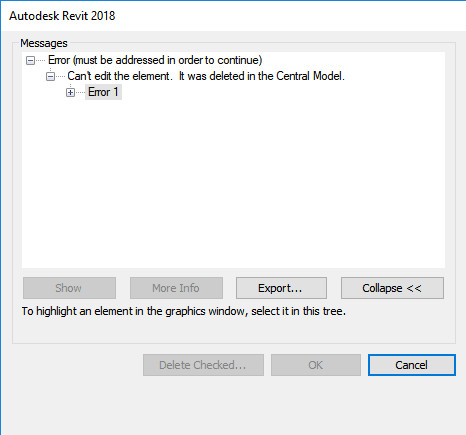
If you Close All Worksets when opening a model on BIM 360 Design, you may get this error (related to Project Info):
Can’t edit the element. It was deleted in the Central Model.
As you can see, it is related to the Project Info : Project Information element:
The error looks like this. You must click Cancel to proceed:
It appears to be some synchronisation bug or similar, possibly related to BIM 360 cloud worksharing. You can force the error to reappear by clicking on the Location option in the Ribbon
To fix it, try doing a full Sync with Central. It seems that this rectifies the bug for that session and future sessions with that particular cloud workshared model.
If you are still running a relatively small SSD (like 512gb), you might see that your C drive fills up pretty quickly while working on a large BIM 360 Design Revit cloud worksharing project. See below image, where the CollaborationCache folder is using almost 50gb of space on my machine:
While I realise that the SSD is the best place to have that data in terms of performance, if you don’t have the space available you may consider moving your CollaborationCache folder to a secondary, larger hard drive. I used a symbolic link to do this, with the script below:
if exist "%localappdata%\Autodesk\Revit\Autodesk Revit 2018\CollaborationCache" rename "%localappdata%\Autodesk\Revit\Autodesk Revit 2018\CollaborationCache" CollaborationCache.old
mklink /d "%localappdata%\Autodesk\Revit\Autodesk Revit 2018\CollaborationCache" E:\C4R
if not exist E:\C4R MD E:\C4R
robocopy /mir "%localappdata%\Autodesk\Revit\Autodesk Revit 2018\CollaborationCache.old" E:\C4R
This creates a folder called C4R on your E drive, copies the CollaborationCache over, and sets up the symbolic link. To use it:
Sync all Revit instances and shut down Revit completely
Make a CMD from the code above and run it as Administrator (elevated privileges required for mklink )
In Explorer, confirm you have the symlink and delete the .old folder :
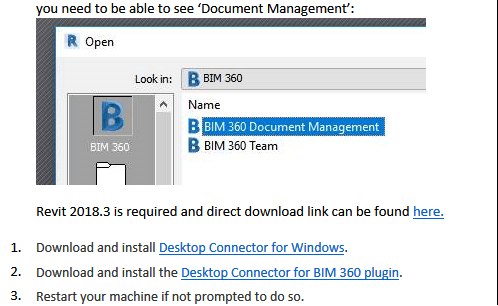
To be able to use the new BIM360 Design or BIM 360 Document Management in Revit you need to be able to see ‘Document Management’ after clicking the BIM 360 link in the Revit Open Dialog box:
Revit 2018.3 (or newer) is required and a direct download link can be found here.
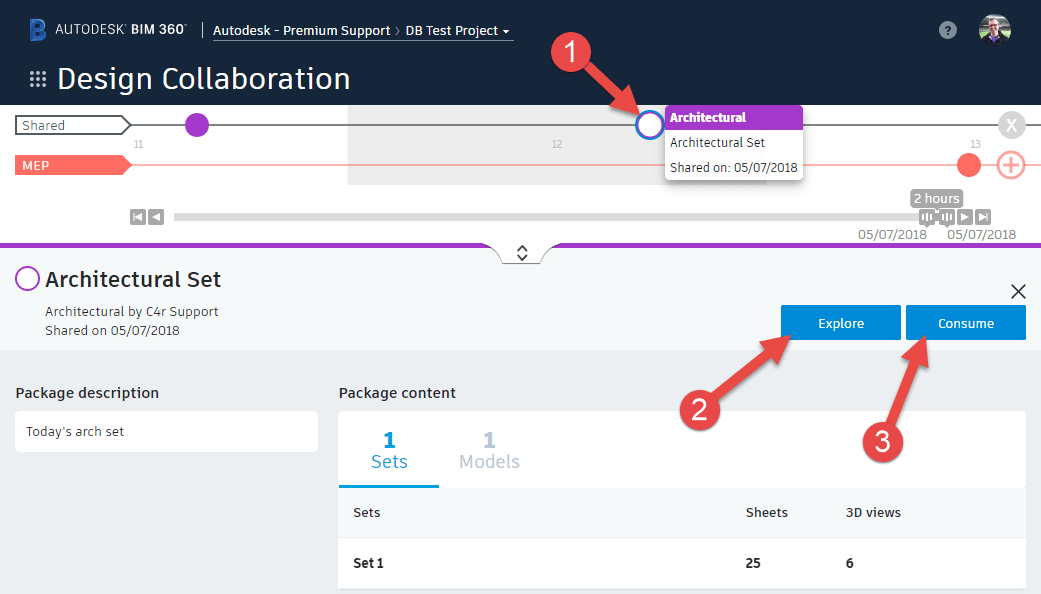
Check out this page from Autodesk Knowledge base. Notice how it describes three different ways of linking for BIM 360 Design projects that involve Revit worksharing:
Method 1 – Controlled Sharing – ‘Consume’ Published Models from Packages
Method 2 – Controlled Sharing – Link from the Shared Folder
Method 3 – Live Linking
Each method requires fundamentally different sharing standards, and varying degrees of prior BIM 360 permissions and team setup.
Notice that Method 1 includes the concept of ‘packages’. The overall intention here is to try to emulate some existing workflows. While BIM files continuously change during project development, in traditional workflows a ‘team’ only interacts with a snapshot of the available BIM data from other teams (a package).
At this point, it is key to keep in mind that these different methods exist, and if you are a BIM Manager on a BIM 360 Design with Revit project, you will need to discuss and agree on the linking Method for managing the Revit data throughout the BIM creation phase of the project.
BIM 360 has just changed in a fundamental way. The trust environment is now more controlled, and it is sharing base technology with BIM 360 Docs. So instead of talking about C4R bolted onto A360 or BIM360, we will now be talking about ‘Revit files in this Docs module in this Team Project on BIM 360 Design’ (I think).
Revit 2018.3 is required and direct download link can be found here.
I’ll follow up with some more detailed information in the coming weeks.
All,
I wanted to welcome you, on behalf of the team here at Autodesk, to the Design Collaboration forum. This forum exists for conversations about the design collaboration workflows possible in the BIM 360 Design product, which released today. We look forward to the conversation. First though, I’ll try to answer some likely questions you all have.
What’s BIM 360 Design?
BIM 360 Design is the next generation of Collaboration for Revit (C4R). It enables the cloud worksharing you’ve come to love in C4R, but connected to the next generation BIM 360 platform. You can learn more about it here on our new product center, and below is an image that captures what comes with it.
You can see that within BIM 360 Design there are 2 next gen modules that are included, Design Collaboration and Document Management. Together with cloud worksharing, they represent the most seamless way to collaborate on Revit data across the globe. We’ll talk more about the new workflow in subsequent targeted posts.
What Happened to C4R?
C4R just became BIM 360 Design as of today. If you’re an existing subscriber, you’ll see the branding update in manage.autodesk.com shortly. If you have existing projects in-progress, working against BIM 360 Team (aka Classic), nothing really changes aside from the branding you see in the account portal. You can continue to work on those projects, and new subscriptions to BIM 360 Design can be allocated to new team members, who can then start to work on those existing projects. More detail can be found in this FAQ.
What Can I Do With BIM 360 Design?
With BIM 360 Design, BIM authoring teams can say goodbye to “high trust” as the only way to work, and hello to flexible dynamics between multi-discipline BIM authoring teams. Along with those improved access controls comes a whole new web and mobile experience delivered by Next Gen BIM 360. Across Document Management and the new Design Collaboration module, teams can:
Quickly and easily set up teams and define the data spaces they will work in.
Easily understand the current state of the project, with an aggregated view of the project data that can be navigated the way they think about it, not how our beloved authoring tools structure it.
Exchange data between teams in a controlled way, on the back of our new currency for data exchanges: Packages. These are like transmittals on steroids, allowing teams to curate the versions of Models, 2D Sheets, and 3D Views needed to communicate process.
Understand how data has changed over time. Change visualization can be enabled with the touch of a button on any BIM artifact contained in a Package. No more hunting for revision clouds or exporting the 3rd party tools.
Provide feedback on those BIM artifacts, with Markups and closed loop Issues created in Document Management (Issues are on their way to Design Collaboration).
Use the Preview version of Desktop Connector to collaborate on non-Revit project data, centralizing the data platform used for all Work in Progress (WIP) project data.
Use those BIM artifacts downstream for construction workflows across the Field Management, Project Management, and Model Coordination modules.
How Do I Get Started with BIM 360 Design?
If you’d like to start a new Project in this new way to work, you need to:
Get a BIM 360 Account
If you have an existing next gen BIM 360 account, you should automatically get the Design Collaboration module enabled tonight (April 9th US time zone)
If you don’t have an existing account, your Contract Manager should receive an email shortly with instructions on how to get one created.
Install the Revit 2018.3 Update
This update released today, and should be available in the Autodesk Desktop app. A direct download link can be found here. This is required for Revit 2018 to know how to communicate with next gen BIM 360.
Start a New Project and Enable Document Management + Design Collaboration
With these two modules enabled, along with the latest update of Revit, you have what you need to get started. We’ll have a separate thread that walks through the process to get up in running in more detail.
Hopefully, you all are as excited about this as we are. We’re biased though; we’ve worked hard based on lots of feedback and customer engagement to deliver this new way to work, and your continued feedback and engagement will make sure that we deliver on the needs you all have. Look out for subsequent discussions on specific parts of the overall product experience, and we look forward to hearing from there. Post here in this thread with general questions.
Cheers,
Kyle & the Team
Kyle Bernhardt
Product Line Manager
BIM Project Delivery
Autodesk, Inc.