Which is best?
Check out the comparison by Tod Stephens at:
Tipniques: Design Visualization with Revit – Which Rendering Engine to Use? | AUGI

What Revit Wants

Which is best?
Check out the comparison by Tod Stephens at:
Tipniques: Design Visualization with Revit – Which Rendering Engine to Use? | AUGI
The BIM Data is a new blog by Mohammed Mahboob. In a recent post, he describes using a Pipe Fittings family template and switching it to Generic Model to enable (retain) the Lookup Table CSV support.
Read the whole post at http://thebimdata.blogspot.ae/2013/08/loop-in-lookup-table-name-parameter.html

Good workaround!
Check the blog out at:
The BIM Data
In a recent project, we received a DWG file and a number of point clouds, all on the same coordinate system (MGA).
To setup project initially, I followed these steps:
Q. Can you acquire the coordinate system from a basic point cloud?
No, Revit 2013 does not recognize a PCG point cloud as a valid source for Acquire Coordinates. You can only place a point cloud by Shared Coordinates where these are already set up.
Great post on initial point cloud coordinate setup:
Point Clouds in Revit – BIM Toolbox
Interesting that centre-to-centre is often recommended as the best initial import method for a Point Cloud:
Point Cloud Processing for Revit Use
Further, you can move one point cloud and use those transforms to modify the next link:
7) Move the cloud in the X, Y & Z to align it where you want it.
8) Once you have it aligned well, repeat steps 1-4 for each cloud except Set “Positioning” pull-down to Auto – Origin to Last PlacedLaser Scanning Forum Ltd • View topic – Shared coordinate and scale in Revit
Also, some users recommended putting all point clouds in their own RVT link for easy unloading / overriding etc. I’m unsure of the impact of snapping to such a cloud in the host project?
Further reading:
One of my team recognised that the point pattern was very similar to an error that occured in Geomagic. very similar to how Revit has issues with things being too far from project base point so does geomagic. It turns out that even though I dropped the cloud very close to the project base point for some reason Revit 2014 must be still reading the old real world coordinates and sees it as if it is still 100s of miles from origin, which is what seems to be causing the resolution problems. Hence we went back into the original registered data in cyclone and made the project arbitrary (moved it close to 0,0,0), we then re-exported to .pts bought into Revit and the results are as per the attachment, loads better than before and deffinately possible to work with now!via RevitCity.com | Revit 2014 Point Cloud Benefits/limitations?
Isolate this the selected element and then use the zoom to fit option. Now you should be able to see your point cloud / import in the center of the screen.
via Point cloud or linked file not appearing in Revit – Shared coordinates | BIMopedia
If you are working with point clouds, you are probably aware that setting up the points to be re-modeled properly within Revit is essential. When you import your point cloud by shared coordinates, you are left with a 3D model of your points.
via Setting up your Revit project to model point cloud data | BIMopedia
On Revit 2014:
The new point cloud engine uses RCP/RCS formats. The RCP format is a project file while an RCS file is a scan file. A RCP file is a group of multiple RCS scan files. If you have raw data in other acceptable formats Revit will index it in the background and let you know when the indexing is complete.
…
They enhanced Revit’s sensitivity to points and planes within the point cloud data. This should make it easier to sketch model elements using the underlying cloud data. Revit will detect planes that are perpendicular to the current work plane and very close to the cursor.
via Revit OpEd: Point Clouds in Revit 2014
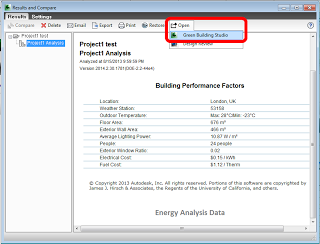
From Revit, you need to:
From here, click on:
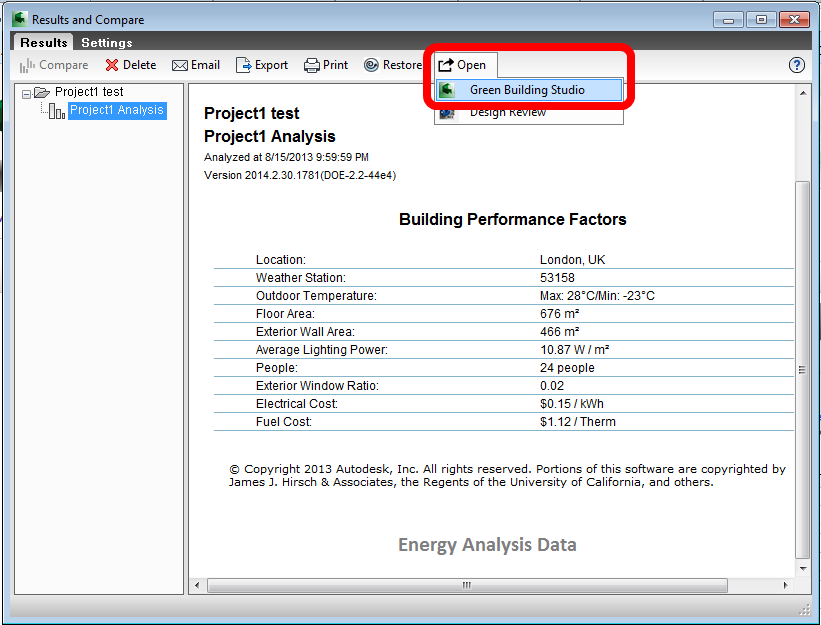
Clicking this little icon in Green Building Studio:
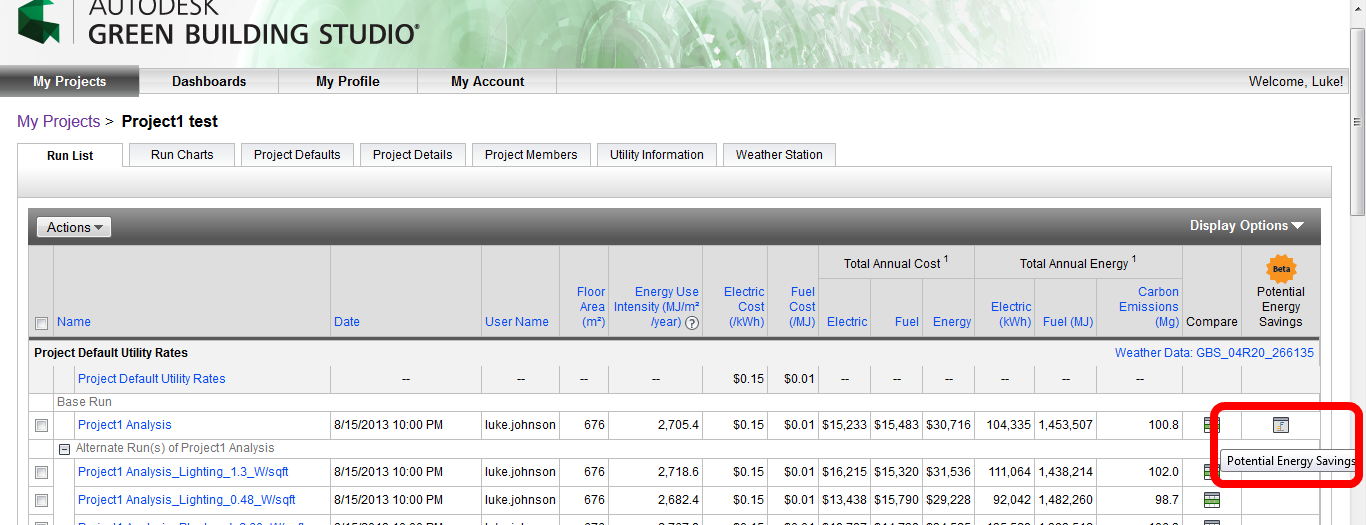
Will show you something like this:

Essentially, this is giving you some ideas on how you may improve the efficiency and performance of your building.
Read more:
Potential Energy Savings Chart – WikiHelp
New Potential Energy Savings Widget Helps You Focus on What Matters! – Building Performance Analysis
Of the 4 free 3D PDF creation methods I have previously posted, this is the easiest and probably the best:
Done. It is literally that easy. For a slightly different step by step method specifically for Revit, go to this page.
Note: for direct, simple and customizable 3D PDF creation capability from Revit, check out the Revit to 3D PDF link in the sidebar.
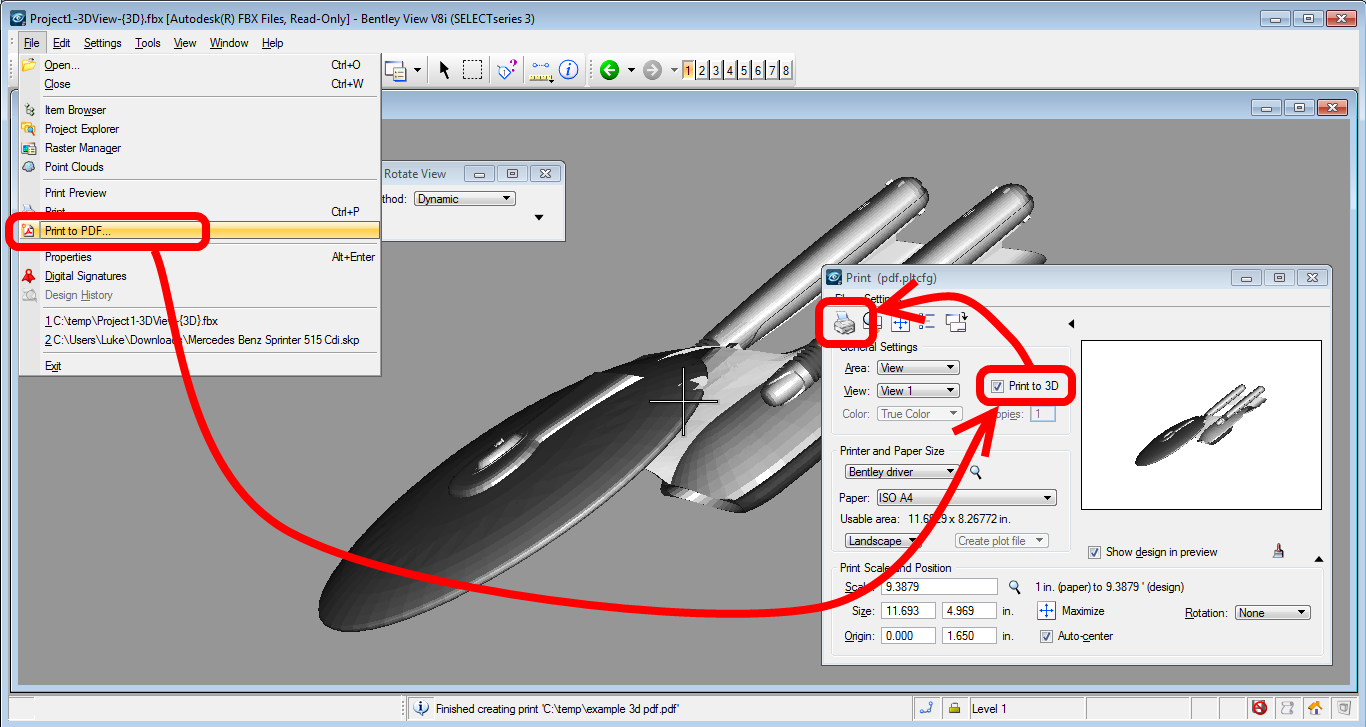
The key difference between this and my previous post about using Bentley View to make 3D PDFs is the fact that it supports opening FBX natively (you don’t need special exporters) – and FBX is a format that Autodesk also supports extensively. Bentley View can open lots of other formats too…check it out:
Now, to those who cry “Nay, but a DWF is better…”
Personally, I think the most limiting factor in the use of 3D PDF for visualization is that it doesn’t support textures (as per the limitations of U3D format in the notes at the end of this post).
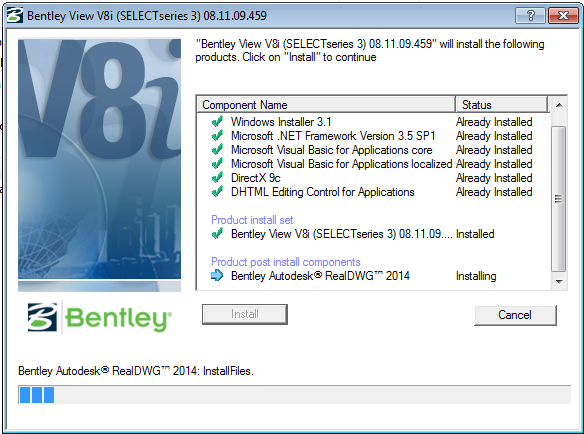
Bentley View V8i (SELECTseries 3) update 2 has some key changes:
Key updates are described at this link.
To easily deploy Bentley View easily, you will need two packages:
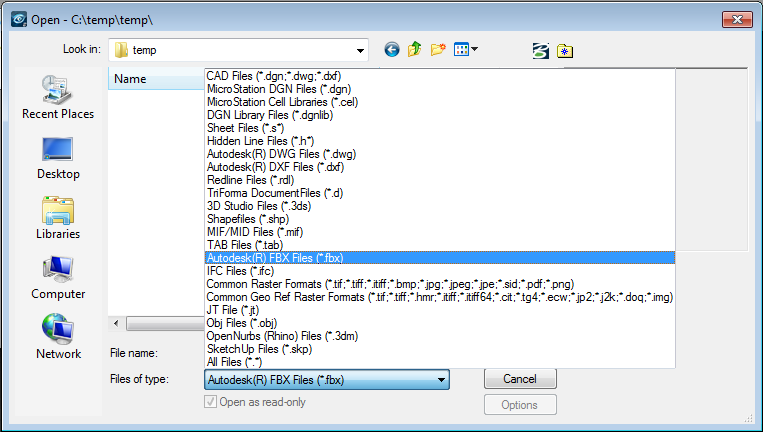
Ok, what if you are using an earlier version of Bentley View that can’t open FBX directly?
Some notes:
Limitations of U3D:
Texture mapping is currently limited to only a diffuse map per material…Okino’s Universal-3D (.u3d) 3D File Export Converter
Photoshop 3D capability:
Note:
In Photoshop CS5 and CS6, 3D functionality was part of Photoshop Extended. All features in Photoshop Extended are part of Photoshop CC. Photoshop CC does not have a separate Extended offering.
You need photoshop cs3 or later for 3d model importing. It will definitely import a .obj. As mentioned you need acrobat pro or acrobat X to import u3d files to use in a pdf. If you do not have access to cs3 or later there are other alternatives for viewing models. Do you specifically need to have a 3d pdf? If not you can download the .fbx plugin for quicktime, you can then export you scene or model as an fbx and open in quicktime and it will server a a 3d viewer. Thee are also numerous other obj viewers available on the net just look around. Wings 3d is a full modeling app that is free and very lite in size and should be able to open several types of 3d files.
CGTalk – How to covert the 3d model to .u3d and put in to PDF
Wings 3D can import FBX and export VRML / WRL:
Wings 3D – Wikipedia, the free encyclopedia
Download at http://www.wings3d.com/?page_id=84 (2011 software)
Well, its available somewhere. I can’t seem to get the link going here in Australia, but Steve Bennett did (see image and tweet below). I’m guessing this is only in certain localities?
Here is a PDF about it:
http://static.autodesk.net/content/dam/autodesk/www/products/autodesk-revit-family/docs/pdf/Revit_RevitLT_online_trial_final.pdf
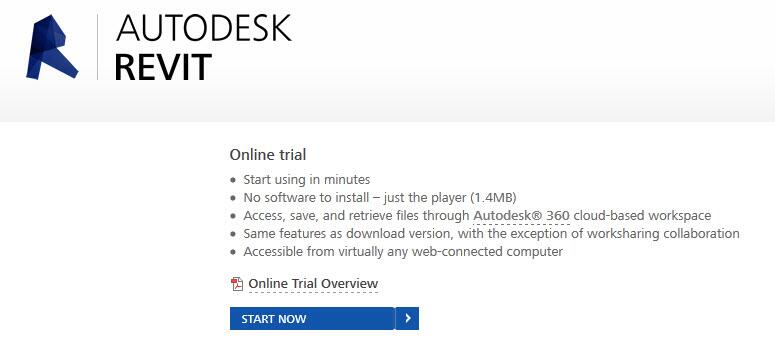
And some Google search results:
Heads-up:
HUGE! #Revit trial in the cloud!!!*** http://t.co/2v1roCaxVZ***NOTE: Workshared projects are not supported… pic.twitter.com/P1UyeFfdGa
— Steve Bennett (@SteveBennett723) August 14, 2013
Just installed CloudWorx (more on this later) and it had a GUID conflict with CADtoEarth – weird? Wonder if the installer somehow couldn’t properly generate a unique identifier (see image).
In any case, Jeremy describes how to generate a new GUID over here, but I couldn’t find GUIDgen.exe easily on my XP 64-bit PC, so I downloaded GUIDgen from:
http://www.microsoft.com/en-us/download/details.aspx?id=17252
You will need to join pdxRUG to download. And yes, it has more than 100 pages:
http://files.meetup.com/6696572/Mass_class_PDXRUG_handout_by_marcello_Sgambelluri.pdf
Embedded video of the July 2013 meeting:
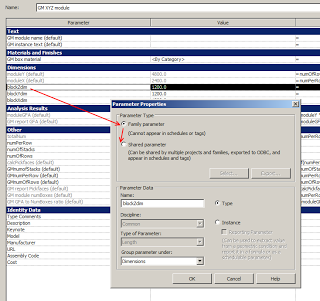
Did you know you could swap a previously added Family Parameter for a Shared Parameter?
Just select it in the Family Types dialog and click Modify…
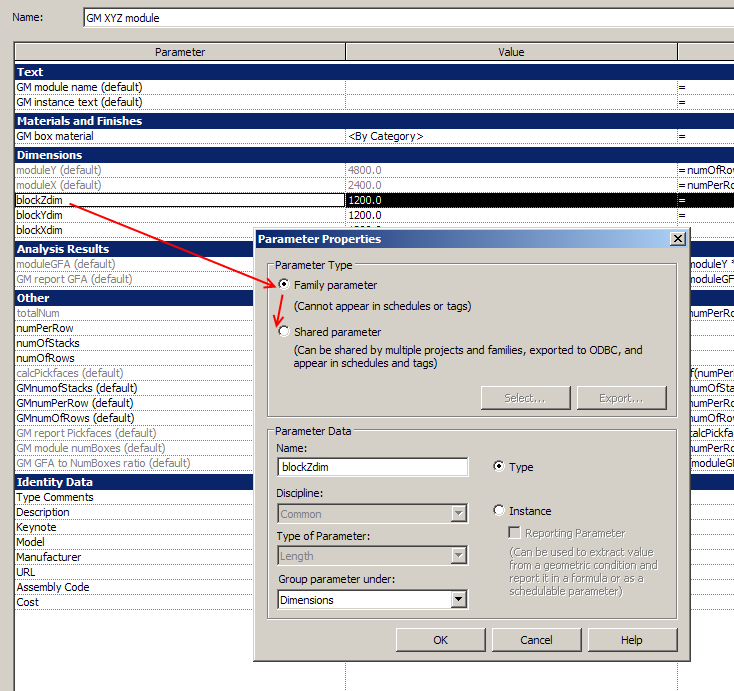
Next question – should you swap, or just add the SP and equal it by formula? What’s your opinion?
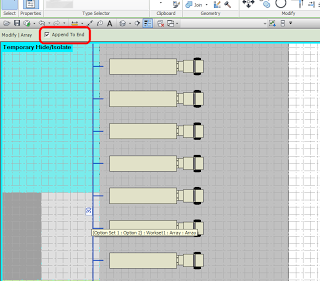
When you select an Array element (the line with the blue number), did you ever notice the little checkbox in the Options Bar?

By toggling this value, you can tell Revit to either add extra elements between the first and last element (thus squashing the elements closer together), or append elements to the end of the array using the current spacing.
Heads-up for this great little tip goes to Revit Family Planner:
Die Optionsleiste oder Neues (?) beim Reihe-Befehl