Once you have imported an image into Revit and then warped it (by unticking the Lock Proportions box and resizing it), then it is not immediately evident how you can reset it to 1:1 (its default X:Y state).  Even if you toggle the tick box, it doesn’t reset the scale to be un-warped.

Here is how you can do it:

  1. Select image and Edit Type
  2. Take note of the pixel sizes
  3. Directly set the image size using these values in the instance properties
  4. Tick the Lock Proportions box

Also, did you notice that Revit records where the image was originally loaded from?  Even though there is no ‘link’ as such, this does allow you to find and edit the source image easily.

    Some of you may be surprised to know that Windows Photo Viewer and Office Picture Manager are not the only ways to view and edit image files 🙂  Here are three of my favourites:

    1)  Irfanview has been updated to version 4.35.  You can download from CNET here.  This is a superfast image viewing and editing program.  I love it for its highly adjustable batch image processing ability.

    You can download all the current plugins from here.  This includes a new plugin that will allow Irfanview to open DXF files, as per this list.  The DXF plugin is provided by BabaCAD – they also provide free CAD software for download at http://www.babacad.com/index.html

    2)  Paint.NET – quick and easy

    3)  Photoshop – awesome filters and effects, and great at enhancing still photos of your buildings

    4) GIMPAndy Milburn reminded me about this in the comments.  I haven’t used it for a long while, but it is essentially a free replacement for Photoshop.

    5) pixlr – another great tip from the comments.  RicardoCC referred me to this online image editor that was actually purchased by Autodesk.  Have you tried it yet?

    From time to time, I export all of the families in a project and add it to our Library as a ‘snapshot’ of where our families were at during that project.  However, Revit still does not export the families into folders by Category (there used to be an add-in that did this).

    Happily, a new free tool from Kiwi Codes will take a folder and then sort all of the RFAs into folders by Category for you!

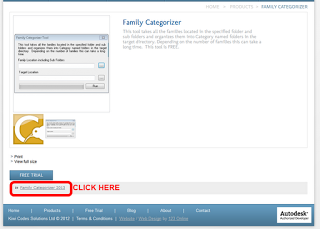
    1. Download (need to submit email as per image below). 
      You can also download it from Autodesk Exchange. (direct link)
    2. Install
    3. Run from Revit

      I did a test run of this on about 200 families – it sorted them in a couple of minutes.  If you don’t know how to export families from a Project, just go:

      1. File – Save As
      2. Library
      3. Family
      4. All families

      From their website:
      This tool takes all the families located in the specified folder and sub folders and organizes them into Category named folders in the target directory.
      via
      Family Categorizer | Products | Kiwi Codes Solutions Ltd

      Heads-up via
      Family Categorizer | AEC-APPS

      EDIT 2 – I have received confirmation from the Director of Kiwi Codes that the tool is “totally Free and not time locked …”

      EDIT – While the website clearly states ‘This tool is free’ (see image above), I received the following by email:
      Thank you for your interest in Family Categorizer and downloading the 21 day trial. We hope that you see the benefits that Family Categorizer will bring to your business like others worldwide are reporting.
       

      There are at least two distinct ways to move an item via dimension edit in the Family Editor, but they can have very different results.  See video:

      My video is directly derivative of one from Steve Stafford last week.  Steve demonstrated some interesting behaviour along basically the same lines at:
      Revit OpEd: Two Minutes with Constraint Quirkiness

      You will find below a visual diary of some site master planning options – the Divide and Repeat tool was used to layout out the units.

      Here is a very concise how-to:

      1. Make a new Mass or Adaptive family (in-place or component)
      2. Draw a Spline
      3. Select it and hit Divide Path
      4. Place a two-point based Generic Model Adaptive family spanning two of the points
      5. Select it, and then click the Repeat button

      The images below will tell you more:

      Further reading:
      Use Divide and Repeat to Create A Curved (elevation) Railing – WikiHelp

      Very cool and advanced workaround by Jose Fandos over at Andekan:
      We will route around this limitation by first inserting the annotation family into another face-based family, and using this intermediary face-based family to place the annotation the way we want into the final Lighting Fixture.
      via
      Symbols for Lighting Fixtures Showing in Plan – Andekan � Blog

      He also demonstrates that some Lighting Fixtures will display the Maintain Annotation Orientation checkbox, but some will not, and how to work around this.

      We had a set of Detail Plan Views that had a graphic stutter, or jerkiness when zooming.  Basically, if you went one click on your mouse wheel, it would take a few seconds to zoom in and regenerate the view.

      In the end, it turned out to be some shape edited floors, far outside the crop boundary, that were causing the problem.  Once I had added these to a saved Selection Set and then hidden it off, the zooming was smooth again.

      A little story about Diagnosing the problem:

      • Checked in other plan views – these seemed to zoom ok
      • Changed View Templates
      • Changed View Type
      • Switched off Worksets until the problem was corrected – thus found that problem elements were in Workset1
      • Turned off all Model Categories – problem corrected.  Now, which category is causing the problem?
      • Turn on about 10 categories at a time – when the problem reappears, you just need to narrow it down a bit further
      • Problem category was Found – Floors
      • Now, go to a 3D view, isolate Floors and try to figure out which element is causing the problem.  In my case, I could safely hide off all of the shape edited floors.