This is the first WHQL-certified driver from the R295 family of drivers. It is the recommended upgrade for all GeForce users…

These drivers come packed with GeForce-exclusive performance and quality enhancements and are now Microsoft WHQL-certified.

Version:

295.73 WHQL

Release Date:

2012.02.21

Operating System:

Windows Vista 64-bit, Windows 7 64-bit

Language:

English (U.S.)

File Size:

157 MB

Download

via
NVIDIA DRIVERS 295.73 WHQL

The Autodesk BIM for Architecture, Engineering, and Construction Management Curriculum can be freely accessed from here.  Click on the various Units on the right hand side of the page.

For example, Unit 1 contains links to various whitepapers.

You can view all of the Curriculum videos here.

Heads up via:
Google Translate of Education – Curriculums BIM Revit Architecture pour les Professeurs en t�l�chargement gratuit ! – Village BIM

WSP Group is a global design engineering and management consultancy specialising in Property, Transport & Infrastructure, Industry and Environment projects.

They recently released a report entitled:
10 Truths about BIM
THE MOST SIGNIFICANT OPPORTUNITY TO TRANSFORM THE DESIGN AND CONSTRUCTION INDUSTRY

Personally, I find the following so-called ‘truths’ most challenging:

  • 4 – BIM will destabilise the construction industry.
  • 9 – The software platform is at a crossroads.

I’m unsure what is fully meant by ‘destabilise’ in point 4, but I guess if it means a shake-up, then that is probably true.

Point 9 is quite interesting – I think we are about to see a new battle in software – the battle for Data.  At the moment, we have plenty of model creation tools, and none that truly dominate (Revit, ArchiCAD, Bentley are probably the best known).  But the next phase of BIM software seems to be the client-server packages that store and present your data, such as VEO.  You can read more about some of these competing technologies here.

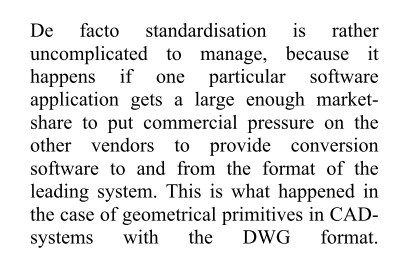
In the report, it quotes from another article entitled CAD standardisation in the construction industry — A process view, which can be downloaded from here.  This document makes an interesting observation with regard to ‘de facto’ file format standardisation:

And its quite true – DWG, PDF and MP3 have gained ubiquitous status because they won the war to be the defacto exchange format for their particular medium.  We don’t have that yet for BIM – but I guess it is coming…

You can download the full WSP report here.

What do you think?  Have you read the report?  Feel free to comment…

10 points via WSP blog post:
BIM: 10 truths about BIM

Heads up and PDF link via:
Village BIM

Here is the problem – I have two linked files, set as separate options in the same Option Set. If any of the Room elements overlap in the two linked files when placed in the host file, and I have the view set to a Secondary option, the Room Tag fails:
None of the created elements are visible in Floor Plan: UPPER FLOOR PLAN – Option 2 View. You may want to check the active view, its Parameters, and Visibility settings, as well as any Plan Regions and their settings.

If I move the link in the secondary option AWAY (geographically) from the link in the primary option, the Room Tags work fine.

The workaround that I am currently using is this:

  1. Place the two link files in different Option SETS.  In this way, both the Revit links can be a ‘primary option’.
  2. Make a ‘blank’ option in each of the Option Sets.
  3. In a plan view, set the Visibility / Graphics such that the link you want to see is selected, and in the other Option Set ‘blank’ is selected.
  4. You should now be able to tag these Room elements through to both of the links in the different Option Sets. 

    EDIT:
    If the above doesn’t work for you, do this:

    1. In a plan view, move the link you want to tag ‘away’ from the other link a known amount.
    2. Tag the Rooms in the link in the new location, then
    3. Move the link back into the correct place.  Revit will prompt to move the Room Tags for you…

    Rethinking BIM is a kinda awesome new BIM site – you should definitely check it out.

    There are lots of videos and downloads available.  Some of this stuff looks like it has been collected or derived from the blogosphere or web in general.

    One recent post provides an example file that can help you to find the surface normal in an Adaptive Component

    Image from Rethinking BIM

    Download the File From Here:
    Link

    via
    Finding the Normal in an Adaptive Component � Rethinking BIM

    Sometimes you want to save some Revit elements for later – like throwing them in the cupboard until you need them.  Here are five ways to do that:

    1. Group, then Link, then Unload the Link (you can copy / paste things from a link instance later)
    2. Add the elements to a secondary Design Option
    3. Put the elements on a Hidden Workset
    4. Put the elements in a Future Phase (after the current job phase).  Or, put them in a phase previous to Existing and then demolish them all in the same phase.  You can also put Views, like Sections, in a Future Phase to keep them in the model but stop them from showing in any plan views.
    5. Group the elements, Pin the Group, Duplicate the Group Type, then delete everything from the new type.  (Technically, you will need to keep at least one thing in the Group – so keep something that won’t print in there.)

    EDIT For some reason the original video is not working.  It was also referenced on Wikihelp here, and that embedded version is broken too.  I tried to contact Youtube user cwm9 but did not get a reply.  I have re-uploaded to here:
    http://www.youtube.com/watch?v=RuYely7lu-0&feature=youtu.be

    Wow 🙂

    Broken version, was at: http://www.youtube.com/watch?feature=player_embedded&v=mVHgJFrBvC0

    From the narrator (?):


    “Uploaded by cwm9 on Dec 3, 2011


    The coordinate system or Revit has been rehashed many times on blogs and posts, but has been clear as mud for me, and I suspect a lot of other people. So I took the time to really figure out it, and here’s a 30 minute explanation of how Revit’s coordinate systems work, interrelate,
    how true north works, and how to put multiple copies of a building on a site.”

    You can’t make a schedule of Levels in Revit.  I won’t get into the argument of “should you be able to” or not.  The fact is, some people want to make a Level Schedule.  Here I provide one workaround that works for the current version of Revit.

    1. Download this example Revit project file
    2. Copy / paste an instance of the LEVEL SCHEDULERS family into your project
    3. Make a section view where you can see the family in profile, just like in the example RVT file:
    4. Copy / paste the LEVEL SCHEDULE into your project
    5. You need to place one instance of the family ON EACH LEVEL, and then lock the handle to the ZERO LEVEL (always).  If your level is BELOW ZERO, then use the Yes/No tickbox for that instance.
    6. Once all the families are placed and locked, you have a Level Schedule that will adjust when (if) your levels move.  Obviously, if a new level is placed, you will need to add a new instance of the LEVEL SCHEDULERS family.

    Do you have another workaround that is perhaps easier or quicker or more BIM than this one?  Feel free to comment…