Link to the presentation:
2012-04-10 – HARUG – Top 10 Revit Tools for Project Management and Panel Discussion – Presentation (pdf)
When was it: Tuesday, April 10th, 2012
via
April 10th 2012 Meeting � Houston Area Revit User Group

What Revit Wants

Link to the presentation:
2012-04-10 – HARUG – Top 10 Revit Tools for Project Management and Panel Discussion – Presentation (pdf)
via
April 10th 2012 Meeting � Houston Area Revit User Group
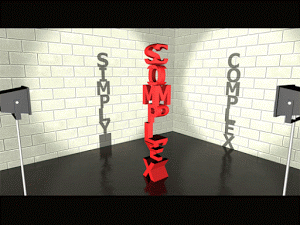
Most of us use the old Reference Line with angular dimension method to control rotation in our vanilla Revit families.
However, Marcello Sgambelluri has posted three alternative methods to control rotation and angular dimensions, with full step-by-step instructions, at his blog Simply Complex.
Marcello says:
I have given three rotation rig methods that do not use the angular dimension parameter in these last two postings. These methods are the Ride the Rail method, the Open Reference Circle method, and the Revolve method.
So the method names again are:
Read more about them at:
Simply Complex: ROTATION RIGS THAT DO NOT USE THE ANGLUAR DIMENSION PART 2
and
Simply Complex: ROTATION RIGS THAT DO NOT USE THE ANGLUAR DIMENSION

Here is a nice idea from the Revit Templateer – make an invisible project setup sheet so that you can see and edit ALL of the important project data in one place!
Read more at:
Revit Templateer: Project Set-Up Sheet
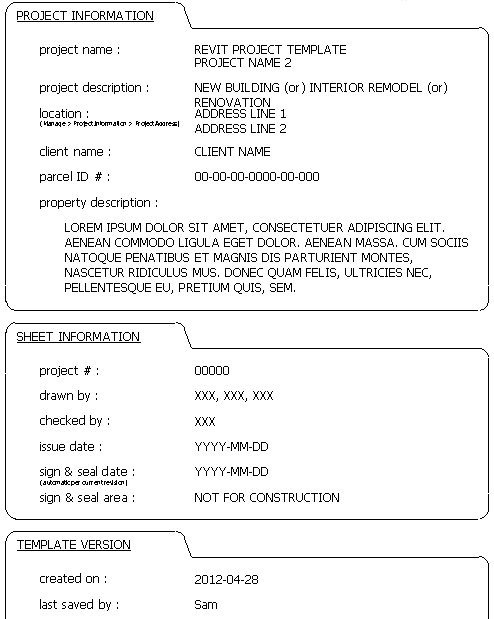 |
| Image from the Revit Templateer |
As per the Revit Architecture 2013 Known Issues:
Hardware acceleration is not available in the Parallels 7 environment, and Revit will revert to a DirectX 9 based software graphics mode, which will not render materials, sky, artificial lights, and other features when the Realistic visual style is in effect.
o Workaround 1: When you first start Revit and see the Graphics Options – Cannot Use Hardware Acceleration dialog, select the Save Hardware Acceleration Setting option, and then close and restart Revit. Upon restart, DirectX 11 software mode will be used and features will display correctly in Realistic visual style.
o Workaround 2: Manually add the following to the [Graphics] section of the Revit.ini file before startup: UseGraphicsHardware=0
Dig down to the Revit folder in program files, where Revit.exe lives, and look for a file called AdskHardwareCertificationReport.xml. Delete this file. Revit will now allow you to enable hardware acceleration, and performance will be MUCH better than the no HA fallback of using WARP (which is an API that uses the CPU to mimic graphics hardware and manages to provide performance on par with, say Intel HD2000 hardware). WARP is much better than true hardware acceleration disabled as in earlier versions, but no where near as good as Parallels virtual hardware.
End Edit
This issue was also reposted at microsolresources.com:
Workaround 2: Manually add the following to the [Graphics] section of the Revit.ini file before startup: UseGraphicsHardware=0″
Workaround 1 did not present itself to me, but workaround 2 was pretty easy to achieve:
[Graphics]
TempDimFontSizeInPoints=12
InvertBackground=0
Antialiasing=0
SemiTransparent=1
UseGraphicsHardware=0
I added the last line above to the 2013 Revit.ini file, restarted RAC 2013, and….
As they say these days: “SWEET!!”
Let’s say you have installed Revit 2013 but you want to use Revit 2012 as your default Revit for the time being (and I don’t blame you).
Here are the steps from RevitForum (thanks Menschmal).
Instructions to set the correct revit.exe file as default for opening Revit files from the file browser in Windows 7
(e.g. I am testing Revit Architecture 2012, but I want 2011 to be my default for now)
Open the Registry Editor (type regedit in the command line in Windows). If you are concerned about messing something up, back up the registry before making any changes.
In the Registry Editor browse the tree to the branch below:
HKEY_LOCAL_MACHINESOFTWAREClassesRevit.Project shellopencommand
In the right pane you will see:
Name: (Default)
Type: REG_SZ
Data: “C:Program FilesAutodeskRevit Architecture 2011ProgramRevit.exe” /dde
Double-click on (Default) and the Edit String dialog box will open.
Edit the Value data field for the correct location for the version of Revit you want to use. For example, I changed 2012 to 2011.
Close the Registry Editor and you are good to go. This change seems to be the universal default for all extensions that open with the Revit.Project application (.rvt, .rfa, etc.).
Thanks to Menschmal at:
http://www.revitforum.org/architecture-general-revit-questions/548-default-revit-version-4.html#post15485
importing IFC2x4. Thanks to Geometry Gym, and Jon Mirtschin in particular, an IFC importer add-on for Revit 2012 is under development that aims to support IFC2x4 with nurbs profile / perimeter exchange.
Jon says:
I’m developing the Revit addon to import these files as the functionality is not available in the native importers. I haven’t built for Revit 2013 yet, but if you have Revit 2012 and want to try, the installer is available from http://www.geometrygym.com/downloads
via the comments at:
Geometry Gym: NURBS GH to Revit
And here is the link to the current build of the IFC 2×4 importer for Revit 2012:
ggRevitIFCx64 v0.0.11.msi (24th April 2012)
Note, Revit 2012 64 bit Addon to import IFC files.
This is an early public release for initial feedback and comment. Addon undergoing rapid development. Please use with care and send suggestions and observations.
(from http://ssi.wikidot.com/downloads)
 |
| Image from Geometry Gym |
Here is an excerpt showing how IFC2X4 RC2 improves geometry capability:
From http://buildingsmart-tech.org/ifc/IFC2x4/rc2/html/annex/annex-e/IFC2x4-RC2_whats-new.htm
Double Click Middle Button in a view = Zoom to Fit
Double Click on a component Family = Edit the Family (open in the family editor)
Some people like the new Stairs functionality?
http://blogs.rand.com/architectural/2012/03/what-really-matters-for-2013.html
Sketch stairs can be added to an Assembly, but Component Stairs can’t…
Multi-segmented grids:
To create a multi-segmented grid, select the Multi-segment tool in the Draw panel of the Modify|Place Grid context tab. This will enable sketch mode for you to draw the grid line. This will work on linear and radial grids or a combination of lines and arcs in the sketch, but must be a continuous segment.
http://blogs.rand.com/support/2012/03/revit-2013-miscellaneous-improvements.html
Arc grids are also available:

Sometimes you have a bunch of model objects of different categories and you want to quickly change the Phase Created of all of them at once. And sometimes, I find that the persistent Properties in Revit doesn’t always reveal ‘Phase Created’ when objects of different categories are selected (this is in Revit 2013 – more investigation required).
In any case, to quickly change the phase of lots of model objects:

Together with our new colleagues at Trimble, we plan to continue making our tools for the building professions as innovative, intuitive and (dare I say) fun to use as we always have.
Read more at http://sketchupdate.blogspot.com.au/2012/04/new-home-for-sketchup.html
I have previously posted about Trimble at these links:
What Revit Wants: Trimble Acquires Tekla
What Revit Wants: Trimble develops point creator plug-ins for Revit and other BIM software
Steve made a few interesting points today about Revit and DWG (Import) extents. I previously posted about Revit accuracy and precision here.
However, did you notice this new setting when importing a DWG in Revit 2013?
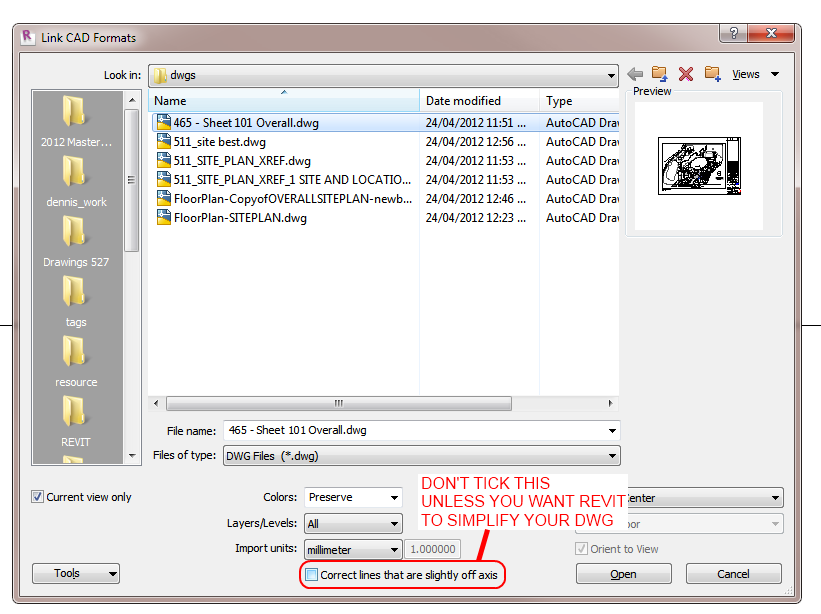
If you UNtick the box that says Correct lines that are slightly off axis, then Revit 2013 will bring in the DWG as-is. It won’t try to straighten things up to make the DWG more Revit-friendly.
Obviously, use this with care. But for me, 9 times out of 10 I want the DWG to come in EXACTLY as it was drawn.