Download the September 2011 issue:
Low Resolution PDF (11.5mb)
High Resolution PDF (33.7mb)
Read it Online
Main page at:
Issues | AUGI

What Revit Wants

Download the September 2011 issue:
Low Resolution PDF (11.5mb)
High Resolution PDF (33.7mb)
Read it Online
Main page at:
Issues | AUGI
Interesting comment from the Autodesk deployment blog, Up and Ready:
We have been getting a lot of posts in our forums regarding corrupt installations and downloads. My suggestion is to use Firefox and the Browser Download instead of using the Download Manager.
via
Downloading Software: Browser Download vs Download Manager – Up and Ready
I have previously posted about using Firefox and DownThemAll to download Autodesk content.
There are some other great third party download managers available – which one do you use?
Jdownloader is quite unique and powerful – check it out if you haven’t before. From the website:
It simplifies downloading files from One-Click-Hosters like Rapidshare.com or Megaupload.com – not only for users with a premium account but also for users who don’t pay. It offers downloading in multiple parallel streams, captcha recognition, automated file extraction, and much more. Of course, JDownloader is absolutely free of charge.
Another option to add to the Parallels / Bootcamp debate:
Download link:
Microsoft Remote Desktop Connection Client for Mac 2.1.1
When running the deployment under a system account, the deployment appears to complete successfully. Revit appears to run normally, however, some of the user data is misdirected and supporting folders like the Journals folder are not created under <%LocalAppData%AutodeskRevitAutodesk Revit Architecture 2012>. Journal files are then written to C:temp instead.
Read the rest at
Revit 2012: SCCM deployments and the Identity.ini file – Up and Ready
To kill the Communication Center … in Regedit replace all the (1) with (0) see image.
(you will need to login to Revit Forum)
Then rename WSCommCntr2.exe to AAWSCommCntr2.exe
( C:Program FilesCommon FilesAutodesk SharedWSCommCntrlibAAWSCommCntr2.exe)
via this post
New AUBench (archive) – Page 22
Obviously, you may need to change the Registry location depending on what version of Revit you are using…
If you don’t want to manually edit the Registry, you can use the CAD Manager Control utility as per this post:
Revit 2011 closes right after the splash screen – Autodesk Discussion Groups
If you are having Communication Center issues, it may be due to a corrupted XML file. Refer to this Revit support page:
Revit 2010 products hang at or before splash screen
This AutoCAD support page is along similar lines:
How to disable the Communication Center in Autocad?
Many of you already know how to export a combination of differently styled images from Revit and then combine them in Photoshop to create something really interesting.
If you aren’t aware of this technique, check out:
Shades of Grey: IMAGE MANIPULATION

You know when you have two pads meeting at a common edge, and then Revit for some reason shows this tiny sliver of created topography between them?
Try this:
This tip worked for me – I hope it helps you. I’m pretty sure that there are still situations where things still just won’t quite work…but for the time being, Revit Wants you to set adjacent Pad levels at the same value.
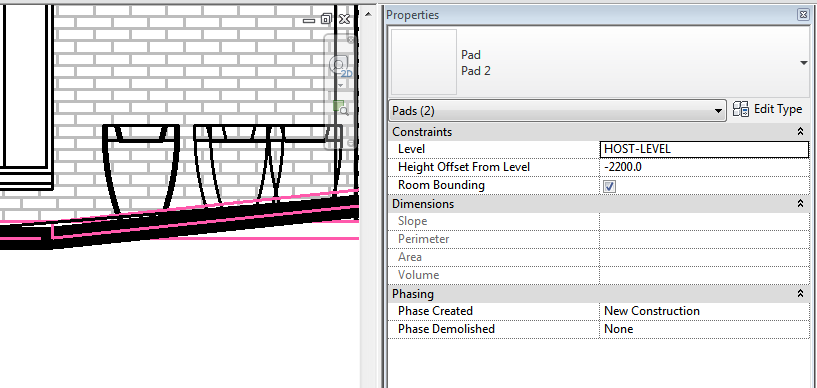
Tip via this thread
Pads Pads Pads…oh and there’s a problem – AUGI
Have you ever been frustrated by Revit when editing the end point of a spline? You try to drag the end point – and instead the entire line gets dragged or scaled!
The problem? You need to Tab-select the actual endpoint after selecting the Spline itself. But you know what? Revit seems to give you no visual cues that you have selected the End Control Point rather than the ‘end point of the entire spline’.
Here is the three ways to modify the spline using the spline end point:
1) Move entire line
Single-click on the end point and drag in one motion
RESULT – entire line gets moved (Press & Drag must be enabled)
2) Scale entire line between endpoints
Select the spline, then select and drag one of the spline endpoints.
RESULT – entire line gets scaled
3) Move the end control point only
Select the spline, mouse over one of the endpoints, hit Tab, then press and drag the point.
RESULT – only end control point is moved, rest of spline remains
Given the big difference between 2) and 3), you would assume that Revit would tell you which one it is going to do, correct? Wrong. The status bar shows the same thing prior to both commands – “Drag Line End”. The tooltip shows the same thing regardless of whether you have pressed Tab or not – “Drag Line End”.
However, if you have incredibly good vision, there is one difference. Have a look at the image below:
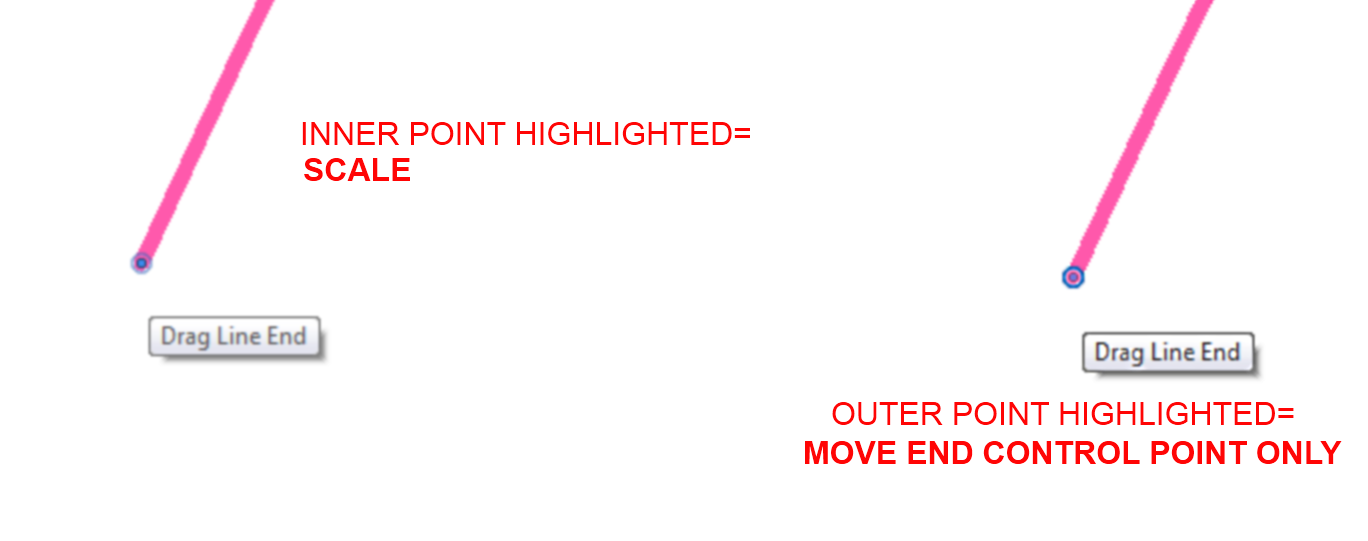
If the inner dot is highlighted, Press and Drag will Scale the spline, if the outer ring of the point is highlighted, Press and Drag will move the Control Point only.
I think the way this works currently is a bit counter-intuitive. Hopefully it will get cleaned up in a future update or new release.
While discussing an interesting baluster-with-lighting family, Steve reminds us that “Revit hates switching between shared and not shared status.”
You have to follow a strict process of deleting and / or renaming affected families that exist in the project if you wish to switch them from Shared to non-Shared, or vice-versa.
If you want to read the rest of Steve’s, post, here is a link:
Revit OpEd: Dept. of Quirky – Baluster with Light Fixture

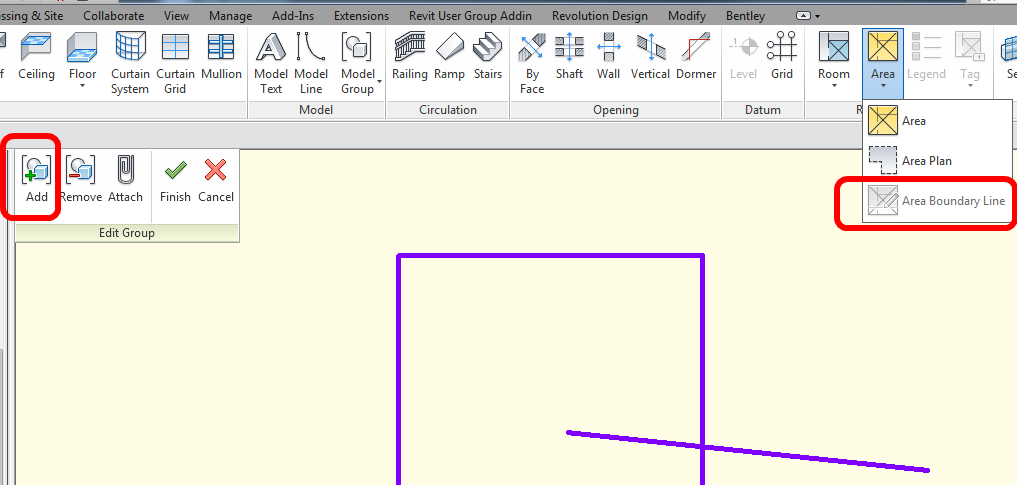
When in Edit Mode for a Model group, the Area Boundary Line tool is grayed out.
However, to work around this limitation, you can:
It is an unusual limitation, but the above workarounds are not too onerous.