Have you ever been frustrated by Revit when editing the end point of a spline? You try to drag the end point – and instead the entire line gets dragged or scaled!
The problem? You need to Tab-select the actual endpoint after selecting the Spline itself. But you know what? Revit seems to give you no visual cues that you have selected the End Control Point rather than the ‘end point of the entire spline’.
Here is the three ways to modify the spline using the spline end point:
1) Move entire line
Single-click on the end point and drag in one motion
RESULT – entire line gets moved (Press & Drag must be enabled)
2) Scale entire line between endpoints
Select the spline, then select and drag one of the spline endpoints.
RESULT – entire line gets scaled
3) Move the end control point only
Select the spline, mouse over one of the endpoints, hit Tab, then press and drag the point.
RESULT – only end control point is moved, rest of spline remains
Given the big difference between 2) and 3), you would assume that Revit would tell you which one it is going to do, correct? Wrong. The status bar shows the same thing prior to both commands – “Drag Line End”. The tooltip shows the same thing regardless of whether you have pressed Tab or not – “Drag Line End”.
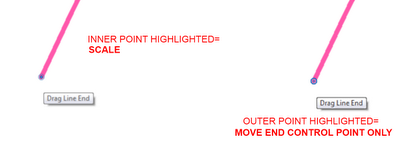
However, if you have incredibly good vision, there is one difference. Have a look at the image below:
If the inner dot is highlighted, Press and Drag will Scale the spline, if the outer ring of the point is highlighted, Press and Drag will move the Control Point only.
I think the way this works currently is a bit counter-intuitive. Hopefully it will get cleaned up in a future update or new release.


Thank you, that has been bugging me for ages.