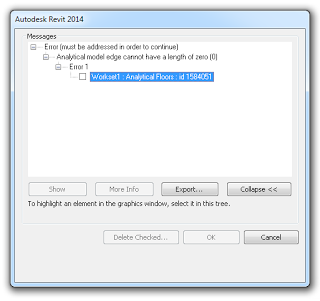
If you want your entire geographically separated team to have access to the same linked files, you need to upload them to Revit Server. This also goes for CAD / DWG files, which will need to be imported into an RVT if you want to save them directly to RS.  2D DWG files can be referenced by Linked View in the host project if necessary.

Here is a bit of a workflow that may help:

1 Open the consultant model in appropriate version of Revit
2 Enable Worksharing (if it isn’t already)
3 Save As … 
a) if this is the first “save” of the consultant model to Revit Server, use a generic name like link-Structural.rvt and save onto Revit Server in the appropriate folder (if you have one for links)
or/ 
b) if this is an updated model, overwrite the existing consultant model, using current name in the Revit Server Link folder
4 Use Reload on this new Consultant model in Manage Links of Architectural (our) host model
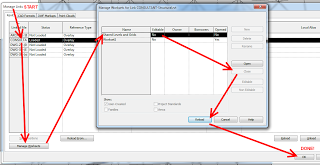
5 Close the Shared Levels and Grids workset for the Consultant Model, like this:
 
6 Sync with Central.  The Consultant model has now been imported / updated onto Revit Server, and other team members should be able to access it.

More info:
Help: Linking Server-Based Workshared Models

Other links and info:
This RFO post details what some firms are doing with Revit Server and links:
Revit Server & Linked Consultant Files

Revit Server Administrator 2013 displays “Server Error” upon loading the GUI

10 Things to Know About Revit Server – The Revit Clinic

Removing and Replacing Models on Revit Server – The Revit Clinic

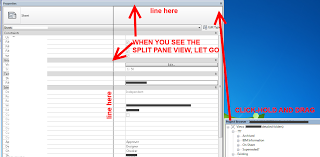
Most of you know that in Revit 2014, you can stack Project Browser, Properties Palette and other “panes” on top of each other, resulting in a tabbed dialog.

But did you know you can also drop them beside each other, resulting in a Split Pane view?  Like this:

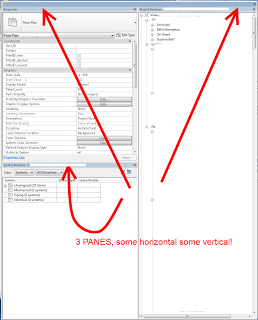
Note: you can also do this with panes stacked on top of each other.  And, it is not limited to two panes vertically or horizontal, you can do a mixture, like this:

I am loving Navisworks more with every passing day.  A job doesn’t have to be a fully collaborative / coordinated project in order to get benefit from Navis.  Here is a collection of recent information and resources relating to Navisworks.  Hope you find something interesting!

Firstly, a link to the Navisworks updates page.

On Revit – Navisworks implementation generally:
“… contractor will import the Revit model into Navisworks and use Navisworks to ‘virtually construct the building’, creating construction sequences to ensure every element slots into place, almost like a jigsaw. Linking the model to packages like Microsoft project will allow digital construction monitoring against the project schedule. This is happening all over the world…”
via
http://revitst.blogspot.in/2013/08/revit-collaboration.html

Using Catalogues in Navisworks Quantification:
http://beyonddesign.typepad.com/posts/2013/08/using-catalogues-in-navisworks-quantification.html

Coordinating Models stored in Vault using Navisworks:

http://beyonddesign.typepad.com/posts/2013/08/managing-your-discipline-and-coordination-models-with-autodesk-vault.html

Up and Running with Autodesk Navisworks 2014
by Deepak Maini

I have been reviewing this book and I really enjoy its content.  It is detailed, comprehensive and easy-to-follow.  Highly recommended for those who are learning Navisworks or those who want to increase their proficiency and efficiency when using Navisworks… More on this book in a future post.

Downloads (via this):
Table of Contents
Tutorial files

Australia / NZ purchase page:
here

Amazon page for the Up and Running book:
http://www.amazon.com/Up-Running-Autodesk-Navisworks-2014/product-reviews/1482605279

Training course by Deepak:
http://www.cadgroup.com.au/community/blog/cadblog/index.php?showentry=330

4D IFC Importer for Navisworks Manage 2014
At this point in time, you can’t create products in Navisworks from the API, but if you import the IFC using the native importer (IFC2x3 only), then you can run my IFC enhancer (plugin can be downloaded from http://www.geometrygym.com/downloads ) which can generate the timeliner tasks and identify the ifc products by their unique identifiers.
Download:
ggNavisIFC2014x64 v0.0.02.msi (18th October 2013) Navisworks 2014
New plugin to extract 4d information from IFC files and convert into Navisworks timeliner.

Read more:
http://geometrygym.blogspot.com.au/2013/10/navisworks-4d-ifc.html

Revising large sets of drawings in Revit can be a little challenging.  I previously posted about a method using Detail Groups, but these two tips are pretty great too:

“One other thing I thought of that is a bit more automatic is to create a revision cloud on one sheet, copy it, and the in the Paste drop down box, choose aligned to selected views.  You’ll get a list of all the sheets in the project, where you can paste the cloud.  Then turn the visibility for the clouds and tags off for that revision, and now each sheet that’s part of that “issue” can be scheduled via a typical sheet index with a parameter for revisions enabled.”
Ross Kirby
BIM Manager

What about for large revision sets for a particular project issue package?  Here:
“Gotcha, so what you’re talking about is not a revision, per se, but more of an issue package (like a 75% set, bid set, or permit set), right?

For those situations, we have a shared parameter that we use as part of the project information parameters, and a separate section in the titleblock for those labels.  That gets manually filled in on one sheet, and is propogated to all other sheets.”
Ross Kirby
BIM Manager

Great stuff Ross!

Read the whole thread:
http://forums.autodesk.com/t5/Revit-Architecture/Revit-Change-Revision-to-Multiple-Sheets/m-p/4322508#M70456

Ah, the simple option is often best.  Just close the Workset that has Levels and Grids on it in the Manage Links dialog.  See image:

Idea from this post on Revitize (it uses language related to older Revit versions):

Go to File menu > Manage links… and select the structural model and select ‘Reload From…”

and select the same linked structural file. Before pressing ‘open’, select the small arrow next to the ‘open’ button:

and select specify. Then press ‘open’. Revit shows the ‘Linking Worksets…” dialog box.

Select the ‘Shared Levels and grids’ workset and press ‘close’ and then Ok and again Ok. Now the ‘Shared Levels and grids’ workset from the linked file is closed and is NOT visible in any Revit view. Even though the linked grids are not visible, Revit still ‘monitors it!!!

If for some reason you want to see the structural grids, you can repeat the steps above to make them visible.

“You can’t do that in Revit” is a common catch-phrase for those who do not know the program well.  Happily, there are people out there who do know how to do those things in Revit – you just have to find those people and take the time to learn from them.  One such person is Paul F Aubin.

He is the author of many Revit-related books, but the most recently published edition focuses on using Revit to make and present Classical and Renaissance building forms and architecture.  What I like about this particular work is that it does not just cover simple “how-to” steps for certain tasks.  It has a larger and more interesting scope.

Combining elements of history, architectural theory, good Revit practices, and of course, the “how-to” bit as well, Renaissance Revit is well worth a read.

It is hard to put it better than Andy Milburn in the Forward:
“The fact that you are reading this foreword suggests that you too are excited by what Revit can do. Take my advice. Grasp the nettle. Don’t look back.
(yes, I did have to look up what “grasp the nettle” meant 🙂

The book delves into proper use of the two key Revit family environments: the traditional Family Editor, and the Massing Environment.  While it may initially seem that the content of this edition is for advanced users only, in actual fact Paul has provided appropriately basic parts to help beginner Revit users, and at the same time even highly experienced users will have the occasional moment where they say “ah, that’s much better than the way I currently do that…”

It is packed with detailed diagrams, images, formulas and workflows.  Here is just one example:

Datasets of lessons are included, with additional progress files provided at logical points through the lesson.  You will be able to download “completed” versions of those families by registering at paulaubin.com.  Also of note – Aaron Maller is the technical editor, and I’m sure most of you are aware of his excellent Revit reputation. 

Discounted pricing available at:
Renaissance Revit: Creating Classical Architecture with Modern Software | Paul F. Aubin

(You can choose between a Black and White or a Full Colour version)

You can also read Paul’s post:
Renaissance Revit Now Available | Paul F. Aubin

Lastly, consider this brief list as a “teaser” of the real scope and value of what is included in this book:
“we will look at practical examples of how to approach many common Revit challenges, such as:

  • Strategies to planning and building reusable family content
  • How to control scale and proportion reliably
  • How to parametrically control curves like arcs, ellipses and compound curves
  • Strategies for working with appropriate levels of detail
  • Approaches to effectively managing repetitive elements
  • Building rules, relationships and design intent into your content
  • Strategies to use two-dimensional geometry instead of 3D

Thank you, Paul Aubin, for bringing a new level of depth and class to the greater Revit bibliography.