EDIT: My post was up before the app I think!  Here is some more info:
Itunes App Store link:
https://itunes.apple.com/us/app/autodesk-formit/id575282599?ls=1&mt=8

Autodesk page:
http://autodeskformit.com/

Autodesk RSS feed for Formit:
http://autodeskformit.com/feed/
And some more from Autodesk FormIt & Revit – The Revit Clinic:

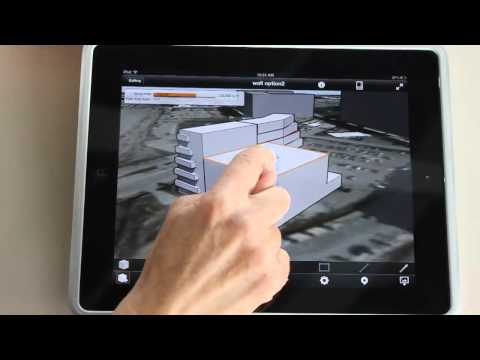
Express design ideas with easy-to-use tools:

  • Create forms quickly from a gallery of shapes
  • Directly manipulate forms using gestures for easy model changes
  • Save designs to the cloud and share with others

Easy access to site information:

  • Set project location in a searchable maps interface
  • Import satellite image of your site
  • Design directly in the context of your proposed building location

Make early design decisions:

  • Explore the effects of the sun using the location-aware Shadow Study tool
  • Start early program analysis by tracking gross building floor area ratio while you design

Experience a more continuous BIM workflow:

  • Store and share designs in the cloud using Autodesk® 360 cloud services
  • Easily transfer designs to desktop applications via RVT or SAT file formats
  • Explore design ideas and add detail to early design forms using award-winning BIM technology


FormIt is an intuitive, easy to use mass modeling application helping designers make informed decisions while accessing site and climate data. The building and site aware app allows designers to sketch proposed design options that can be compared with program requirements and then shared with the project team for continued collaboration through Autodesk® 360.

Available now on the Apple App Store.

(I can’t find it on there, can you?)

Basically, if you have one site toposurface, and you cut it with pads in different phases, then an ‘outline’ around every single pad appears in the creation phase of the toposurface (they affect the topo backwards in time).  It looks ugly …  Additionally, there will be ‘holes’ cut in the toposurface for the pads.

I recently handled this by making a Design Option Set for Topography, then for each Stage / Building Option combination, I added the entire site Toposurface.  From here, I could use model groups to transfer pads between the different options / phases, while still retaining their size and position and editability.  It was a pain to set up, but once configured properly (with views etc), it seems to work ok.

The most ‘logical’ way to configure it would be:

  1. Make a Design Option Set
  2. Make an Option called ‘Existing’.  Add your original / untouched site topography here.
  3. Duplicate the Option, call it Stage 1.
  4. Make all the Stage 1 pads, then group them.
  5. Duplicate Stage 1 topography option, call it stage 2 (the grouped pads will come through).  Add additional pads in Stage 2 option, then group Stage 2 pads and the Stage 1 pad group (forming a nested group.)
  6. Rinse and repeat

I never said being a Revit pro would be easy.

You can read about the problem at:
Re: Building pads don’t seem to respect phases. – Autodesk Discussion Groups

This poem has done the email forward rounds for years, and has been incorrectly attributed to various authors.  It is in the style of Dr Seuss, but was authored by Gene Ziegler.  Here is the full version, from this link:

Bits Bytes Chips Clocks
Bits in bytes on chips in box.
Bytes with bits and chips with clocks.
Chips in box on ether-docks.

Chips with bits come. Chips with bytes come.
Chips with bits and bytes and clocks come.

Look, sir. Look, sir. read the book, sir.
Let’s do tricks with bits and bytes, sir.
Let’s do tricks with chips and clocks, sir.

First, I’ll make a quick trick bit stack.
Then I’ll make a quick trick byte stack.
You can make a quick trick chip stack.
You can make a quick trick clock stack.

And here’s a new trick on the scene.
Bits in bytes for your machine.
Bytes in words to fill your screen.

Now we come to ticks and tocks, sir.
Try to say this by the clock, sir.

Clocks on chips tick.
Clocks on chips tock.
Eight byte bits tick.
Eight bit bytes tock.
Clocks on chips with eight bit bytes tick.
Chips with clocks and eight byte bits tock.

Here’s an easy game to play.
Here’s an easy thing to say….

If a packet hits a pocket on a socket on a port,
and the bus is interrupted as a very last resort,
and the address of the memory
makes your floppy disk abort
then the socket packet pocket
has an error to report!

If your cursor finds a menu item
followed by a dash,
and the double-clicking icon
puts your window in the trash,
and your data is corrupted cause
the index doesn’t hash,
then your situation’s hopeless,
and your system’s gunna crash.

You can’t say this? What a shame, sir!
We’ll find you another game, sir.

If the label on the cable
on the table at your house
says the network is connected
to the button on your mouse,
but your packets want to tunnel
on another protocol,
that’s repeatedly rejected
by the printer down the hall,
and your screen is all distorted
by the side-effects of gauss,
so your icons in the window
are as wavy as a souse,
then you may as well reboot
and go out with a bang,
cause as sure as I’m a poet,
the sucker’s gunna hang!

When the copy of your floppy’s
getting sloppy on the disk,
and the microcode instructions
cause unnecessary risc,
then you have to flash your memory
and you’ll want to RAM your ROM.
quickly turn off your computer
and be sure to tell your mom!

via
http://web.archive.org/web/20070814042925/http://www.people.cornell.edu/pages/elz1/clocktower/DrSeuss.html

More info at:
Plagiarized Poem – Why Computers Sometimes Crash! by Dr. Seuss

In Revit, certain view properties are not schedulable.  Additionally, you cannot change Visibility / Graphics through a schedule.  However, let’s say you have a schedulable view property that allows you to form a group of a views that you would like to modify.  You can’t use the Show option in a View List (to multi-select Views):

However, to multi-select views using a known property (in this simplistic and slightly pointless example, Phase), we can:

  1. Add a Text type Shared Parameter called View Selector to the View List, ticking ‘Add to all elements in the Category’
  2. Now, a little complication – to modify this property, you will have to untick it from every applied View Template that would possibly impact the View List.  I grouped my Project Browser by View Template so I could quickly see the ‘in-use’ View Templates, then went View – Manage View Templates and unticked View Selector in each of these.  Once this is done, we can now drive the View Selector parameter through the View List schedule.
  3. Now go to the Type Properties of the Project Browser and make a new type called View Selector.  You can either use folders and set them to View Selector, or Filter by View Select = whatever.
  4. Finally, select a bunch of views in the Browser and then adjust the Property you want to edit.  This method allows you to  modify certain parameters that you couldn’t get to from the View List itself.

Some of these parameters are View / Type specific (like Underlay for Plans).  When you multiselect them, Revit will tell you what the ‘common’ parameters are in the Properties Palette.

The following diagram gives you an idea which View Properties can be ‘hacked into’ using this multi-select method:


    In the Parameter Properties dialog, click Export.

    Note:  The Export option is not enabled if the selected parameter is already in the current shared parameter file.

    A message displays informing you that the shared parameter will be exported to the shared parameter file you set up in Step 1.

    Here is the rest of the how-to:
    Exporting Shared Parameters to a Shared Parameter File – WikiHelp
    Edit:

    You can export from the Family or Project environment. If you already have a SP with the same name in your current SP file, you will need to switch to a blank SP file, export the parameter, and then possibly you can “hack” it into your current file by text editing the SP files (maybe).

    Surely Revit integration with VEO will be a high priority, now that Autodesk are buying into VEO so heavily?

    Some of you may recall that VEO-LUX was once a Revit add-in application , and that Revit Architecture 2009 beta was codenamed VEO … what a long path back to Revit it has taken!  Up to the clouds and back again … but bringing all its collaborative goodness to the Revit world.

    via
    VEO News: Autodesk and M-SIX have partnered! Revit and VEO, finally together again …

    “In Revit, the default font is Arial, for example, is therefore the DWG file represent fonts in Arial.
    The “shxfontmap.txt” is located at:
    C: Users AppData Roaming Autodesk Revit Autodesk Revit 2013
    First you should make a backup copy of “shxfontmap.txt” are created, they can then be opened with Notepad.
    Note: Please do not use software to edit the file, which could change the formatting of text, such as Word.

    At the end of the file is then added to “txt.shx Arial” or “Arial italic8.shx” added.

    After the names of the SHX once is “Tab” and then use the new font specified.”

    via
    Google Translate
    of
    Autodesk BIM Blog – Darstellung von SHX Schriften f�r DWG Dateien anpassen – Revit Architecture/MEP/Structure 2013