Have you ever tried to use the Split tool on a Structural column? Doesn’t work?
You need to change the Column Style to one of the Slanted types. Now you will be able to split the structural column.

What Revit Wants + Black Grid AI
AI Empowered Project Management
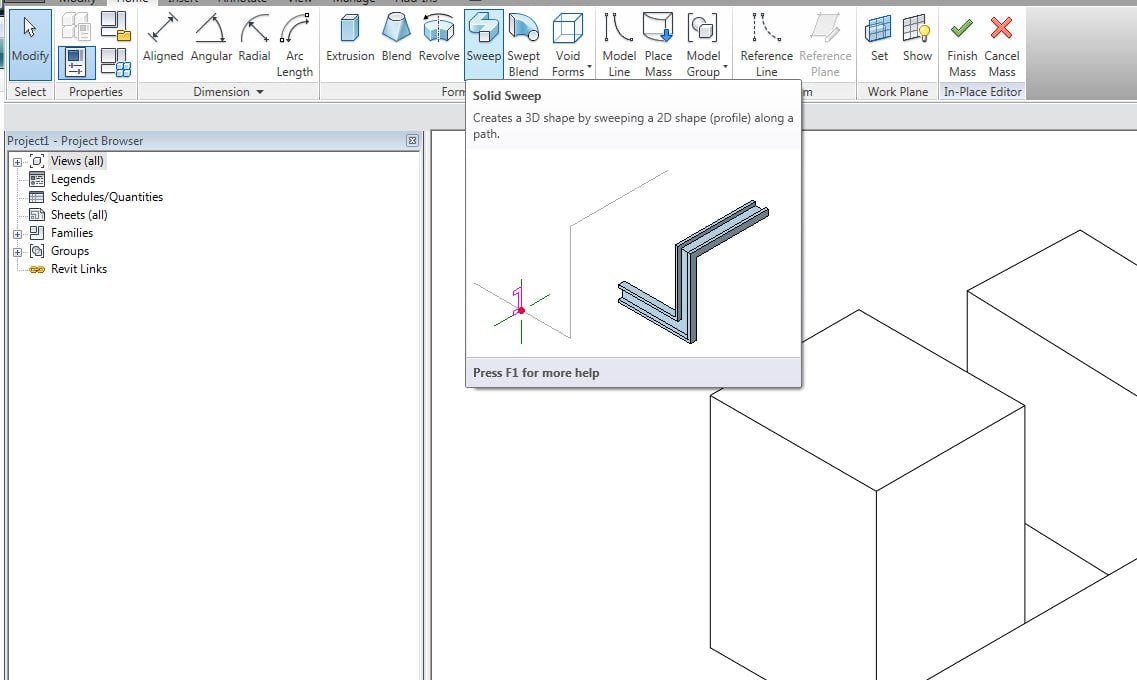
By ‘legacy mass forms’, I mean the nice, simple kind – sweeps with editable profiles, extrusions with sketches and the like.
The problem with 2010 and 2011 massing is that you cannot create these nice and simple forms in the conceptual massing environment in a project.
The answer? Simply download the file below. It contains a 2009 version mass. Copy this mass to a 2010 or 2011 project and you now have access to the simple sweep and extrusion tools! You can create new sweeps within this mass and have all kinds of legacy mass fun.
Download the file from this link
 EDIT the above link will let you download 2009 mass family for Revit
If you select multiple views in the Project Browser in Revit 2011, how would you modify their common properties?
If you attempt to directly modify them in the open Properties palette, they are not modified. In fact, the only thing that is modified is the ‘active’ view – not the ones you have selected in the Project Browser.
The even weirder part is that the Properties palette shows a mixture of properties from the selected views in the Project Browsers AND the active view (which is not selected). Scary!
This is a dangerous little workflow anomaly. Keep it in mind until the Factory fixes this up.

Let’s say you have hundreds of views in a Project, with some customised view sorting. How do you delete a view that you have open, without having to find it in the Project Browser?
Simply right-click in the view and go to one of the referring views (Find Referring Views). The view you were in previously will now be ‘selected’ and you can just press Delete to delete it!
Note: I recently requested that the Revit team provide a ‘Find in Project Browser’ command to quickly browse to a view (or family or group, for that matter) in the Project Browser.
This is one of the most exciting blog posts I have read for some time:
http://revit.blogspot.com/2010/03/accessing-project-parameters-in.html from Jay Polding at revit in plain english.
Essentially, in any schedule you can actually add Project Information parameters. This includes Sheet Schedules, Component Schedules and Material Takeoffs, but not Note Blocks. All you need to do is tick the ‘Include Elements in Linked Files’ box to expose the ‘Project Information’ option in the dropdown list. And when you add custom Project Information parameters, make sure you tick ‘Instance’ in the Parameter Properties box (otherwise you won’t see Project Information as a possible category for your new parameter).
My brain is starting to tick over as to possible uses of this in filtering and calculation… You could use it to set a provisional unit cost for flooring, use the parameter in a number of different cost schedules, and then 6 months down the track if the cost changes – you only have to change it once, in Project Information!
You could filter all of your schedules with a Yes/No Project Information parameter, lets say for ‘optional building elements’, and when the Client decides they don’t want them – just untick the box in Project Information and all the schedules hide all of these optional elements. That is cool!
Sometimes you will want a component family to ‘always’ show a certain label. In other words, you do not want to have to manually ‘tag’ the family after placing it in project. How can we do this?Basically, while in the component family (for example, a Plumbing family), load the following Annotation family:
Generic Label.rfa Now, place an instance of the annotation family. You can drag the type directly from the Project Browser and drop it into the Ref Level view.You should link the parameter in this annotation family to a parameter from the Plumbing host family (you should know how to do this by now!) When you load this Plumbing component into the project, it now comes with an ‘automatic tag’, of sorts. However, there are some things to keep in mind – the main one being that this annotation will show in any view where the host family is included in the view range – it will not be masked by geometry.So, use this method with care. I have found it useful for things like a Hot Water System family, where you always want to show ‘HW’ in plan views. And I have handled the visibility issue with some trickly view filters.
Have you ever wanted to ‘re-issue’ or revise a large group of sheets such that they all receive the same, updated revision in the Revision Schedule?
Lets say you have 100 sheets and these form the ‘Approval’ set of documents – how do you go about amending and reissuing them?
For significant revisions, it is our company policy that all revised sheets have the same entry in the Revision Schedule. Therefore, we use the following method (it takes a little setting up the first time, but it is worth it):
Now, you can quickly re-issue that entire set. How?Just edit the ‘Approval Revision Set 1’ Detail Group that you created, and:
You can do some tricky things with ‘nesting’ these Detail Groups to give you more flexibility or add new sheets to sets.
If you are having problems with the ‘Copy Spreadsheet’ utility, it is likely because you are running 64 bit Revit or you have recently updated Revit. If you haven’t heard of this tool, it is a simple program made in Autohotkey, and it automates the ‘copying’ of data from a spreadsheet into a Revit schedule. The Revit schedule will need to be a key schedule, and you will need to add the columns and rows before starting the utility.
Head over to http://forums.augi.com/showpost.php?p=950435&postcount=1 for the updated version.
Direct link http://www.nichitecture.com/downloads/Copy%20Spreadsheet%20for%20Revit%202010.zip
You may need to login to AUGI to access the above.
Sometimes you really want to copy some model lines from a project RVT to a family RFA, but Revit says NO!
This is the workaround:
Sure, this method has some limitations, but it is a valid workaround in a lot of situations.